How to Transfer Photos from iPhone to Flash Drive?
If anything, iPhone users are fond of capturing tons of photos. As these full-resolution images consume a lot of space, it's best to transfer photos from iPhone to USB to free up iPhone storage. Besides, this is an effective way to back up iPhone data and conveniently share memories with another device.
This blog post will provide a step-by-step guide to importing iPhone photos to USB using several simple methods. Let's get the ball rolling!
Can You Directly Transfer Photos from iPhone to Flash Drive?
Yes, it's possible to move photos from an iPhone to a flash drive directly without a computer. However, you can only move the "unedited" versions of the photos to the USB.
With that said, check out the below steps:
Step 1: Plug the USB into your iPhone using a lightning-to-USB connector or USB-C connector(iPhone 15 Series).
Step 2: Open the Photos app and select the photos you want to transfer.
Step 3: Tap the Share icon and click Save to Files.
Step 4: Under Locations, choose your flash drive and start the transfer.
Note: Ensure your flash drive is compatible with your iPhone. For iPhone 15, you can connect your iPhone to a flash drive directly. For other models, you may need an adapter to connect the USB drive to your iPhone.
An Overview of Other Methods to Transfer Photos from iPhone to Flash Drive
In this section, we will briefly analyze the solutions to copy photos from iPhone to flash on both Windows and PC.
#1. Windows Photos App: A built-in Windows app that allows photo transfer from your iPhone both wirelessly and using a data cable.
#2. Windows Explorer: With this method, you need to simply copy and paste photos from the iPhone to a flash drive. It requires a wired connection between your iPhone and computer.
#3. Mac Image Capture: Mac users can rely on "Image Capture" to seamlessly transfer photos from iPhone to flash drive. However, you might encounter iPhone connectivity issues with this method.
#4. AirDroid Personal: The most ideal solution to transfer iPhone photos and other data because of its super-fast speed and compatibility with both Mac and Windows as well as Android.
#5. iCloud: This method works for both Windows and Mac but iCloud backs up the whole iPhone gallery which is time-consuming. Plus, you get a free iCloud storage of 5GB only.
Best Methods to Transfer Photos from iPhone to Flash Drive via Computer
Solution 1: Use Photos App
Device Compatibility: Both Mac and Windows
Limitation: The app takes forever to move the photos to the PC. Also, the transfer process often freezes or breaks down.
The Photos App is available for both Mac and Windows and helps you migrate camera roll photos from an iPhone to a PC. Once moved, you can easily save them to an external USB drive. Here's how to do that:
Step 1: Connect your iPhone to the computer using a lightning cable and open the Photos app.
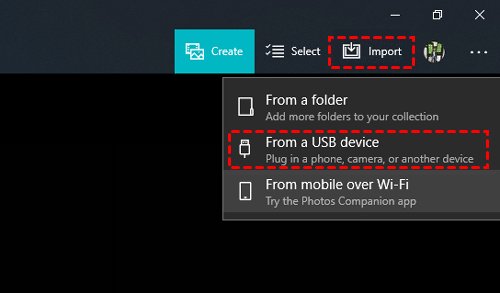
Step 2: Now, click on Import at the top and select "From a USB device." It will auto-detect the photos on your device.
Step 3: Wait until it processes the photos and then, unselect the photos you don't want to transfer.
Step 4: Go to the Downloads folder and move these photos to the USB drive.
Solution 2: Use Windows Explorer
Device Compatibility: Windows
Limitation: Difficulty in finding the right folder that contains the iPhone images.
Wondering how I transfer photos from iPhone to a thumb drive without any app? Consider using the default Windows Explorer feature of your PC to move photos as shown in the steps below:
Step 1: Connect the iPhone to Windows using a data cable.
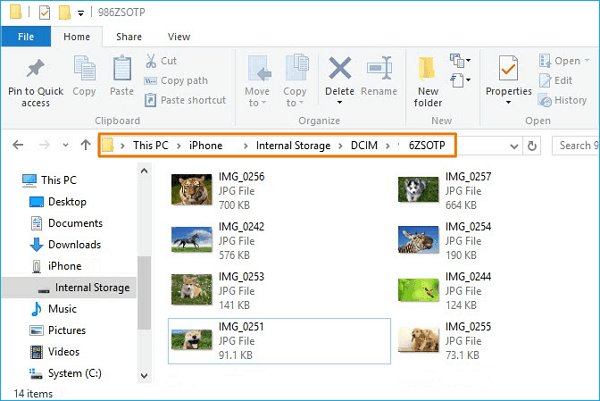
Step 2: Go to "This Computer" and open the drive with your iPhone's name.
Step 3: Click on Internal Storage > DCIM, to view and copy the desired photos.
Step 4: Now, connect the USB drive to the PC and paste these pictures.
Solution 3: Using Mac Image Capture
Device Compatibility: Mac
Limitation: Users get error messages halfway into the transfer process.
If you're a Mac user and wondering how to transfer photos from iPhone to jump drive, cheer up. Each Mac comes with built-in Image Capture software for transferring photos and videos between iPhone and Mac.
To use this tool:
Step 1: Get your iPhone and the USB drive connected to the Mac.
Step 2: Launch Image Capture from the Applications folder and choose your iPhone on the left tab under the Device section
Step 3: It will display the iPhone images in a list.
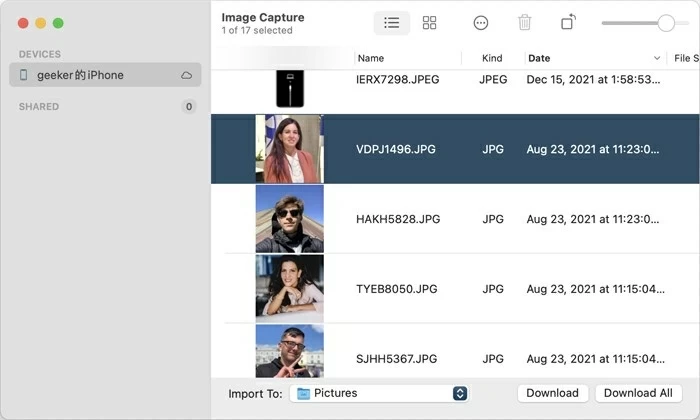
Step 4: Select the media files you want to import and click "Import To" at the bottom. Choose a destination folder and hit Download All.
Step 5: Once downloaded, go to that location and move the images to the USB drive.
Solution 4: AirDroid Personal
Device Compatibility: Both Windows and Mac
AirDroid Personal is a professional file management and file transfer app that has been the industry leader for over a decade now. It can move photos, videos, music, documents, and other files from an iPhone to a PC wirelessly.
AirDroid works seamlessly on all devices, making it possible to transfer data across different platforms like iPhone to Windows, iPhone to Android, or Android to Mac.

Key features of AirDroid Personal
- Transfer selective photos to another device, if you don't want to move all photos.
- Share data to multiple devices simultaneously.
- Compatibility with all devices and platforms including the latest iPhone 15.
- View and access iPhone files on your PC.
Before proceeding, download AirDroid Personal for free on devices you want to transfer data.
Now, follow the below instructions to transfer photos from iPhone to the flash drive:
Step 1: Run AirDroid on your iPhone and computer and register with the same AirDroid account.
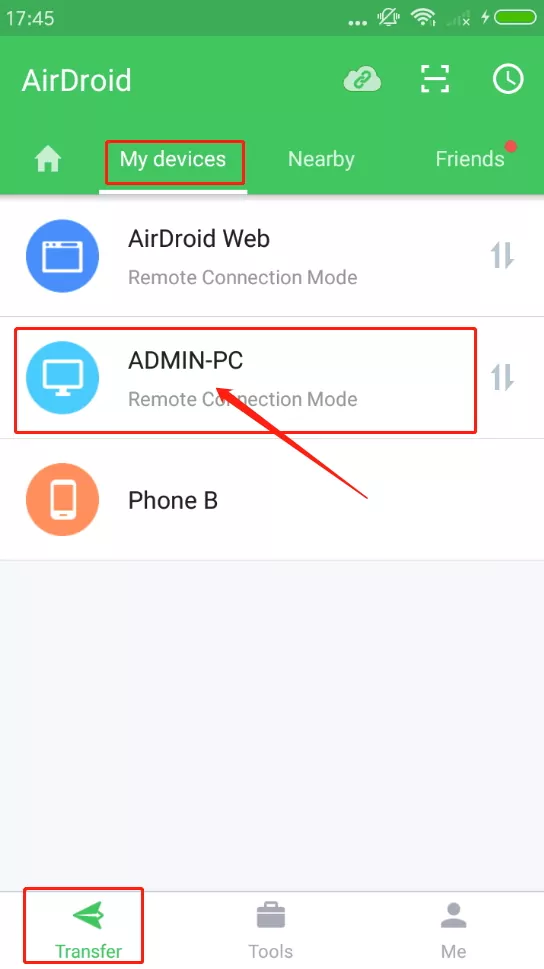
Step 2: Open the mobile app and select your PC's name under My Devices to connect both devices.
Step 3: Now, tap the paperclip icon and select the photos you want to transfer.
Step 4: Hit Transfer to receive the photos on your PC.
Step 5: Now, go to the AirDroid folder in the "Downloads" section on your PC and move the photos to the flash drive.
Solution 5: Using iCloud
Device Compatibility: Both Windows and Mac
Limitation: iCloud backs up the whole iPhone gallery which consumes a lot of time besides offering only 5GB of free storage.
Do you prefer backing up the photos on iCloud? If yes, then moving these photos to a flash drive on a PC is a walk in the park. All you need to do is access the iCloud website on any device and download the backup photos effortlessly.
Check out how to download photos from iPhone to a memory stick via iCloud:
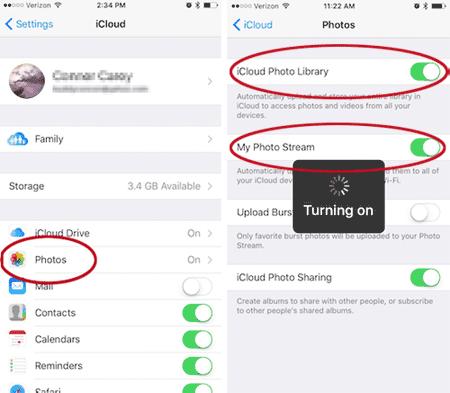
Step 1: On your iPhone, go to Settings > Your Name > iCloud.
Step 2: Select Photos and enable the toggle for "iCloud Photo Library" or "Sync this iPhone." Wait until the photos are uploaded.
Step 3: Now, head to iCloud.com on the Mac or Windows browser and log in with your Apple ID.
Step 4: Open "Photos" on its main screen, select the desired pictures, and hit Download at the top.
Step 5: After downloading the photos, move them to the flash drive by simple cut-and-paste operation.
Benefits of Moving iPhone Photos to USB
There can be plenty of reasons why you are likely to transfer pictures from an iPhone to USB a stick. Some common reasons include:
Free up iPhone Storage: Most people tend to migrate photos from iPhone to flash drive to clear up extra space. Getting a 64 or 128GB USB is fairly cheap compared to a monthly iCloud subscription.
Backup iPhone Photos: iCloud can back up only 5GB of photos for free. If you have plenty of photos (and videos) and want to make an extra copy to avoid accidental data loss, simply move them to a flash drive.
Convenience in Sharing Data: The biggest advantage of moving photos to a USB drive is its portability. You can easily carry the USB stick everywhere and plug it into any device to move the data.
Final Remarks
Whether you want to avoid accidental data loss, conveniently share memories, or just clear extra storage on the device, it's a great idea to transfer photos from iPhone to USB. All the methods explained in this guide are simple, practical, and user-friendly.
But as you can see, AirDroid Personal offers the quickest and most efficient method for wireless file transfer. Besides file transfer, you get to benefit from its stellar file management and remote-control features as well.


Leave a Reply.