How to Screen Record on a Mac [Built-in Solutions & Alternatives]
Apple’s Macs are absolute powerhouses for a productivity laptop, and they can do a lot more than people know. One great example of this is screen recording, a feature that’s built into the Mac’s operating system. So today, we’re showing you how to record your screen on Mac with three of the best methods to try!
Way 1: Screen Record on Mac via Screenshot Toolbar
The first method to screen record on a Mac is by using the Mac’s built-in keyboard shortcuts. Using this shortcut will pull up the ‘Screenshot Toolbar’ which you can use to take screenshots and to record your screen.
But keep in mind that this feature is only available on macOS Mojave or newer. If you’re on an older macOS version, consider upgrading to use this feature or try one of the other methods below.
All in all, Using the Screenshot Toolbar is very fast and convenient because I can bring it out just by pressing the keyboard shortcuts, so I won't miss any important movement before recording.
Start Recording Screen with the Screenshot Toolbar:
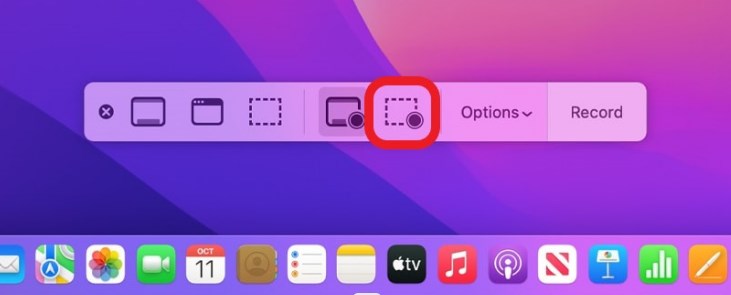
- Step 1.Press the Shift + Command + 5 keys on your Mac keyboard simultaneously to open the Screenshot Toolbar.
- Step 2.You’ll see a pop-up widget with a few icons to select.
- Step 3.In the center of the toolbar, you can select the full-screen recording button.
- Step 4.On the right-hand side of the full-screen recording button, you can select to record a portion of your screen. Use this method if you only want to record a designated area on your Mac. Draw out the area and release the mouse to start the recording.
- Step 5.Select either of the screen recording methods to start recording.

Stop Screen Recording on Mac
When you’re done with the recording, you can stop and end the recording by clicking on the ‘Stop’ button on your Mac’s menu bar located in the top-right-hand corner.
![]()
![]()
Save and Configure Screen Recordings on Mac
Once you’ve stopped the screen recording, it will show up as a ‘Floating Thumbnail’ in the bottom-right corner of your screen. It’ll stay there for a few seconds so you can move it to another folder, share it, or edit it before it’s saved.
By default, screen recordings and screenshots are saved to your desktop.
If you’d like to change the save location, you can do so in the Screenshot Toolbar app
1. Pull up the Screenshot Toolbar by pressing Shift + Command + 5.
2. Select ‘Options’ in the Screenshot Toolbar pop-up widget.
3. Under the ‘Save to’ section, select where you’d like to save your screen recordings.

4. You can also set a timer to start the recording after 5 - 10 seconds. Select one of the options under the ‘Timer’ section.
5. If you’d like to include your mouse movement and clicks in the screen recording, select the ‘Show Mouse Pointer’ option.
Way 2: Record Mac Screen via QuickTime Player
The next method to screen record on a Mac is by using the built-in QuickTime Player app. QuickTime Player is an all-in-one destination for your media files. Using the app, you can record your screen or audio, view your saved videos, or edit video and audio files. So if you want to make a tutorial, you can record and edit it all in one app.
How to start screen recording on your Manc with QuickTime Player:
- Step 1.Use Spotlight Search to find the QuickTime Player app or browse through your apps on Launchpad. Select it to open it.
- Step 2.In the menu bar, select ‘File’ and then click on ‘New Screen Recording’.
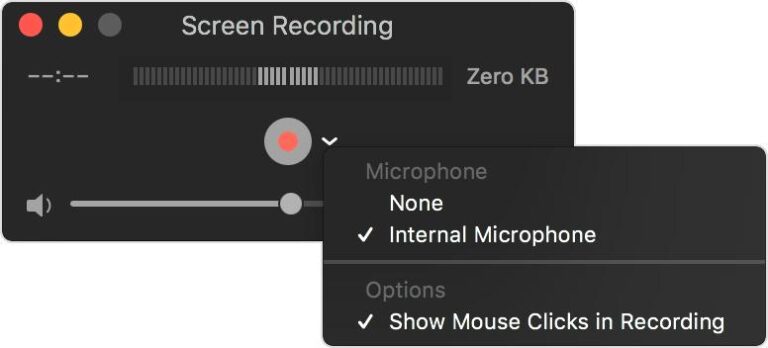
- Step 3.You’ll now see the screen recorder widget pop-up. If you need to change the settings of the screen recording, click on the downwards arrow next to the ‘Record’ button. Here you can change your Mic settings or enable Mouse Clicks and movement to show up in the recording.
- Step 4.Once you’re done with the settings, click the red ‘Record’ button to start recording your screen.
- Step 5.You’ll have to select either a portion of your screen to record or simply click on anywhere on the screen to start recording the entire Mac screen.
- Step 6.When you’re done with the recording, press the ‘Stop’ button located in the top-right-hand corner of the menu bar. Alternatively, press Command + Control + Escape to end the recording.
- Step 7.When you stop the recording, the recorded video will open automatically with QuickTime Player. Here you can save, view, or edit the recording.

However, QuickTime Player can record the microphone sound on Mac, but it doesn't support recording the internal audio on Mac. You’d need to download and install an additional plugin like Blackhole on Github which can be a bit too complicated for some.
If you need to record your screen audio as well, we’d recommend trying our last method on the list for a simpler experience.
Way 3: Record Screen on Mac via Third-party Software
The last method of how to record screen on a Mac is by using third-party software. For example, EaseUS RecExperts is a solid solution for screen recording on Macs with a plethora of screen recording-centric features.
Some of these features include the ability to record your screen, mic audio, in-device audio, and video calls all at once. You can also edit the recording audio and videos using the same app.
- Step 1.Download tne EaseUS RecExperts app and install it on your Mac.
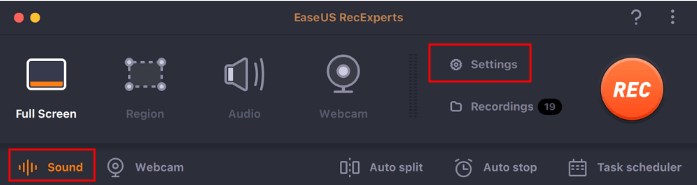
- Step 2.Launch the app. You will be presented with record the full screen, Region, Audio, or Webcam. Click the Sound button at the bottom left to choose to record the device sound or the microphone, and you can also click Settings to configure the recording settings, such as the output format and quality.
- Step 3.Once you have set up the recording settings and decided whether you want to record the full screen or select region, click the 'REC' button and it will start recording the Mac screen.
- Step 4.You can click the Pause button to pause the recording. Once done, click the Stop button to stop recording on Mac.
- Step 5.The app will pop up a window for you to play the recording, and you can also click the Edit button to edit it immediately.

The good news is that the free version doesn’t limit the time for screen recording and you can add annotations while recording, but you can only play the recording for 1 minute.
This tool is super easy to use with an intuitive UI design, and it works flawlessly without slowing down my computer. It offers great feature sets but most of them will require paid version.
Summary
And that’s how to screen record on Mac with Apple’s own built-in features and a great alternative. For most people who may want to create a quick tutorial video or record simple gameplay, the Screenshot Toolbar and QuickTime Player screen recorders are their best options. If you would like to have more features for screen recording, try third-party screen recorders like EaseUS RecExperts.
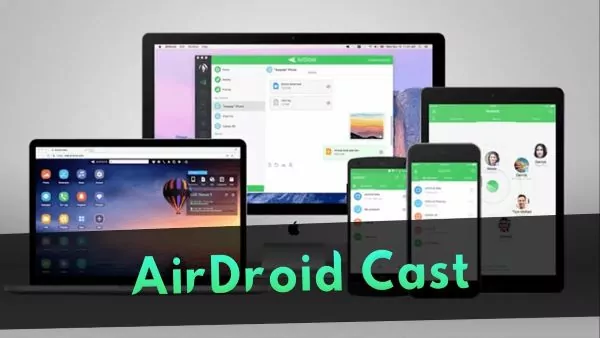
In addition, in case you may want to mirror your Mac screen to another PC or TV, or mirror your Android or iPhone to your Mac device, you may want to use an all-in-one screen mirroring tool like AirDroid Cast.


Leave a Reply.