
How to Stream on Twitch on PC [Full Guide]
Every day, more and more people get into streaming for a myriad of reasons. Whether it's to build and chat with a community or to start an illustrious career online. But it's not all sunshine and rainbows and can be confusing when you're just starting.
So today, we're going over how to stream on Twitch on PC, Android, and iOS to get you equipped with everything you need to know. We'll go over the basic requirements, some tips and tricks, and more!
1. Requirements for Twitch Streaming on PC
Before you get started, you need to figure out what you need to stream on Twitch with PC. You need to make sure your PC setup is up to standard to handle heavy processing and encoding of both audio and video.
Not to mention you need a powerful enough CPU and GPU to not only handle gameplay but also multitask with OBS software and audio/webcam software you'll use while streaming.
In terms of specs, here's the minimum that you should have:
- CPU: Dual-Core CPU
- GPU: NVIDIA GeForce GTX 650 or higher/AMD Radeon 6000 series or higher
- RAM: At least 8GB RAM
In reality, you'll need a far more powerful CPU and plentiful RAM to handle the intensive software. A general rule of thumb is depending on how high-res you want your stream to be, you'll need better specs.
We'd recommend getting a high-end CPU and RAM capacity, and if you're focusing on gaming, invest in a high-end GPU as well. A powerful GPU will also help edit videos.
Besides your PC's specs, there are a few other things you'll need to stream. Here's a rundown of some important hardware and software you'll need.
Hardware Requirements
1. USB Interface (or Audio Mixers)
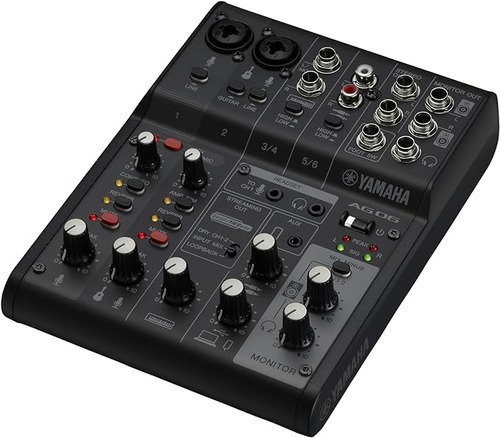
A USB interface or audio mixer is a great tool to help handle all your audio needs. It can help boost your audio quality while making it simple to manage your mics and audio sources. Typically, a USB interface is sufficient for most new streamers.
But if you're working with multiple audio sources, an audio mixer may be a better bet.
2. Camera
While you could stream with your laptop's webcam, the quality won't be great. To start with, you can use your built-in webcam but eventually, you should consider upgrading to a high-end streaming webcam or even a DSLR paired with a capture card.
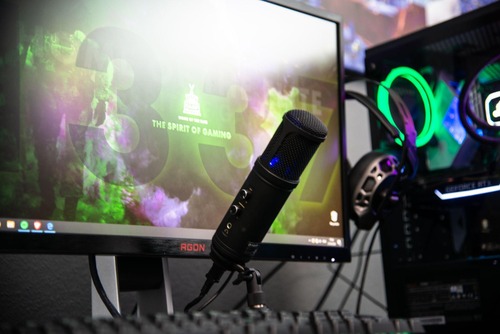
3. Microphone
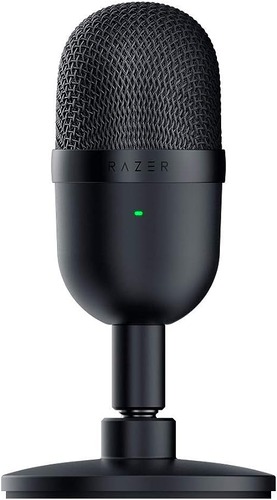
A good mic can make all the difference to your stream's audio, making it sound clearer and professional. A simple USB mic is a great choice to get started with. Look for mics built for podcasts or streaming, and you should be good to go.
4. Lighting (Optional)

Making sure your audience can see your face while you stream is pretty important. Most built-in webcams, for example, don't capture light very well so you'll probably need a dedicated ring light or similar to keep your face lit up while you stream.
Software Requirements
Broadcasting Software
The most important software you'll need is broadcasting software to handle your live streams. This software can manage your themes, layouts, & overlays, chat and alert monitoring, peripheral detection (audio, video sources, etc.), and much more.
You can try out Twitch's own Twitch Studio for a simple-to-use streaming software with useful guides and tips for beginners. But eventually, you may feel it's too limited, in which case we'd recommend checking out OBS, Streaming Labs OBS, XSplit, etc.
2. How to Stream on Twitch on PC?
Now that we've gone over what you need to live stream on Twitch from PC, here's a step-by-step guide on how to start streaming on Twitch on PC.
ACreate a Twitch Account
You will need a Twitch account before starting to live stream on Twitch. If you have already created an account, skip this step and go to the next step.
Step 1. Go to the Twitch website and select 'Sign Up' in the top-right corner of the page.
Step 2. Create a unique username and password for the account.
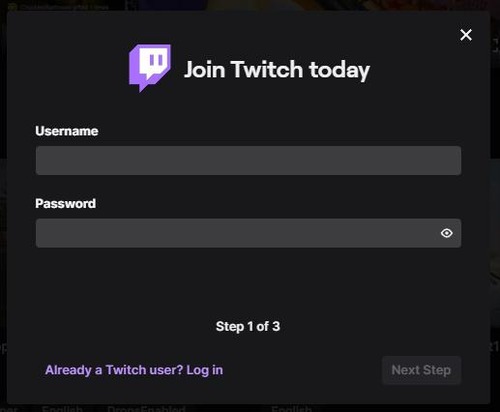
Step 3. Verify your account with a phone number or email.

Step 4. Enter your date of birth and select 'Sign Up'.
Step 5. Verify your account with a 6-digit code from your email or phone number.
Now you have your own Twitch account for streaming.
BConnect Streaming Software to Twitch
For this portion of the how-to-stream Twitch on PC guide, we'll be using OBS as an example of streaming software.
Step 1. Download and install OBS on your streaming PC.
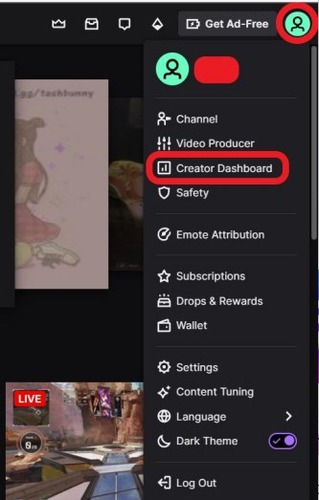
Step 2. Go to the Twitch website with your account logged in. Select your profile in the top-right corner and click on 'Creator Dashboard'.
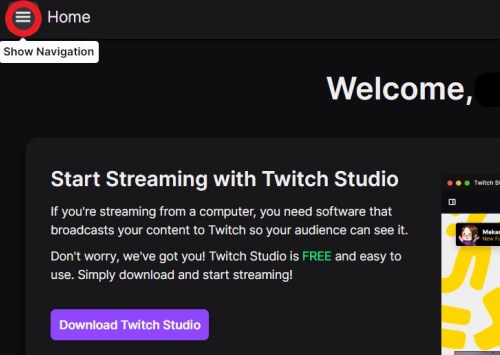
Step 3. Select the 'Show Navigation' button in the top-left corner.
Step 4. Select Settings > Stream.
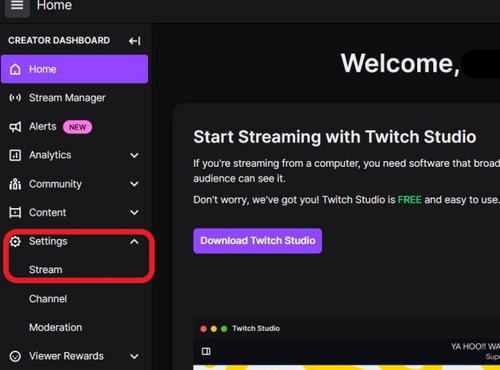
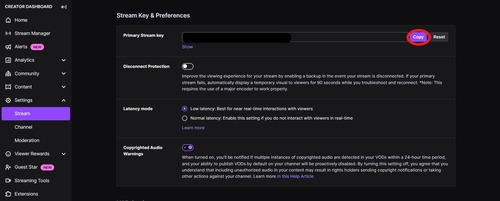
Step 5. Under Stream Key & Preferences, find the 'Primary Stream Key' option and click on 'Copy'. This is what you'll use to link your Twitch account to broadcasting software.
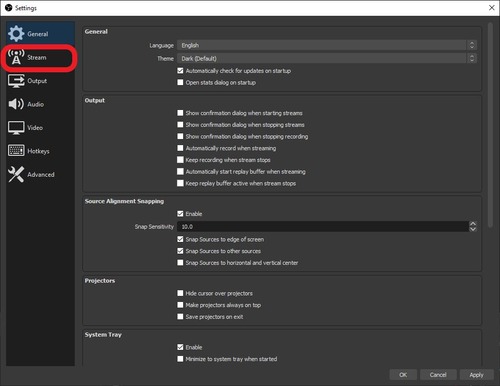
Step 6. Open OBS after the initial installation and setup. In the bottom-right corner under the 'Controls' tab, select 'Settings'.
Step 7. In the Settings menu, select 'Stream' in the left-hand menu.
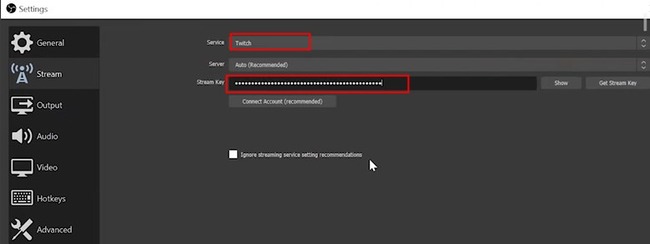
Step 8. Change the 'Service' option to Twitch. Then paste your Twitch stream key into the text field for 'Stream Key'. Once you're done, click on Apply to connect your Twitch account to
CConfigure the Streaming Software for Twitch
Step 1. In the Settings menu, select 'Output'. Change the Video Bitrate settings to '6000 Kbps' which is the maximum on Twitch. This ensures 1080p quality at 60FPS. For lower-resolution 720p streaming, lower the bitrate to either 5000kbps or 3500kbps.
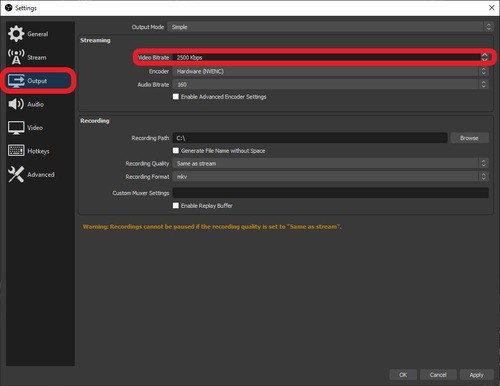
Step 2. Change the 'Audio Bitrate' to 160kbps. This is ideal for live streaming, but if your broadband upload speeds are low, you can lower the bitrate.
Step 3. Select 'Video' from the left-hand menu bar. Change your 'Base (Canvas) Resolution' to match your display. 1920 x 1080 is the ideal resolution for most displays and games.
Additionally, change your 'Output (Scaled) Resolution' to either 1920 x 1080 or 1280 x 720 depending on how high-res you want your audience to view your stream.
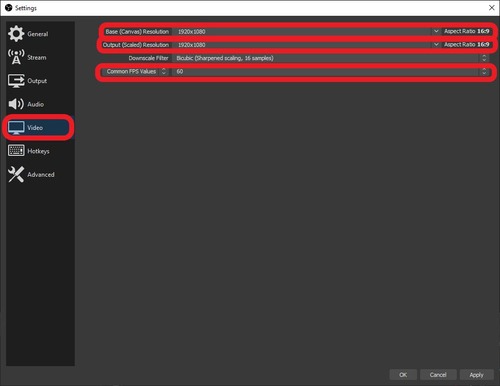
Step 4. Change the 'Common FPS Values' option to either 60FPS or 30FPS. 60FPS can be taxing on your system, especially if you don't have a powerful streaming setup. In that case, we'd recommend testing 30FPS first.
DAdd Scenes & Sources
Step 1. In the bottom left corner, under the 'Scenes' tab, click on the + icon and add a scene. Name it and select 'OK'. This is where you can add different layouts, waiting windows, edit your overlay, and other stream elements.
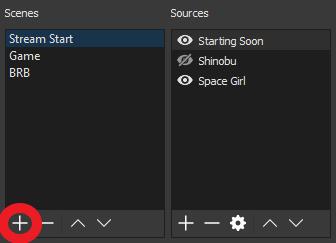
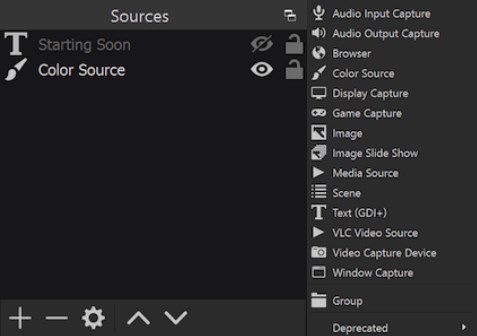
Step 2. Next to the 'Scenes' tab, add to the 'Sources' tab by clicking on the + icon. Select what type of source you'd like to use such as game capture, display capture, video capture, etc. This will control which camera/video shows up on your stream.
EGo Live!
What we've mentioned above is the basics of what you need to get started with streaming on Twitch. As you get more familiar with broadcast software like OBS, you can add a chat overlay, custom designs, alerts, and much more.
Follow these last few steps to get started:
Step 1. Open OBS with your linked Twitch account.
Step 2. Find the 'Controls' tab in the bottom-right corner of the OBS window.
Step 3. Select 'Start Streaming'.
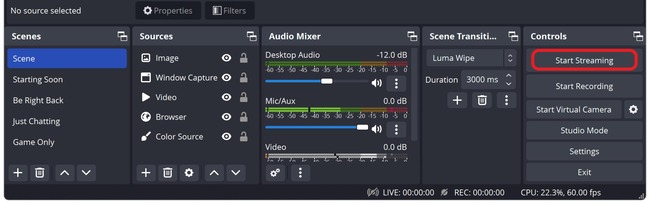
Step 4. You're now live on Twitch!
3. How to Stream on Twitch on Android?
Here's a quick guide to set up a stream on Twitch using your Android device. You can stream via your phone/tablet camera, or stream mobile games directly. Here's how to get started:
Step 1. Download and install the Twitch app from the Google Play Store.
Step 2. Log in to your Twitch account.
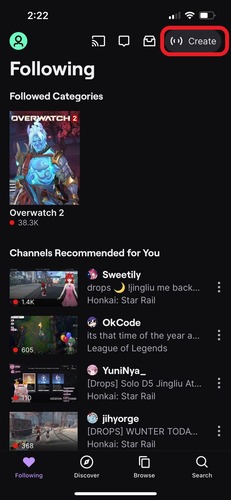
Step 3. Select the 'Create' button in the top-right corner.
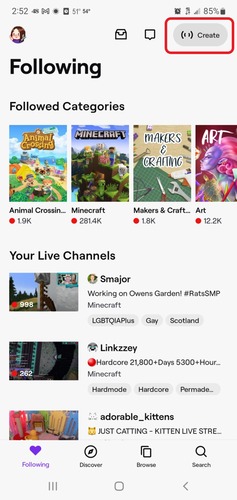
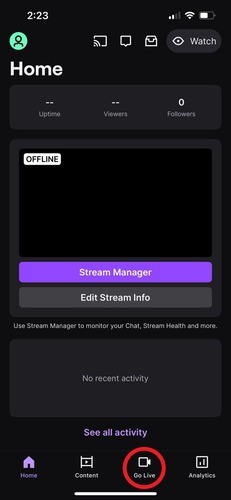
Step 4. Select 'Go Live' in the bottom-right corner of the app.
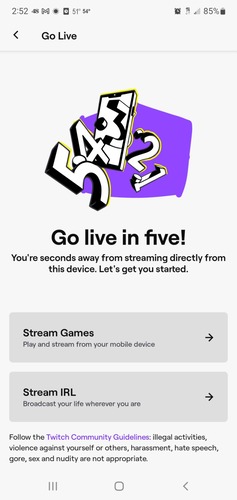
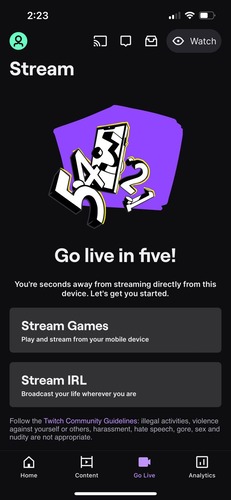
Step 5. Select 'Stream Games' to capture footage of your screen or 'Stream IRL' to live stream from your device's cameras.
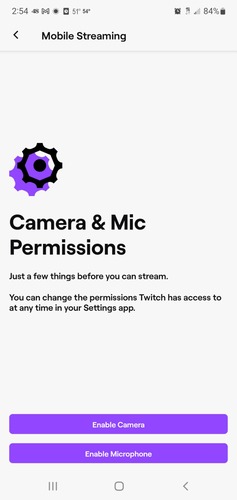
Step 6. Enable access to your Camera & Mic permissions.
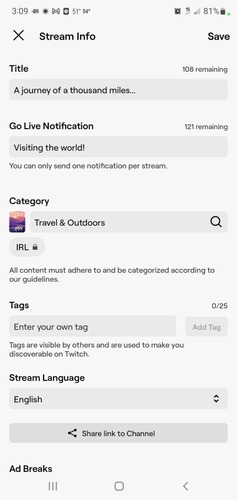
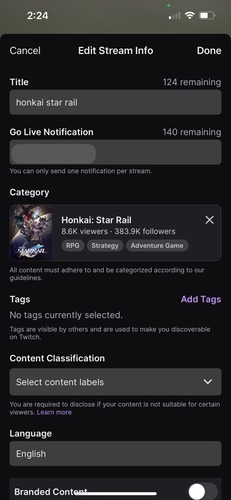
Step 7. Edit your stream info including the title, tags, and category, and tap 'Save'.
Step 8. Select the 'Stream' icon to go live!

4. How to Stream on Twitch on iPhone and iPad?
Here are the steps to stream to Twitch from iPhone and iPad:
Step 1. Launch the Twitch app on your iPhone or iPad, and sign in with your Twitch account.
Step 2. Tap the 'Create' icon in the top-right corner.
Step 3. Select 'Go Live' in the bottom-right corner.
Step 4. Select 'Stream Games' or 'Stream IRL'.
Step 5. Allow access to your iPhone/iPad's mic and camera.
Step 6. Edit stream info including title, tags, and category, and tap on 'Done'.
Step 7. Select the 'Stream' icon to go live.
5. Why Stream on Twitch?
There are a few great reasons to stream on Twitch, most notably of course it's easy to stream on Twitch on PC for free. There's no initial cost to get started, similar to other streaming platforms but Twitch is the OG and is the best place for you to grow.
On other platforms like YouTube, for example, you may get lost in the sea of content creators and videos.
Twitch on the other hand is approachable and carefully segments its content categories by genres of content (gaming, just chatting, art, music, etc.) and even segments the content further by specific games you're interested in.
The trick to Twitch, especially for gaming content, is to jump on the latest and hottest games that may not have as many popular streamers. This way, you can efficiently grow and make a name for yourself as a streamer on the platform.
6. Tips & Tricks for Twitch Streaming on PC

Here are some great tips and tricks to get the best way to stream PC games on Twitch:
1How to Choose What to Stream
The first thing you need to do is figure out your niche. Are you trying to start game streaming? Or just an everyday live chatting channel? Play around with a few different categories before focusing on one.
The ideal would be to focus on creating content that you enjoy. Creating content you 'think' will be popular but don't enjoy will make it hard for your audience to immerse and connect with your content.
2Optimize Your Streams
If you're seriously getting into streaming, you'll need to optimize your streams to get the best quality possible. This means you'll need a stable and speedy internet connection. 10Mbps is the minimum, and anything over 20Mbps is recommended.
You should also have an ethernet cable connected directly to your streaming setup.
Additionally, change your OBS settings to ensure your stream is of the right quality for your internet connection. Maxing out at 60 FPS, at a high resolution like 1920 x 1080 will be the best possible stream quality, but if your upload speed can't keep up, lower it.
3Stay Active on Socials
To build an audience, you need to engage and create meaningful content they resonate with. Once you start getting traction on Twitch, it's a good idea to cross-post content to other platforms like YouTube, Reddit, X (Twitter), Facebook, etc.
This way you grow not only on Twitch but across other platforms that link back to your Twitch channel for healthy organic growth. Maintaining a regular streaming and posting schedule helps too.
7. Bonus: Screen Mirror PC to TV with Friends & Family

While Twitch is a great platform to create and build an audience, sometimes you just need a simple way to share your screen to enjoy content on TV, share photos and videos with friends and family, or for presentations.
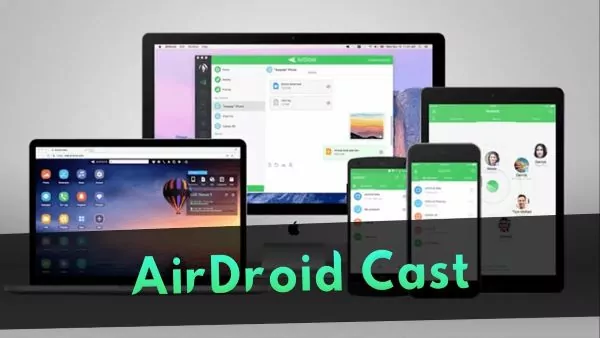
In that case, we'd recommend checking out AirDroid Cast, an all-in-one screencasting tool perfect for both work and play. It's available on most platforms including Android, iOS, macOS, and Windows, and even a web platform which makes it easy to cast to any device!
It's the perfect solution for streaming your PC to a TV without any additional app downloads for your TV. Simply download the app to your PC/smartphone, and connect via the 9-digit Cast code to enjoy high-resolution screen sharing!
8. Summary
We've reached the end of our guide on how to stream on Twitch on PC and we hope you've got everything you need to get started. Remember, streaming is meant to be enjoyed so it won't work if you're just trying to grind to 'make' it as a streamer.
Enjoy the process, even if your audience hasn't grown. Eventually, you'll get noticed as you optimize your streaming setup, create an online persona, and get more familiar with the process. Confidence is key people!


Leave a Reply.