How to Set Up iPhone Parental Controls Based on Your Concerns
Setting up parental controls on your child's iPhone isn't about enabling every restriction Apple offers. It's about choosing the right settings based on your child's age and your biggest concerns as a parent.
Hence, instead of walking through every feature one by one, this guide focuses on the situations parents care about most. Now, jump to your concern to find the recommended setup steps:
📱Addiction: My child can't put the phone down
🔞Inappropriate content: I'm worried about inappropriate content
💰Overspending: My child keeps spending money on apps and games
📍Safety: I want to know if they are safe
Before you start, make sure your child has a dedicated Apple ID set up through Family Sharing. Everything else depends on it. Also, we conclude common setup mistakes to avoid. Let's start.
Quick Overview: What iPhone Parental Controls Can and Can't Do
Before diving into the specific setup, it's worth knowing exactly what you're working with. iPhone's built-in parental controls are more capable than most parents realize, but they are also not 100% foolproof:
- See your child's real-time location
- View and limit daily screen time and app usage
- Schedule device-free hours with Downtime
- Block adult websites and age-inappropriate content
- Manage app downloads and in-app purchases
- Control who can contact your child via phone, messages, or games
- Lock the privacy settings for your child
- Trigger a Screen Distance alert when your child holds the phone too close
- Read your child's text messages or social media chats
- See browsing activities in private mode
- Record where your child has been in the past days
- Alert you to concerning searches or behavior
- Monitor activity that takes place on another device
Concern 1: My Child Can't Put the Phone Down
If your child scrolls TikTok or other social media during dinner, stays up late on their phone, and melts down when you call time, Apple's built-in Screen Time tools can help create healthier boundaries.
Recommended Settings
- Screen Time Passcode
- Downtime
- App Limits
- Screen Distance (automatically enabled for child accounts under 13)
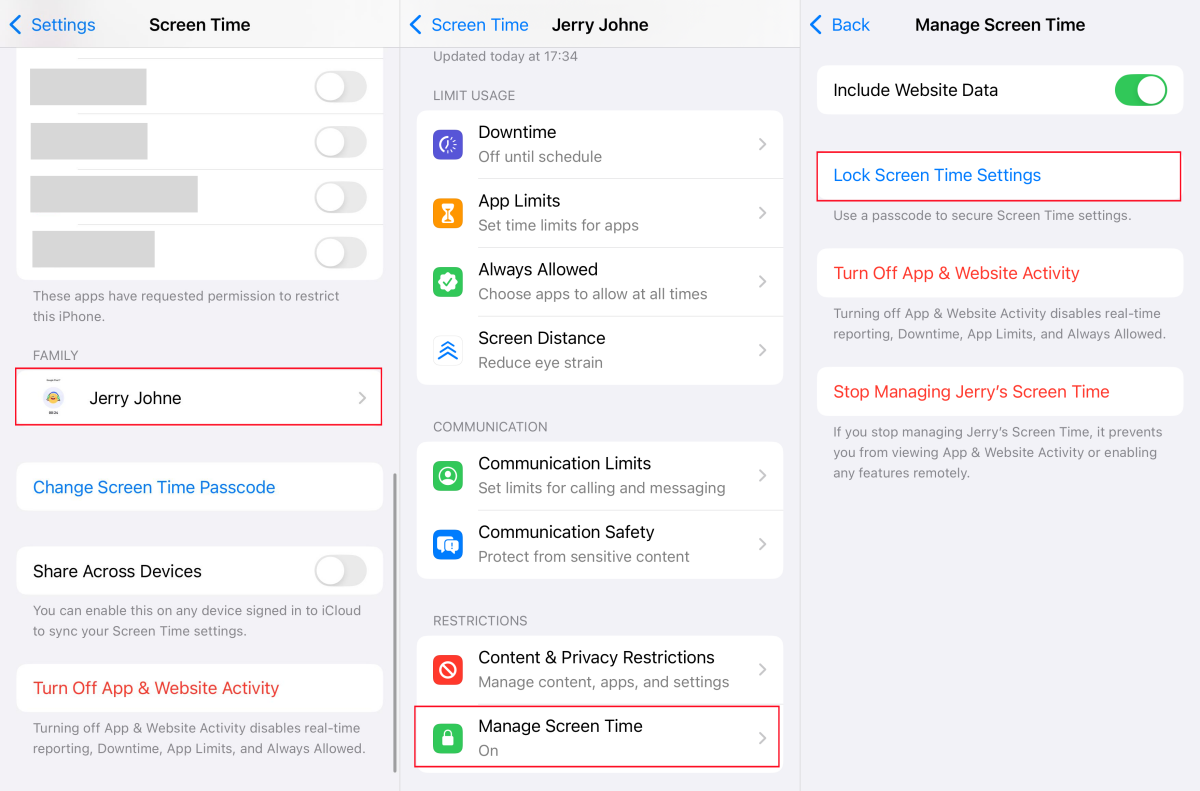
Step 1: Set a Passcode for Screen Time
Screen Time is the foundation of all iPhone parental controls. And once you create a child account for your child, the iPhone typically prompts you to set it up. But some parents forget or skip the passcode step.
Without one, all your restrictions are practically useless because your kids can turn them off without any hassle.
- 1.Open "Settings > Screen Time > your child's name" on your phone.
- 2.Go to "Manage Screen Time."
- 3.Tap "Lock Screen Time Settings."
- 4.Create a 4-digit code that your child does not know.
Step 2: Add App Limits
App Limits allow you to set daily usage limits for specific apps or app categories, like Games, Social, Entertainment, etc. When the timer is up, the apps are restricted. To do so:
- 1.On your device, go to "Settings > Family > [Your Child's Name]."
- 2.Tap "Add Limits > Add Limit."
- 3.Select addictive apps or app categories for restrictions.
- 4.Set the daily time allowance and tap "Add."

Step 3: Schedule Phone-Free Hours with Downtime
App Limits control how long your child can use certain apps each day. But what about times when they shouldn't be on the phone at all, such as during school or after bedtime?
That's where Downtime comes in. When the downtime schedule is activated, all apps except the allowed ones are unavailable to use.
- 1.In your child's Screen Time setting, tap Downtime.
- 2.Turn the "Scheduled" switch on.
- 3.Customize the daily window when you don't wish your child to access the iPhone.
- 4.You can also tap "Customize Days" to adjust weekends separately.
Concern 2: I'm Worried About Inappropriate Content
According to research carried out by Protect Children, three in five respondents were exposed to CSAM before turning 18, and many of them said they had seen it by accident.
Sometimes, even if you blocked harmful apps, your child still encounters explicit websites, unwanted contact from strangers, or risky interactions.
So, if your goal is to create a safer online environment, the following settings can help reduce these risks.
Recommended Settings
- Content Restrictions
- Communication Limits
- Communication Safety
- Disable Safari
Step 1: Limit Age-Inappropriate Web, Apps & Media
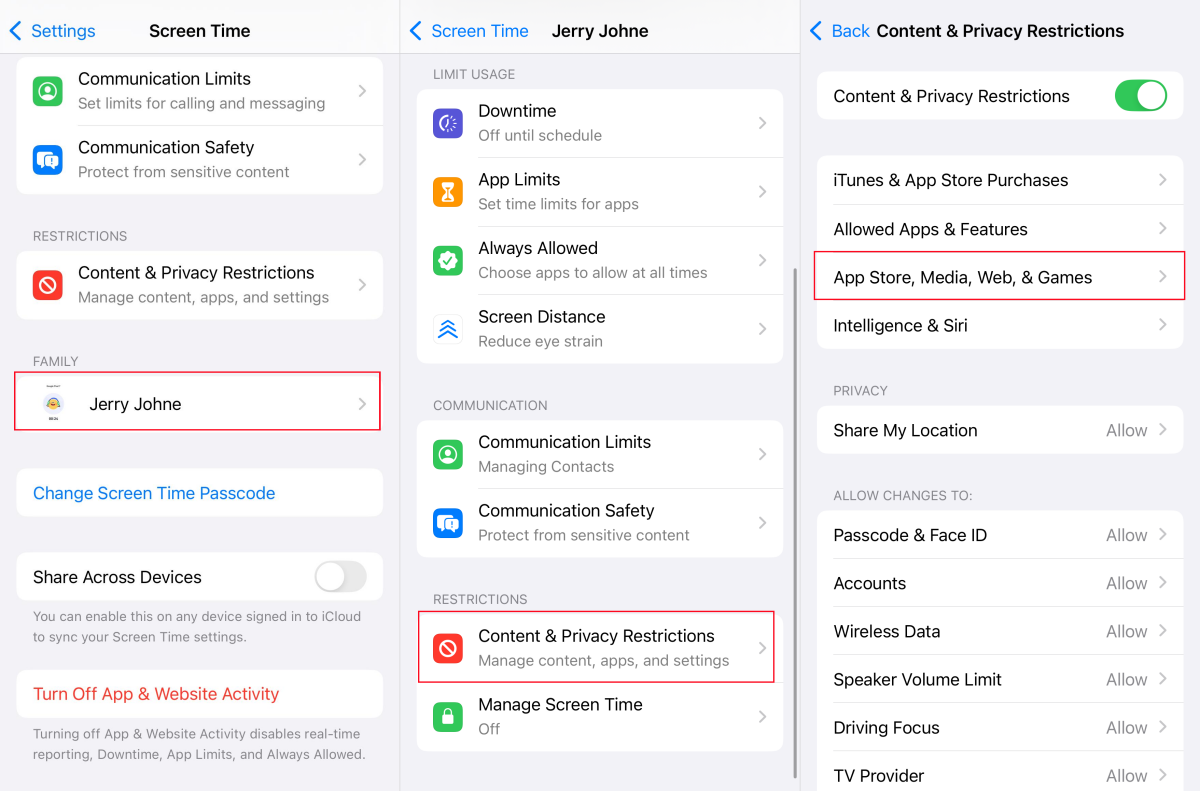
iPhone offers a "Content & Privacy Restrictions" menu to let users activate most content-related parental controls.
From here, you can block control web content, set age ratings for apps, and clean up explicit media, such as music, movies, and books. To access these settings:
- 1.On your phone, open "Settings > Screen Time > [Your Child's Name]."
- 2.Select "Content & Privacy Restrictions," and turn on the toggle.
- 3.Tap "App Store, Media, Web, & Games."
- 4.Then, adjust the following content settings based on your needs:🎵Music & BooksSet to "Clean"Explicit streams and books filtered out📱AppsChoose a rating4+, 9+, 12+, 17+. Apps rated higher will be invisible🎬Movies & TV ShowsChoose a ratinge.g., TV-14. Movies and series rated higher will be invisible🌐Web ContentLimit Adult WebsitesBlocks thousands of sites across Safari and other browsers
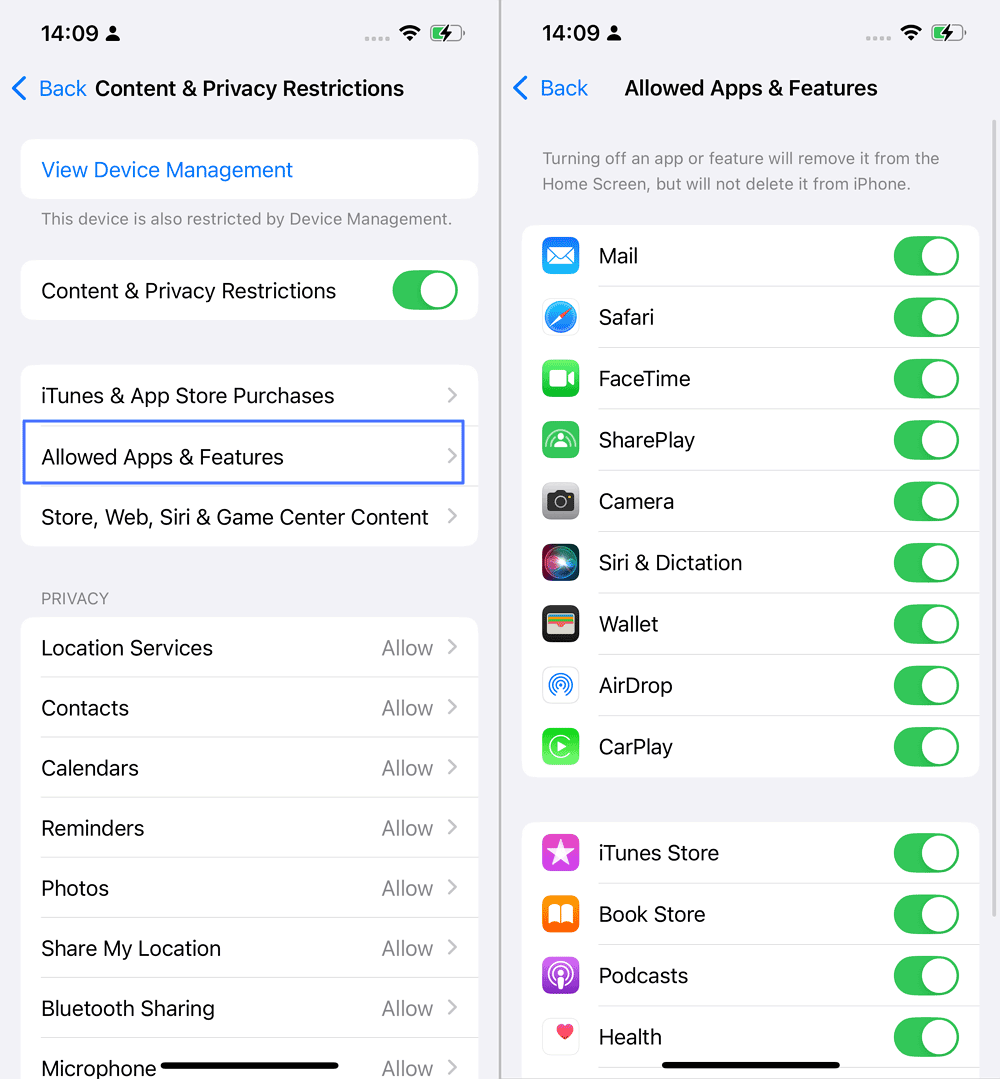
Step 2: Disable Safari
For children younger than 11, some parents prefer to completely remove web browsing access instead of relying on website filters. If so, you can also remove the Safari app icon from your child's home screen entirely. When the app is not there, they cannot use it.
Since Safari is a system app, Apple doesn't support uninstalling it. That said, you can disable it by:
- 1.In the "Content & Privacy Restrictions" setting, tap "Allowed Apps & Features."
- 2.ind Safari in the list and toggle the switch OFF.
- 3.Then Safari will instantly disappear from your child's iPhone.
Step 3: Limit Strangers from Contacting Your Child
By default, anyone with your child's phone number or Apple ID can send them iMessages, FaceTime calls, or even group chat invites. In NCMEC reports, predators often exploit messaging apps for online enticement.
Thankfully, by utilizing "Communication Limits," parents can limit only their child's contacts to talk to them during Screen Time and Downtime.
- 1.Head to Screen Time settings and select your child's profile.
- 2.Tap "Communication Limits."
- 3.Choose when and who can contact your child.
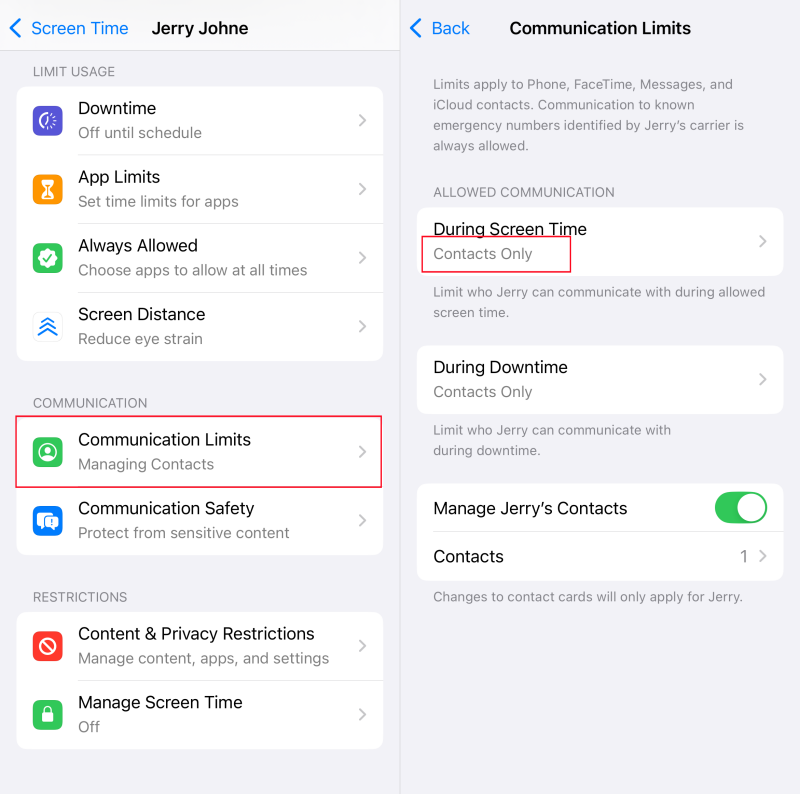
For children under 12, set to "Contacts Only." For teens, you may choose "Everyone" but discuss risks. Also, Apple allows you to manage your child's contacts.
Step 4: Turn on Communication Safety for Explicit Photos
Communication Safety is designed to alert children before opening nude images they received. When it detects a sensitive visual in messages, FaceTime calls, or AirDrop, it first blurs it and notifies children if they need to view it.
Though it won't prevent the inappropriate material, it can warn children, and you can get notified.
- 1.As before, dive into your child's Screen Time settings.
- 2.Select "Communication Safety."
- 3.Turn it ON.
Concern 3: My Child Keeps Spending Money on Apps and Games
App Store and Apple Pay make spending frictionless. One tap, Face ID, or a double-click of the side button, and money is gone. This is also called the "click to buy" culture.
An Achieve survey reveals that 31% of parents caught their kids making online purchases without permission, and 19% of parents report costs of over $300.
If you've ever been surprised by unexpected charges from your child's games, subscriptions, or virtual gems, iPhone parental controls can help prevent unauthorized spending before it happens.
Recommended Settings
- Ask to Buy
- Purchase Sharing
- In-App Purchase Restrictions
Step 1: Turn On Ask to Buy
As its name implies, "Ask to Buy" is a purchase approval system. When it's on, every time your child tries to download an app or make an in-app purchase, Apple sends a notification to you. Nothing gets downloaded or purchased until you approve it.
To enable Ask to Buy:
- 1.Open "Settings" and tap your name.
- 2.Select "Family" and choose your child's account.
- 3.Locate "Ask to Buy."
- 4.Turn the feature on.
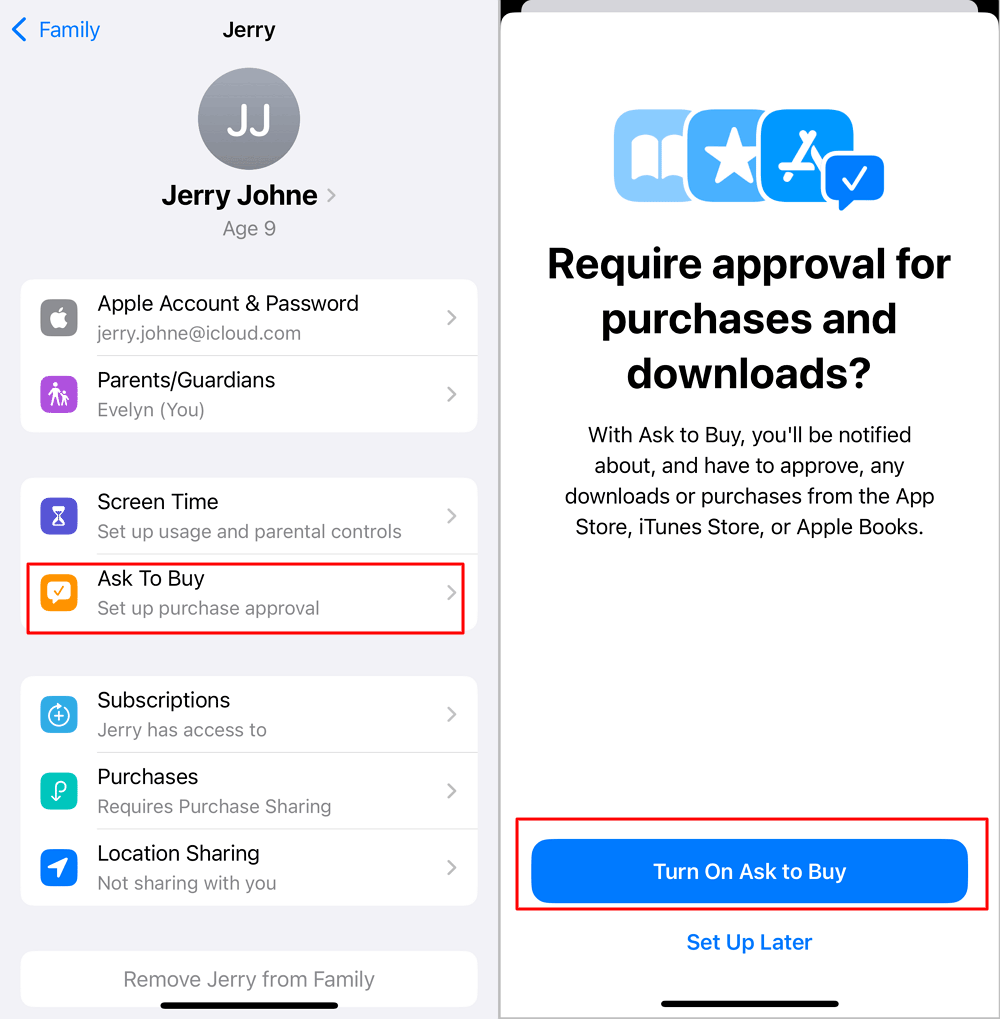
Note: By default, for child Apple accounts created through Family Sharing, Ask to Buy is enabled by default. But it's still worth checking.
Step 2: Review and Disable Family Purchase Sharing
When your child is part of your Family Sharing group, purchases may be billed through the family organizer's payment method. That is, if a parent's payment card is linked and shared, your child is able to spend it.
So, if you're the family organizer, consider turning off purchase sharing. This adds an extra layer of protection against accidental or unauthorized spending by other members (including your child).
- 1.On the family organizer's "Settings" app, tap the name.
- 2.Go to "Family > Purchase Sharing."
- 3.Select "Stop Purchase Sharing."
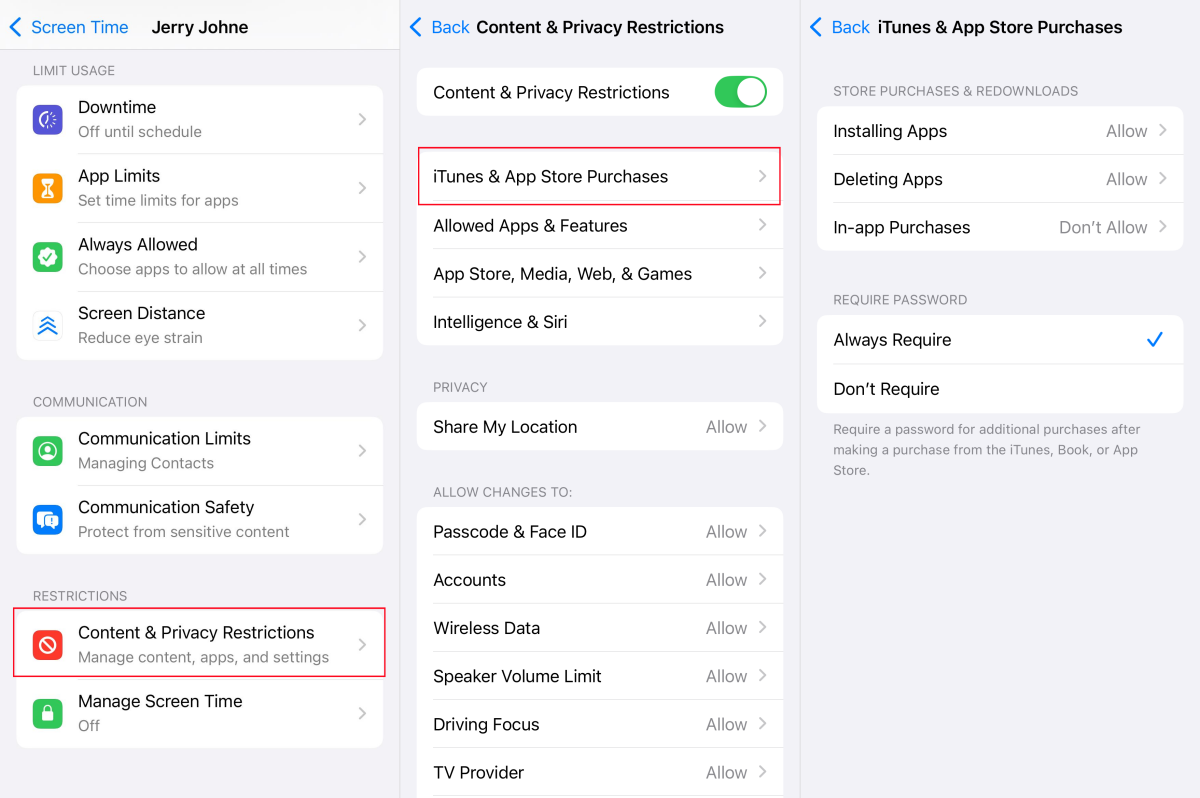
Step 3: Block All Purchases Entirely
Though your child's purchases and downloads must be approved through Ask to Buy, there's a stricter lock: completely disabling in-app purchases. This is useful to prevent game currency and premium upgrades.
Some parents prefer this because the purchases cannot proceed, so they never receive the purchase requests.
- 1.Go to "Settings > Screen Time > [Your Child's Profile]."
- 2.Select "Content & Privacy Restrictions."
- 3.Tap "iTunes & App Store Purchases."
- 4.Set "In-App Purchases" to "Don't Allow."
Concern 4: I Want to Know If They're Safe
One of the biggest reasons parents give their child a phone is to confirm safety when they're walking home or school alone, attending after-school activities, or spending time with friends.
Fortunately, iPhone includes a built-in location tool (Find My) that makes it easier for families to stay connected and have peace of mind.
Recommended Settings
- Find My
- Location Permission Restrictions
- Emergency Contacts
Step 1. Check Your Child's Location on Find My
Find My is a standalone location tracking app built into iPhones running iOS 13 and later. Once Family Sharing is set up, your child's location is automatically shared with yours and vice versa.
That means you can view their locations in your Find My service.
- 1.Just launch the Find My app.
- 2.Switch to the "Devices" tab.
- 3.Scroll down to find your child's device and know where they are.
Step 2: Block Location Permission and Find My Changes
Though Find My location sharing is effortless, the setting is just a switch. Your child can toggle off Find My, location services, or location sharing in seconds. As a result, you no longer know where they are.
To prevent that, lock the location settings on your child's device so they cannot change them.
- 1.Access your child's iPhone, and navigate to "Screen Time" in settings.
- 2.Tap on "Content & Privacy Restrictions."
- 3.Under "Privacy," tap "Location Services."
- 4.Set "Don't Allow Changes."
- 5.Also, in the same "Privacy" section, look for "Share My Location" and set it to "Don't Allow Changes."

Now the "Find My" and "Location Service" options are greyed out. And your child cannot disable location tracking.
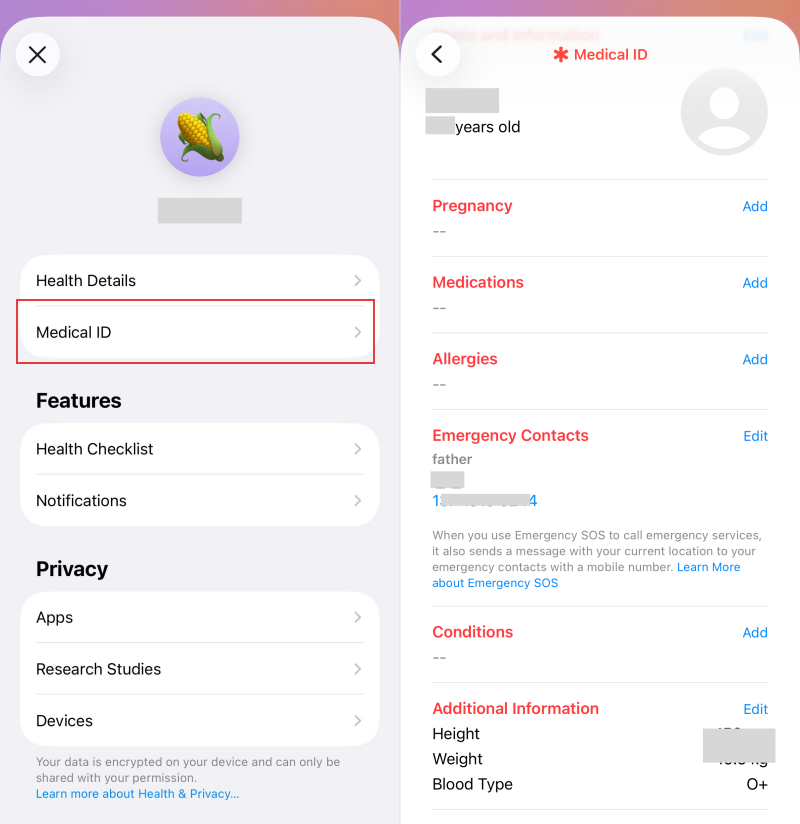
Step 3: Set Up Emergency SOS & Medical ID
In addition to location sharing in place, you should ensure your child is able to get assistance in an emergency.
iPhone's Emergency SOS lets your child call emergency services and send their location to emergency contacts even if they cannot speak or unlock the phone.
So, make sure your child's medical ID is created and teach them how to use the Emergency SOS shortcut.
- 1.In your child's "Health" app, tap the profile.
- 2.Select "Medical ID" to edit and fill in information, such as name, blood type, allergies, etc. More importantly, add yourself or other family members as emergency contacts.
- 3.Next, search for "Emergency SOS" in your child's "Settings" app.
- 4.Ensure "Call with 5 Button Presses" or "Call with Hold and Release" is ON.
- 5.Then, practice this with your child before they need it.
Common Mistakes Parents Make When Setting Up iPhone Parental Controls
Even with a detailed guide, many parents unknowingly overlook key settings. As a result, the parental controls become less effective than they think. Therefore, we list the most common mistakes to watch out for:
❌Mistake 1: Not Creating a Screen Time Passcode
Setting restrictions without a Screen Time passcode is like locking a door without turning the key. Your child can simply ignore, change, and even remove your restrictions in seconds.
❌Mistake 2: Not setting up the child's account or Family Sharing first
Many parents jump straight into Screen Time settings without realizing that a proper child account is what makes parental controls work best.
For instance, if your child is using your Apple ID or an adult Apple ID they created themselves, you are not able to manage their device remotely, and some key protections (e.g., Ask to Buy) are lacking.
❌Mistake 3: Leaving "Account Changes" Unlocked
If you didn't lock the account changes and meanwhile didn't set a passcode, your child can sign out of their Apple ID to bypass all Screen Time settings.
Since this setting is hidden deep inside "Content & Privacy Restrictions," most parents don't know it exists.
❌Mistake 4: Forgetting to turn on "Block at End of Limit"
Without "Block at End of Limit," your child can exploit the "Ignore Limit" button to extend the app timer until the day. Your carefully set app limit becomes meaningless.
Apple doesn't show this setting if there is no screen time passcode. And even when it does appear, many parents don't know what it actually does.
❌Mistake 5: Ignore the "Always Allowed" app list
Downtime blocks all apps except those on the Always Allowed list. However, "Safari" is included in this list. If you haven't reviewed that list, your child has still accessed endless web content during downtime.
❌Mistake 6: Setting up Find My but leaving it easy to disable
Not a few parents found they could not see their child's location. This is mainly because they didn't prevent their child from changing location services.
❌Mistake 7: Turning on restrictions but never testing them
Many parents enable settings and assume they're working. However, in our testing, we found that Screen Time settings didn't always sync properly when the same child account was signed in on multiple devices (an iPad and an iPhone).
Conclusion
In short, setting up iPhone parental controls doesn't mean enabling every restriction Apple offers. Instead, using it depends on the problem you're trying to solve:
- To reduce excessive screen time on your child's iPhone, set up "Downtime" or add "App Limits" for games and social media apps. And most importantly, protect the settings with a Screen Time passcode.
- To protect your kids against inappropriate content, turn on "Content & Privacy Restrictions" and limit adult web and media content. Also, enable "Communication Limits" and "Communication Safety" to restrict unwanted contacts and receive sensitive image alerts.
- To prevent unauthorized purchases, enable "Ask to Buy" so every download requires your approval, disable purchase sharing across families, and even block in-app purchases.
- To know where your child is and stay connected in emergencies, it's essential to lock the location service changes, set up Medical ID, and practice the Emergency SOS function with your child.


Leave a Reply.