Apple Family Sharing: Change Organizer/Member Roles & Set Up
Welcome to Apple Family Sharing, where technology helps organize your family. This article covers managing your digital family, including roles, permissions, and changing the organizer and member roles. Discover how Apple Family Sharing can simplify your family's digital life.
Apple Family Group Roles, Permissions, and Data Sharing
Apple Family Sharing lets up to six members share Apple services and purchases without sharing Apple IDs. Permissions vary between all members and specific roles. Here's what can be shared and what permissions are specific to each role:
Role-Specific Permissions in Family Sharing
1Family Organizer
The organizer is the adult who sets up the Family Sharing group.
- They can invite or remove family members, manage shared features, and disband the group.
- The organizer has the ability to manage payment methods for purchases made by family members. He can see all purchase history made by family members.
- They can set up parental controls for children in the group, including features like "Ask to Buy," which requires approval for purchases made by minors.
2Adults
Adults (18 years or older) can be added to the family group but do not have administrative privileges like the organizer.
3Parents/Guardians
An adult member can be designated as a parent/guardian by the organizer. They have additional permissions to manage parental controls for children in the group, including approving purchases through the "Ask to Buy" feature.
4Children/Teens
Members under 18 are classified as children or teens. They require the organizer to create an Apple ID for them and manage their settings.
Features Shared by All Family Members
Location: Family members can share their locations using the Find My app, which helps in locating lost devices.
iCloud Storage: All members can share an iCloud storage plan; personal files or photos remain private, but you can see the storage space used by everyone. If you also want to share files or photos, you can use iCloud Drive and iCloud Shared Photo Library.
App Store Purchases: Family members can share purchased apps, music, movies, and books.
Apple Subscription: Family members can share an Apple Music, Apple TV+, or Apple Arcade family subscription, with each person having a separate account.
Calendars/Passwords/Grocery List : A family calendar can be created for managing events. You can also share passwords and grocery lists after iOS 17.
How to Change Organizer on Family Sharing
As mentioned earlier, the family organizer has more management permissions and responsibilities. However, Family Sharing does not allow to have two organizers or more, nor is there a direct way to change the organizer. To change the organizer, you must disband the group and have another adult set up a new one.
Notes:
- Family members can only join one family group at a time and can switch groups only once per calendar year.
- If a child is in the Family Sharing group, the organizer must transfer them to another group before disbanding the group.
- The organizer can assign a family member as the Legacy Contact. If the account holder passes away, the Legacy Contact can request access to its data.
- When disbanding the family group, all members will lose access to shared services like Apple Music or iCloud immediately.
- The personal data in iCloud will remain for a period and intact once they rejoin the new family group.
- Individual purchases made by others will stay on devices but become inactive. They remain inactive until repurchased or until joining a new family group that shares them.
1Disband the Current Family Group
The current family organizer must disband the current family group first.
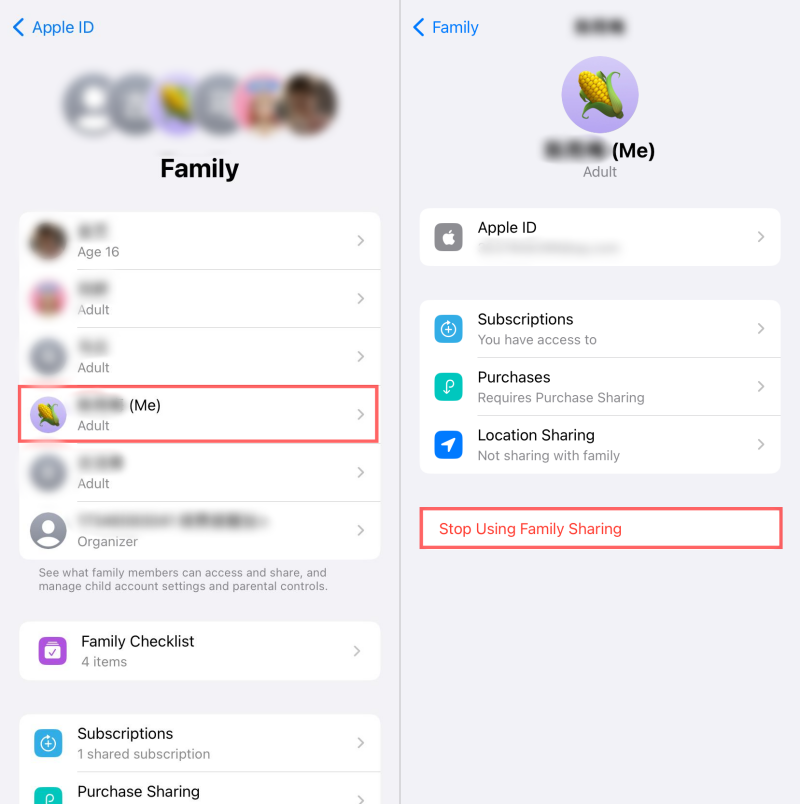
- Go to "Settings" > [Your Name] > "Family Sharing."
- Tap on "Stop Using Family Sharing." This action will remove all members from the group, and they will lose access to shared subscriptions and content immediately.

2Create a New Family Group
Set up a New Family and Invite Family Members
The new organizer should then create a new family group.
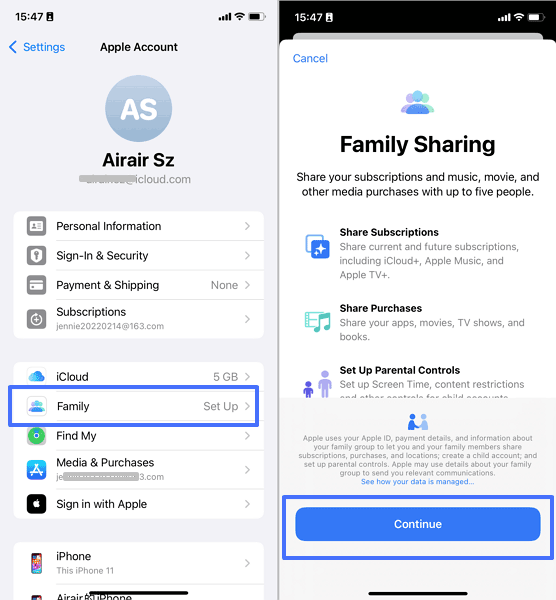
- Open the Settings app and tap your name at the top.
- Go to "Family," and you'll then be brought to a Family Sharing introductory page. Hit "Continue."

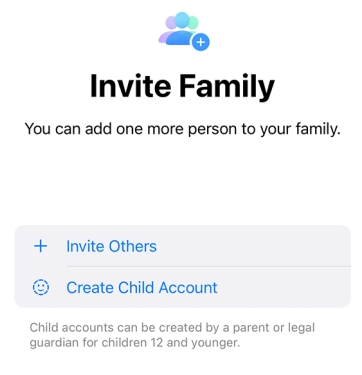
- You'll be given two options to invite members of your family.

- If you hit "Invite Others," Apple will ask you to send your Family Sharing invitation to family members via email, Message, AirDrop, or other apps.
- If you select the "Create Child Account" option, iPhone will walk you through the whole process, from creating to setting up the parental controls.
Family Members Accept the Family Sharing Invitation
Once other family members view your invitation and agree to join the Family group, they will be added to Family Sharing and can instantly enjoy the benefits.
3Set up Family Sharing
After creating a new group on your iPhone, you'll need to set up parental controls and content-sharing settings again.
Manage Your Child's Device
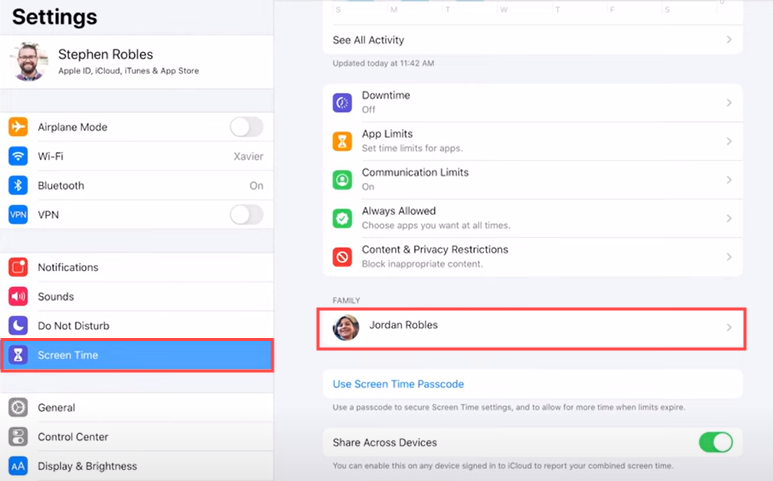
If your child under 13 joined the new family group, you can remotely monitor the screen time of the kid's account and configure parental control, including downtime, app limits, web and content restrictions.
It's also possible to designate another family member as a guardian so both of you can manage your child's device. Here's how you can enable Screen Time for your child.
- Go to "Screen Time" on your iPhone or iPad Settings.
- Tap on your child's name under "Family."
- This will take you into an overview of your child's screen time. Also, you'll have the following controls:
- Downtime - Choose which period your child can't access their devices.
- App Limits - Set time limits for specific apps or app categories.
- Always Allowed - Decide which apps your child can use during downtime.
- Communication Limits: Decide which contacts your child can communicate via calls, FaceTime, or Messages during downtime or allowed time.
- Content & Privacy Restrictions - Manage iTunes & App Store purchases, control privacy settings, and block inappropriate content, including music, websites, apps, books, etc.
- After enabling parental controls for your child's device, set up a Screen Time passcode to prevent the restriction from being bypassed by your child.
Share Payment Method and Set up Ask to buy
The new organizer can also share his payment method, monitor and approve your kids' purchases.
- Go to "Settings" > "Your Apple ID" > "Payment & Shipping" to add a new payment method or update existing information.
- Go back to "Your Apple ID," select "Family," and you will see a list of members.
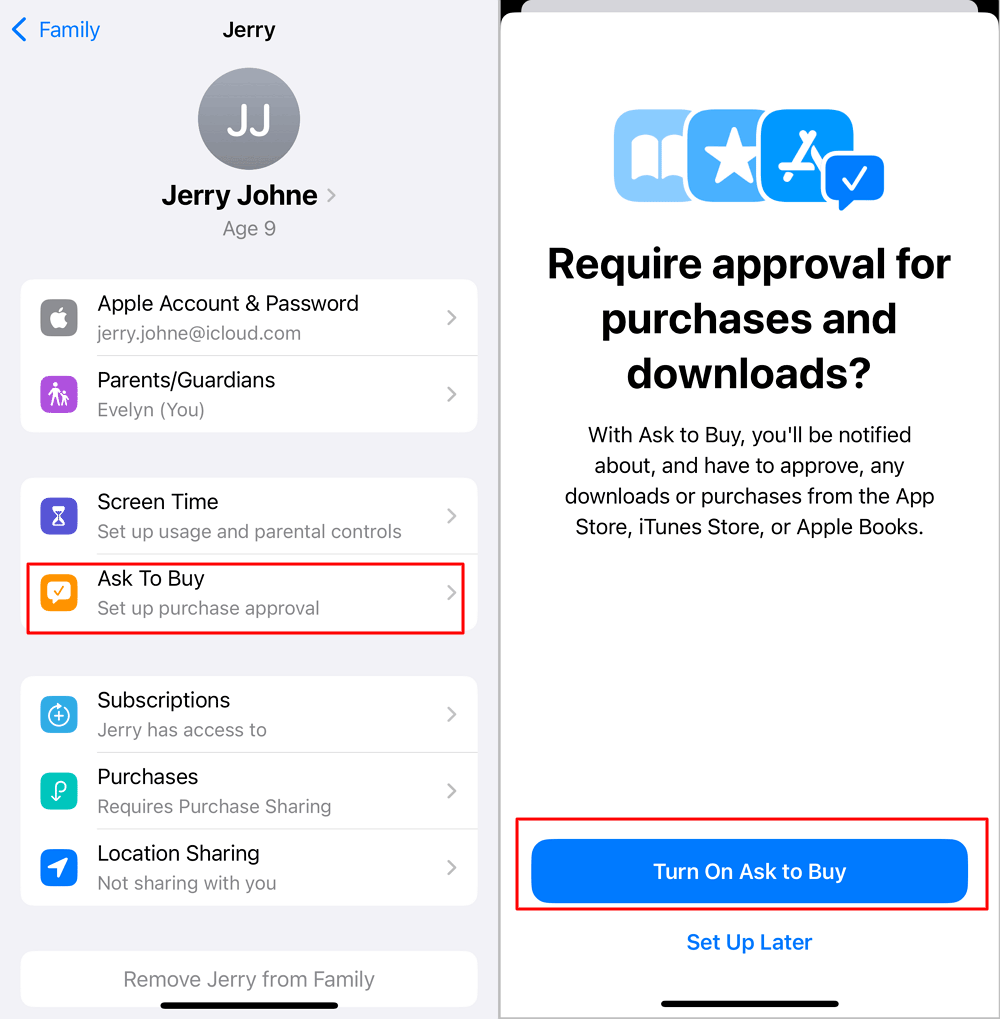
- Tap on the name of the child for whom you want to enable Ask to Buy.
- Toggle the switch to turn on "Ask to Buy." This will require that child to request approval for any purchases or downloads they attempt.

Other members can't add or modify payment methods but can use their own Apple ID balances to make purchases. They can only view their own purchase history and can't access the purchase history of other family members unless the organizer allows it.
Share Location and Locate Lost Apple Devices
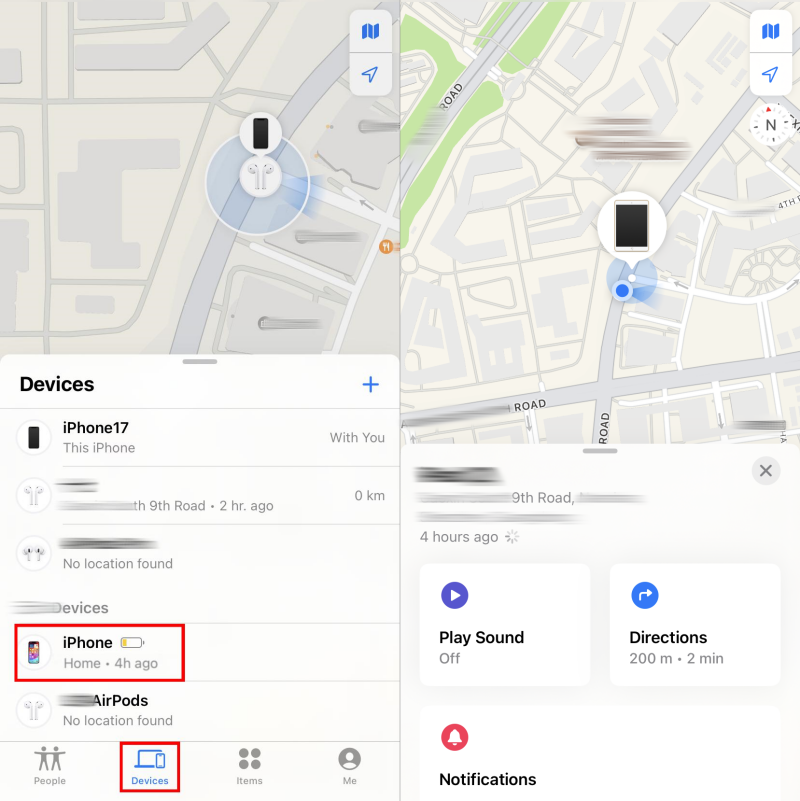
Family members can keep track of each other's Apple devices using Find My or iCloud, such as iPhone, iPad, Mac, AirPods, AirTags, etc. This function may assist each other in locating the lost gadgets.
Prerequisite:
- The Find My feature must be enabled on every member's device.
- The location services are not turned off on every member's device.
- The member has allowed Family Location Sharing. (Open Settings > Family > Location Sharing > Turn on.)
- After then, open Find My or icloud.com/find/.
- Locate the "Devices" tab and all devices of your family members display.
- By tapping one, you can see the real-time location.
Share iCloud+ Storage
The new organizer can purchase an iCloud storage plan and share it with other family members. Suppose a family member already has their own iCloud storage plan. In that case, they can choose whether to share it with the family group or not.
Suppose a family member prefers to keep their own iCloud storage plan; they can do so. However, they cannot combine their storage with the shared family plan; they must choose one or the other. If they decide to switch to the family plan, they should cancel their existing subscription to avoid being charged for both plans.
If the new organizer would like to pay and share the iCloud + storage plan, he must do the following:
- Subscribe to an iCloud+ plan with at least 200GB of storage.
- Turn on iCloud Family Sharing. (Head to Settings > Family > Subscriptions > iCloud > Share with family.)
After this, a notification will be automatically sent to the family members' devices to notify them and prompt them to accept the shared plan.
Share Apple Subscriptions
If the family organizer has an Apple subscription, such as TV+, Music, News+, or Card, the rest of the family members can access it using their own devices and accounts.
Therefore, to share the Apple subscriptions with other family members, the family organizer needs to navigate to the Family Sharing settings and select Subscriptions. Choose any subscribed service or subscribe to a new family plan to share with the family.
As long as your family members use their accounts to log in to Apple Music or other services, the membership will be accessible.
Share Apps and Store Purchases
Everyone in the same family group can see and download the music, movies, TV shows, books, and apps other members have purchased.
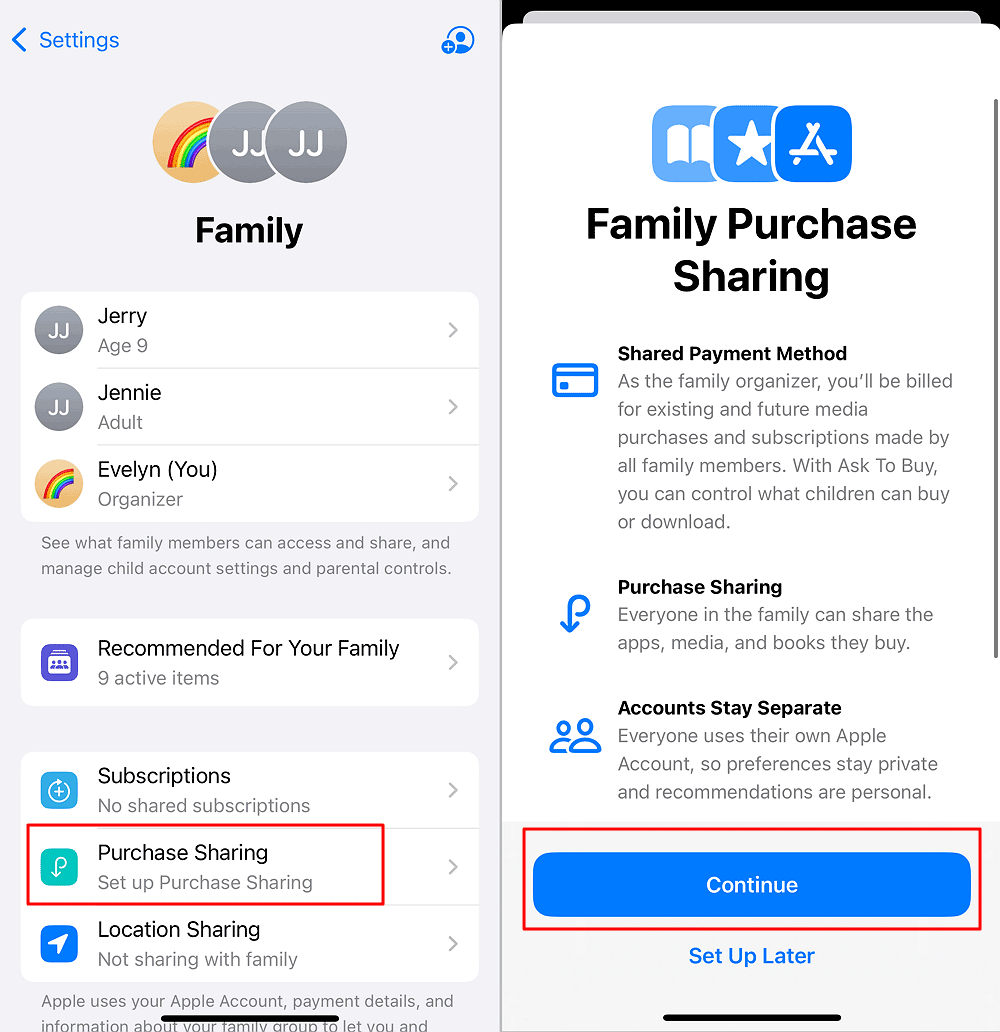
- The new family organizer should enable Family Purchase Sharing first. Go to Settings > Family below the Apple ID > Purchase Sharing and follow the onscreen instructions.

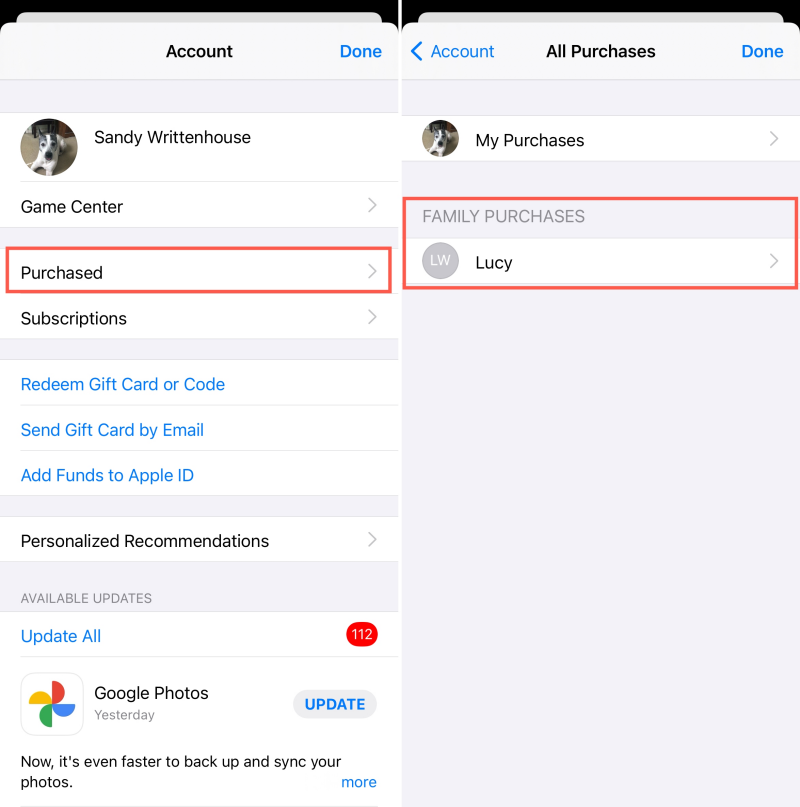
- Now, go to the App Store and tap on your profile in the top right.
- Select "Purchased," and you'll get family purchases that are shared with you.
- Choose one member to open his or her purchased app list. If there is any app you are interested in, you can directly download it on your device at no cost.
How to Change Other Members' Role in Family Sharing
Having discussed how to change the organizer in Family Sharing, let's now delve into altering other members' roles within the group.
Change Adult to Child on Family Sharing
Apple does not allow changing an existing account's age from adult to child. Instead, you can remove the adult member and create a new Apple ID for the child.
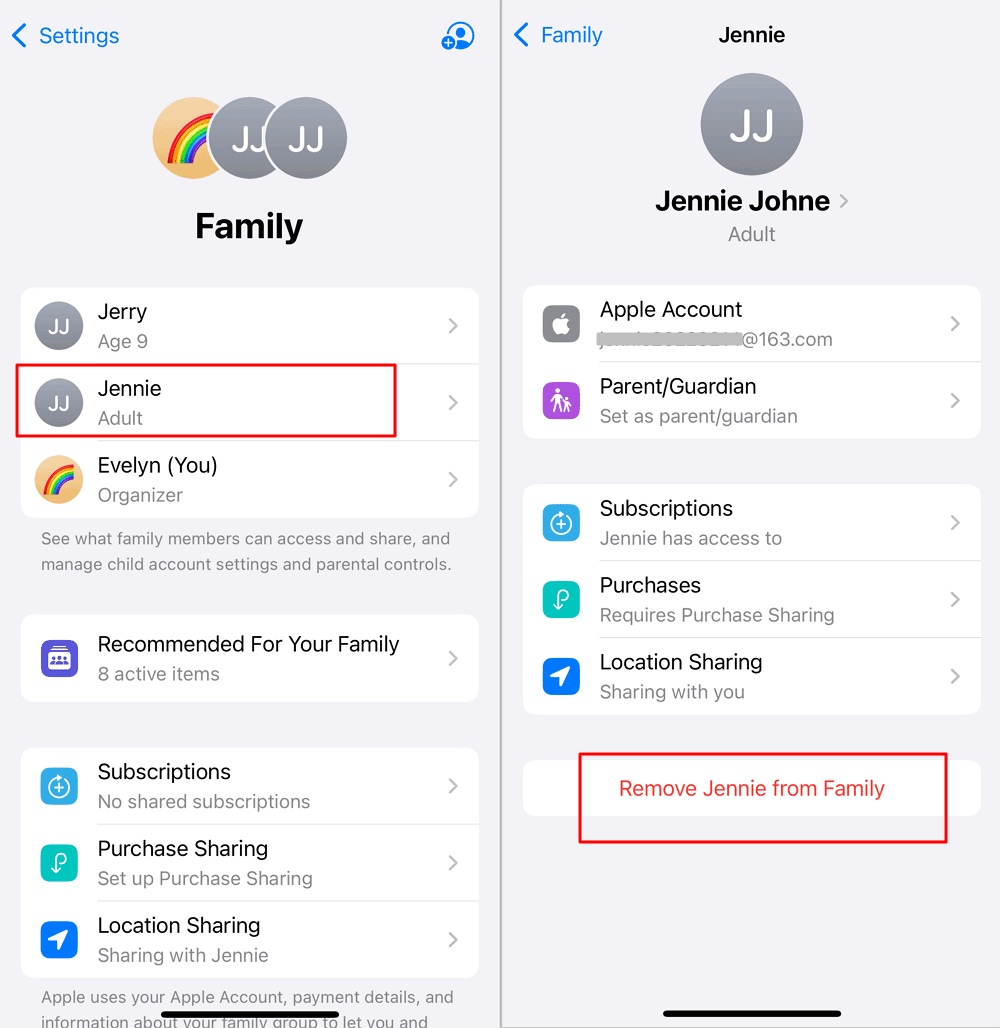
- The family organizer needs to remove the adult member from the Family Sharing group. This can be done by going to Settings > [Your Name] > Family, selecting the adult member, and tapping Remove [Member's Name].

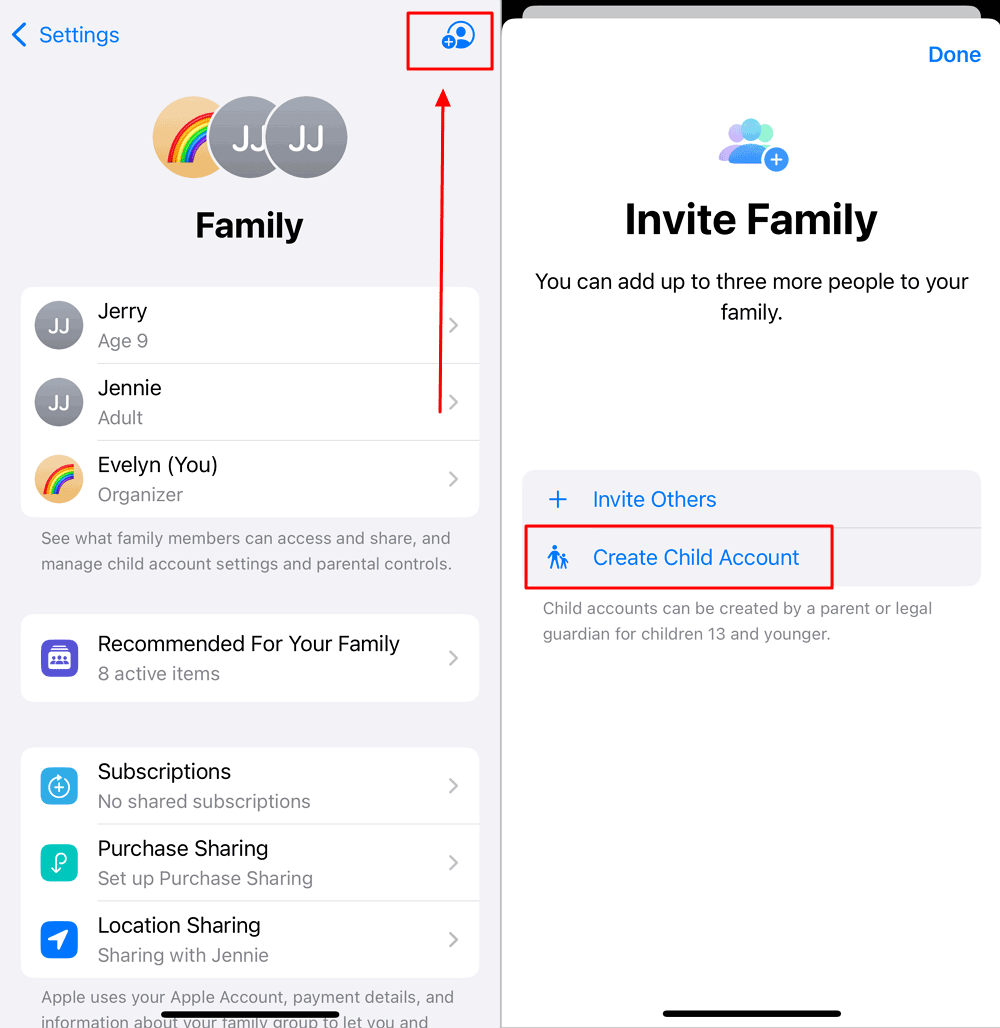
- Going back to the Family, tap "Add Member," and then selecting "Create Child Account."

- Follow the prompts to enter the child's information, including their correct birth date.
- Once the new child account is created, he is in your family group.
Tips:
- The adult member also has the option to leave the Family Sharing group from his side.
- Removing the adult account will result in loss of access to any shared purchases or subscriptions associated with that account.
- Conversely, we cannot directly change a child to an adult either. However, once a child reaches the age of 18, their Apple ID automatically transitions to an adult account.
Change an Adult to Parent/Guardian
To set an adult member as a parent or guardian in Apple Family Sharing. We will take the steps on iPhone as an example:
In iOS 16 or later:
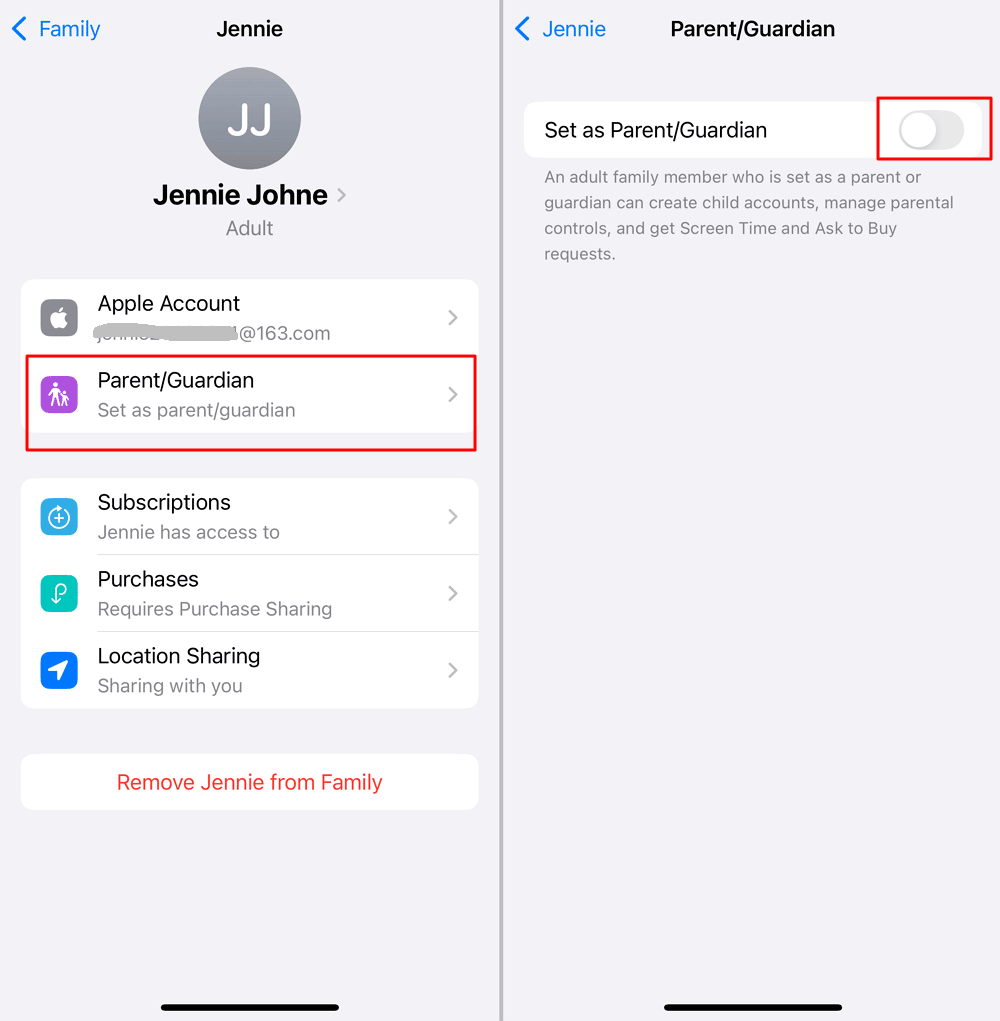
- Go to Settings.
- Tap Family, then tap your family member's name.
- Tap "Parent/Guardian" and enable "Set as Parent/Guardian."

In iOS 15 or earlier:
- Go to Settings, then tap your name.
- Tap Family Sharing, then tap your family member's name.
- Tap "Role" > "Parent/Guardian."
Final Words
As you can see, Apple Family Sharing offers a robust platform for families to connect and collaborate in the digital age. Whether you're adjusting who's in charge or changing roles within your family group, these steps ensure a smooth transition and continued harmony.
With Apple Family Sharing, managing your family's digital footprint has never been easier. Let's keep the family connected and organized, one setting at a time.







Leave a Reply.