[100% Fixed] Microsoft Remote Desktop Not Working
Most users say their remote desktop works well for years or months, but someday it doesn't work. It can be due to network issues, system errors, firewall interference, or other reasons.
In this comprehensive guide, we will highlight the common issue types behind Remote Desktop not working and their corresponding best fixes.
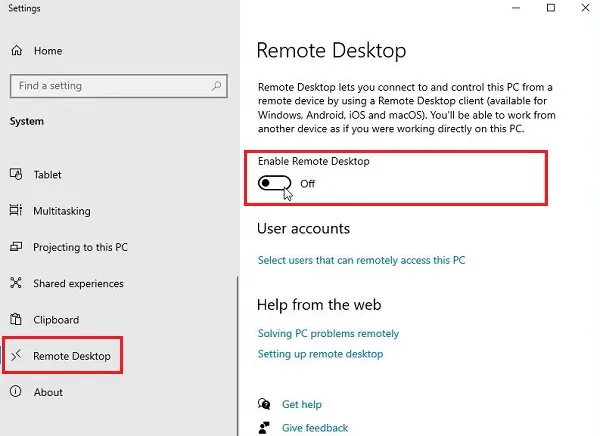
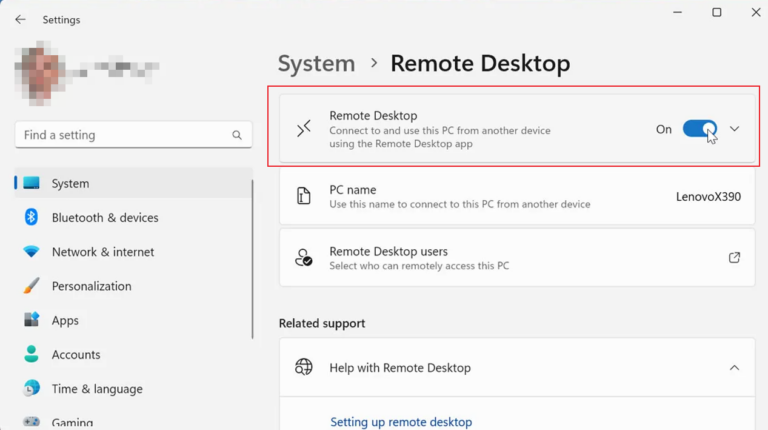
Pre-check: Before you read further, make sure the remote desktop is enabled on the target computer. To do so, open Settings > System > Remote Desktop > toggle on Enable Remote Desktop.
Part 1. Common Issue Types for Remote Desktop Not Working
Various issues can cause Remote Desktop malfunctions. In this section, we will introduce some of the most common reasons for Remote Desktop not working, along with their corresponding error codes. We will also explain how to fix those issues.
1Network Issue
Remote Desktop requires a stable network connection to transmit data back and forth between the local and remote computers. If the network connection is disconnected or unstable, Remote Desktop may not work.
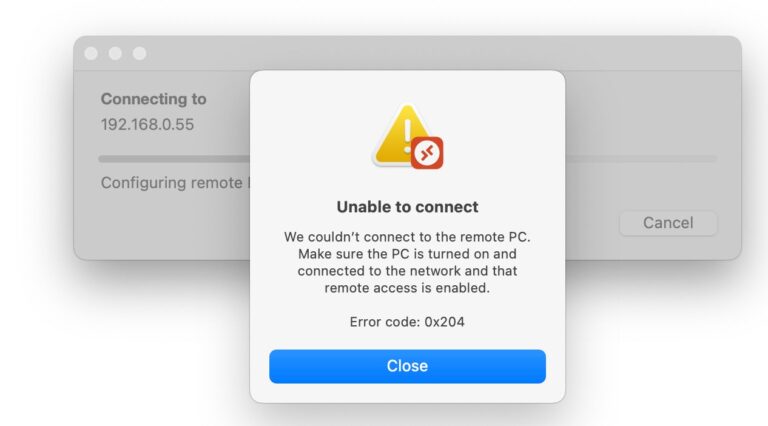
Error code and error message: 0x204 – "We couldn't connect to the remote PC. Make sure the PC is turned on and connected to the network and that remote access is enabled."
Solution:
- Ensure that the network cable is connected correctly or Wi-Fi is enabled.
- Test network connectivity in the Command Prompt by typing: ping [remote computer's IP address].
- If ping fails, check the router and modem; restarting them might help restore the connection.
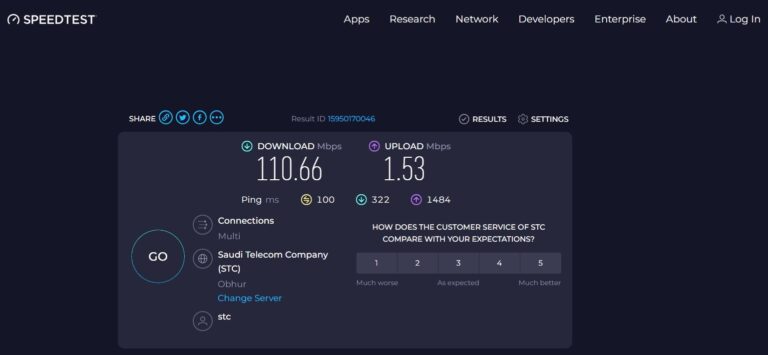
After implementing the above fixes, check the network connection using any internet speed testing tool, like Ookla.
2Remote Connection Was Blocked by Firewall
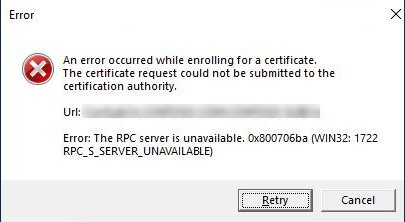
If the firewall blocks the remote desktop port (default is 3389), the traffic will not be able to pass through. This will lead to Remote Desktop not working on Windows 11/10.
Error code and error message: 0x800706BA – "The RPC server is unavailable."
Solution
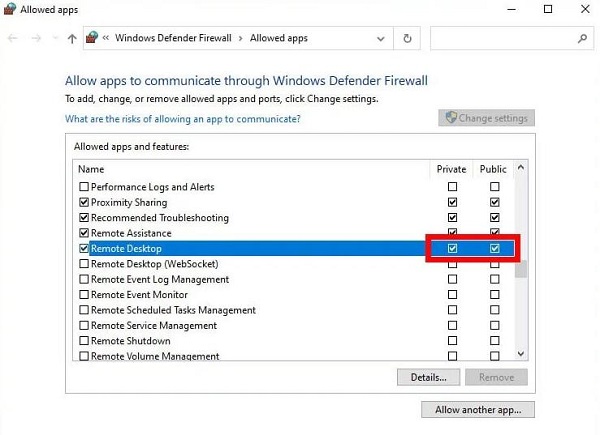
You have to adjust firewall settings to allow remote connection to pass through the firewall. The steps are as follows:
- Step 1.Open the Control Panel on your PC.
- Step 2.Navigate to System and Security > Windows Defender Firewall.
- Step 3.Click Allow an app or feature through Windows Defender Firewall.
- Step 4.Click Change settings. Find Remote Desktop and tick both Public and Private options.
3Insufficient User Permission
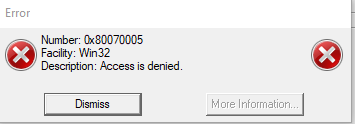
Sometimes, the user has insufficient permission to log in through Remote Desktop services. Basically, users need to be added to the Remote Desktop Users group to access the system remotely. If the user doesn't have this permission, the Remote Desktop client will block access.
Error code and error message: 0x80070005 – "Access is denied"
Solution
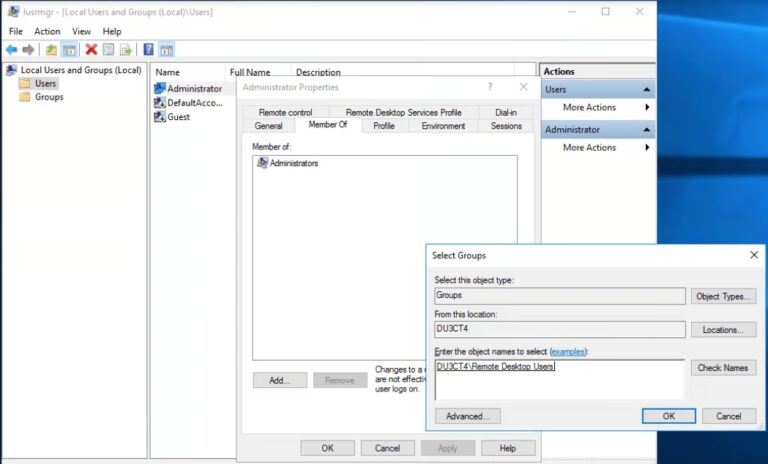
To fix this issue with the remote desktop not working, you have to add the user account to the Remote Desktop Users group. The steps are as follows:
Step 1. Add the User via Local Users and Groups
- 1.Open Local Users and Groups by pressing Windows + R, typing lusrmgr.msc, and hitting Enter.
- 2.In the left pane, select the Users folder and double-click the desired user account.
- 3.Go to the Member Of tab and click Add.
- 4.Enter Remote Desktop Users in the field, click Check Names to verify it, and then press OK.
Step 2. Add the User through the Remote Desktop Users Group
- 1.In the Local Users and Groups window, select the Groups folder from the left pane.
- 2.Double-click Remote Desktop Users, then click Add.
- 3.Type the user's name, verify it by clicking Check Names, and click OK.
Step 3. Allow Remote Access via System Properties
- 1.Right-click the Start menu and choose System.
- 2.Select Advanced system settings from the right pane.
- 3.Switch to the Remote tab and click Select Users…
- 4.Click Add, type the user's name, verify it with Check Names, and confirm by clicking OK.
Step 4. Add the User through Server Manager (For Servers)
- 1.Open Server Manager and click Local Server from the left-hand menu.
- 2.Next to the Computer Name, click the blue link.
- 3.In the Remote tab, click Select Users…, then Add.
- 4.Enter the user's name, verify it using Check Names, and click OK.
Once the user is added to the Remote Desktop Users group, the tool should start working perfectly.
4System Error
Another reason Remote Desktop not working on Windows 10 could be system errors, such as missing patches, no updates, etc. For example, when Windows 10 is not updated regularly, system files/drivers can become outdated and may compromise Remote Desktop functionality.
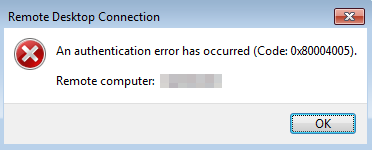
Error code and error message: 0x80040005 – "An authentication error has occurred"
Solution
1.Restart Both Computers
Restart both the local and remote computers to fix any temporary system bug causing the issue.
2.Update System
Update the Windows OS to the latest version. To do so:
- Open the Start menu and search for Windows Update.
- Click Check for updates and install any pending updates.
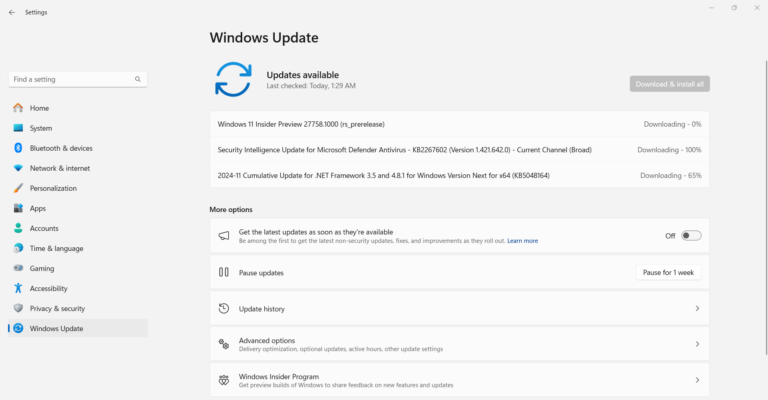
After updating the system, head back to Remote Desktop and test out its performance.
5Software Conflict
If you recently installed a new program or updated an existing one, the software may cause a conflict within your system. Incompatible or outdated drivers may also cause this issue.
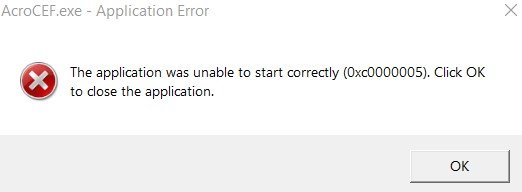
Error code and error message: 0xC0000005 – "The application was unable to start currently"
Solution
To tackle software conflict, start the remote connection in Safe Mode. Safe Mode is a diagnostic mode that runs Windows in a basic version without needing any non-essential files or drivers.
Follow the below steps to start the remote connection in Safe Mode:
- Step 1.Restart the computer and press F8 (or another key, depending on your system) during startup.
- Step 2.Select Safe Mode with Networking from the boot options menu.
- Step 3.Start a remote connection.
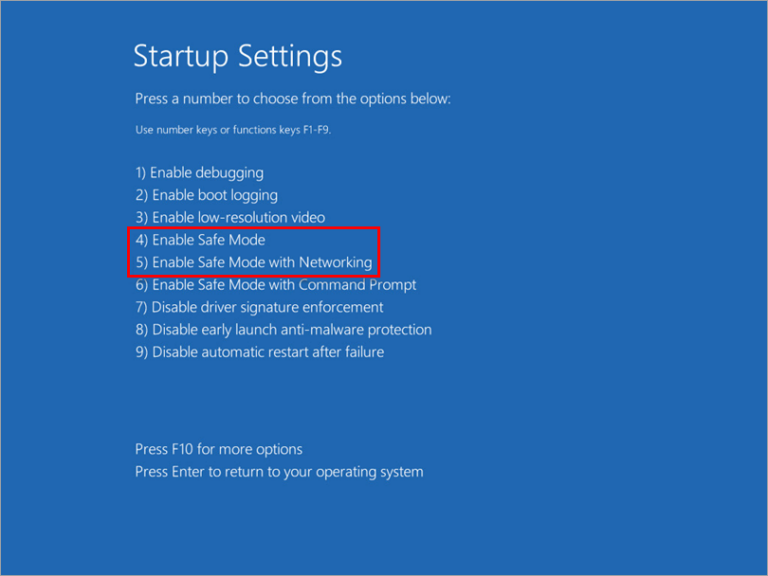
If you don't face the Remote Desktop connection not working issue in Safe Mode, it verifies that there is a software conflict. So, check your recently installed or updated programs and reverse the changes.
Part 2. Other Issues for Remote Desktop Not Working
Apart from the above problems, there are some other causes for Remote Desktop not working, as follows:
1UDP Issues
In the Remote Desktop Protocol (RDP), by default, communication between the client and server may utilize both TCP and UDP protocols. UDP (User Datagram Protocol) is a connectionless network protocol that offers fast data transmission but does not guarantee the order or integrity of the data.
In certain network environments, such as home networks or through some ISPs (Internet Service Providers), UDP may be restricted or limited by QoS (Quality of Service) policies, which can lead to unstable or choppy remote desktop connections.
Some of the issues that cause Remote Desktop not to work include:
- Network Restrictions: Since network providers may restrict UDP, using it for Remote Desktop can lead to unstable or slow connections, thereby affecting the normal operation of the remote desktop.
- Unreliable Data Transmission: UDP does not ensure reliable data transmission, which may result in data loss during remote desktop sessions, causing connection interruptions or performance degradation.
You can disable UDP by editing the registry and group policy as follows:
Steps to Disable UDP through Registry
- Step 1.Press Windows + R to open the Run dialog, then type regedit and press Enter.
- Step 2.Navigate to HKEY_LOCAL_MACHINE\SOFTWARE\Policies\Microsoft\Windows NT\Terminal Services\Client
If the Client key does not exist, create it:
Right-click on Terminal Services, select New > Key and name it Client. - Step 3.Inside the Client key, right-click on the right pane and select New > DWORD (32-bit) Value.
Name it fClientDisableUDP and set its value to 1 to disable UDP. - Step 4.Restart your computer for the changes to take effect.
Steps to Disable UDP through Group Policy
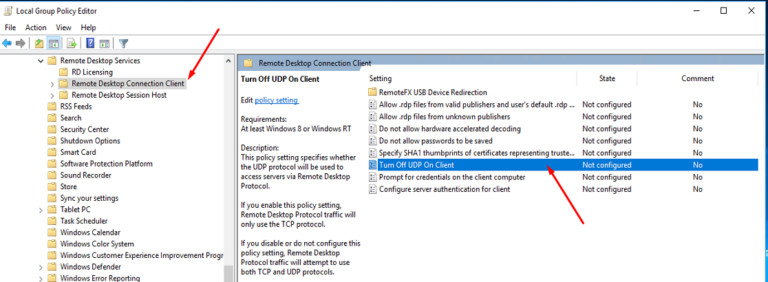
- Step 1.Press Windows + R, type gpedit.msc, and press Enter to open the Local Group Policy Editor.
- Step 2.Navigate to Computer Configuration > Administrative Templates > Windows Components > Remote Desktop Services > Remote Desktop Connection Client
- Step 3.Double-click on Turn Off UDP On Client.
- Step 4.Select Enabled, then click Apply and OK.
- Step 5.Restart your computer to apply the changes.
2SSL Certificate Issues
SSL (Secure Sockets Layer) certificate issues can also lead to Remote Desktop not working on Windows 11/10. Some of the common issues include:
- Untrusted certificate
- Expired or invalid certificate
- Certificate and domain name mismatch
- Certificate chain incomplete or corrupted
To tackle this issue, you should check the SSL certificate:
- Check the certificate's expiration date to verify that it is still valid. If it has expired, obtain a new certificate from a trusted Certificate Authority (CA).
- If it's a self-signed certificate, ensure it's added to the client's trusted certificate store.
- In the RDP client, check the option to "ignore certificate errors if available."
3CredSSP Issues
CredSSP (Credential Security Support Provider) is a protocol that allows client computers to securely delegate user credentials to a remote server when establishing a Remote Desktop Protocol (RDP) connection.
CredSSP issues that lead to Remote Desktop not working are primarily related to security updates and compatibility with the authentication protocol.
For example, the updated CredSSP may no longer support the old protocol versions. This can cause updated clients to be unable to connect to un-updated servers or updated servers to reject connections from un-updated clients.
To fix that, you should install the latest security updates as follows:
- Step 1.Go to Settings > Windows Update.
- Step 2.Click Check for Updates.
- Step 3.Install all pending security updates.

4Network Discovery Disabled
If network discovery is disabled, the remote desktop client may not be able to discover the target computer on the network. This will prevent the establishment of a connection.
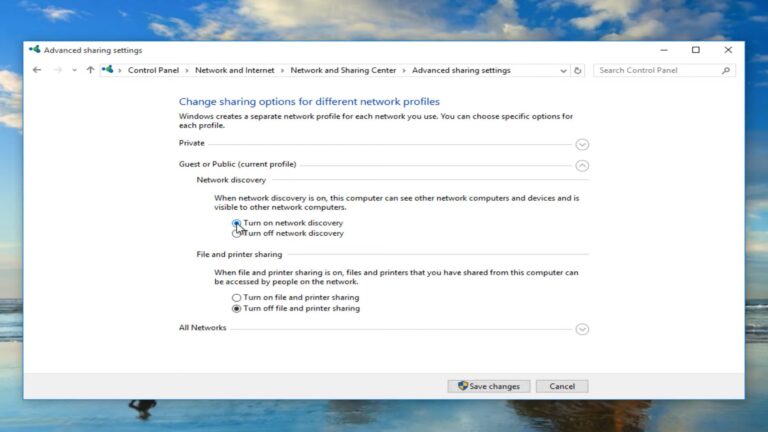
You can easily enable network discovery through the "Network and Sharing Center", as follows:
For Windows 10
- Step 1.Open the Control Panel and navigate to Network and Internet > Network and Sharing Center.
- Step 2.Click Change advanced sharing settings from the left panel.
- Step 3.Turn on network discovery.
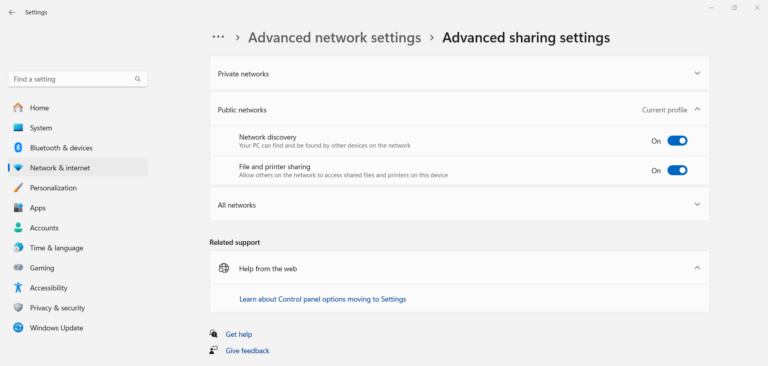
For Windows 11
- Step 1.Open Settings and navigate to Network & internet > Advanced network settings > Advanced sharing settings.
- Step 2.Toggle on Network discovery.
5Capacity Exceeded
When the available licenses for Virtual Desktop Infrastructure (VDI) or virtual desktops are exhausted, you may not be able to establish new remote desktop sessions.
Check the license server to ensure there are enough licenses available. Purchase or activate additional licenses if necessary.
Part 3. Alternative to Remote Desktop
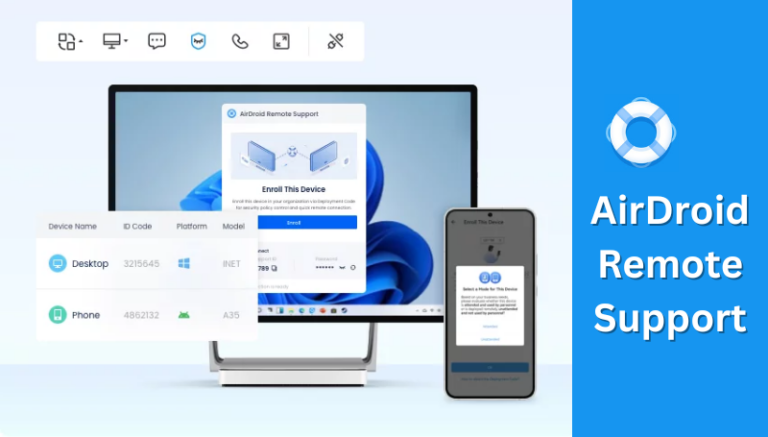
If you have tried all the checks but still cannot solve the Remote Desktop not working issue, or the remote desktop issues occur frequently, you can use a better alternative. We recommend AirDroid Remote Support—a secure, stable, and easy-to-use solution designed to remote access and troubleshoot any desktop or mobile device.
Compared to Remote Desktop, AirDroid Remote Support offers a seamless solution to remote control devices without any connection complications.
Key Features of AirDroid Remote Support
- Remote control Windows, iOS, and Android devices.
- Text and voice chat during a remote session.
- Unattended remote access
- Black screen mode
- Log remote sessions
- Industry-leading security (AES 256-bit encryption, TLS 1.2, etc.)
Steps to use AirDroid Remote Support:
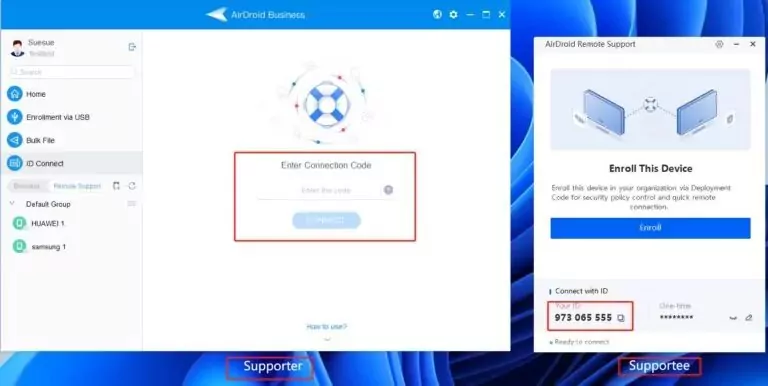
- Step 1.Install and launch AirDroid Remote Support on the remote computer. Install and launch AirDroid Business on the local computer.
- Step 2.On the remote computer, you will see a 9-digit ID displayed within the AirDroid Remote Support app. Copy this ID.
- Step 3.On the local computer, go to ID connect section. Enter the 9-digit code and click Connect.
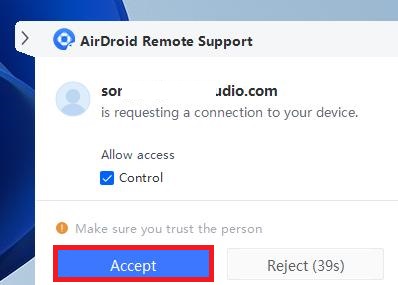
- Step 4.On the remote computer, click Accept from the pop-up window to establish the connection.
Conclusion
Remote Desktop not working can occur for multiple reasons, as discussed above. However, it is fixable if you know the root cause of the issue. So, you have two options: spend your time and effort in resolving the Remote Desktop issue or opt for a better alternative. Simply put, if you want to have a full-fledged remote access experience without struggling with Remote Desktop issues, download AirDroid Remote Support and get started!


Leave a Reply.