Android Kiosk Mode: Definition & Set Up Guide for Tablets/Phones
Android kiosk mode is built to restrict device usage, with limitations varying based on different scenarios.
For example, users may want to lock an Android device on an application when lending it to a friend, so as to prevent access to private content.
Enterprises are looking for a way to lock multiple Android devices into kiosk mode for business operations.
Let's discuss the details of different Android kiosk mode.
1 What is Android Kiosk Mode?
Android kiosk mode is a feature that defines the content accessible on a device, lockdown Android devices only to run approved apps and websites.
Under kiosk mode, Android tablets/phones are limited to single app/website or a pre-defined set of apps/websites, users cannot access other apps and settings, making the devices purpose-built for a specific use. And prevent cyber risks and boost productivity by eliminating all unnecessary access.
1.1 Kiosk Mode Uses - Best Practices
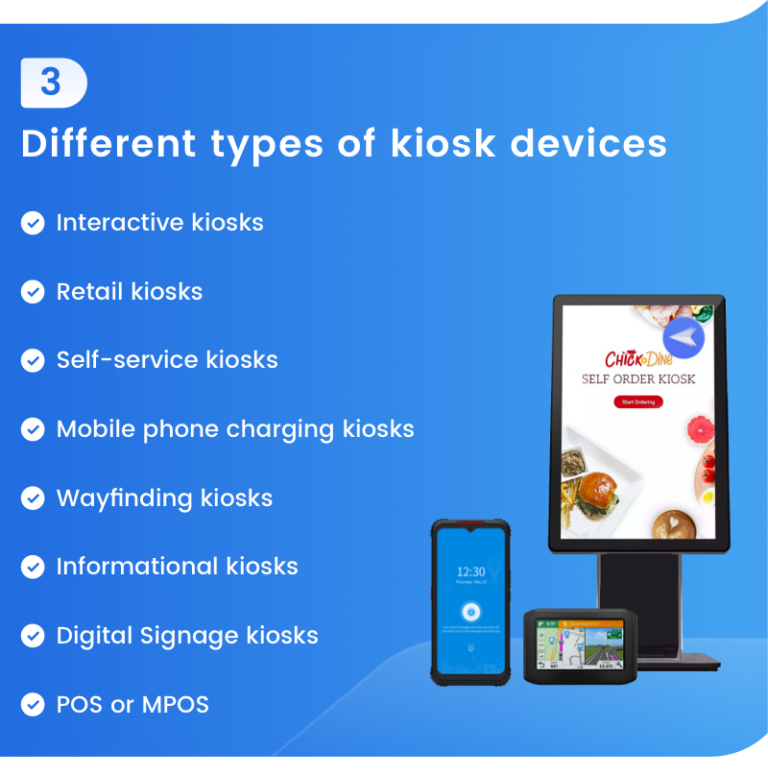
Kiosk mode for Android is beneficial in numerous ways. Different usage scenarios require different types of kiosk modes. Let's explore:
Android Kiosk Mode for Individuals
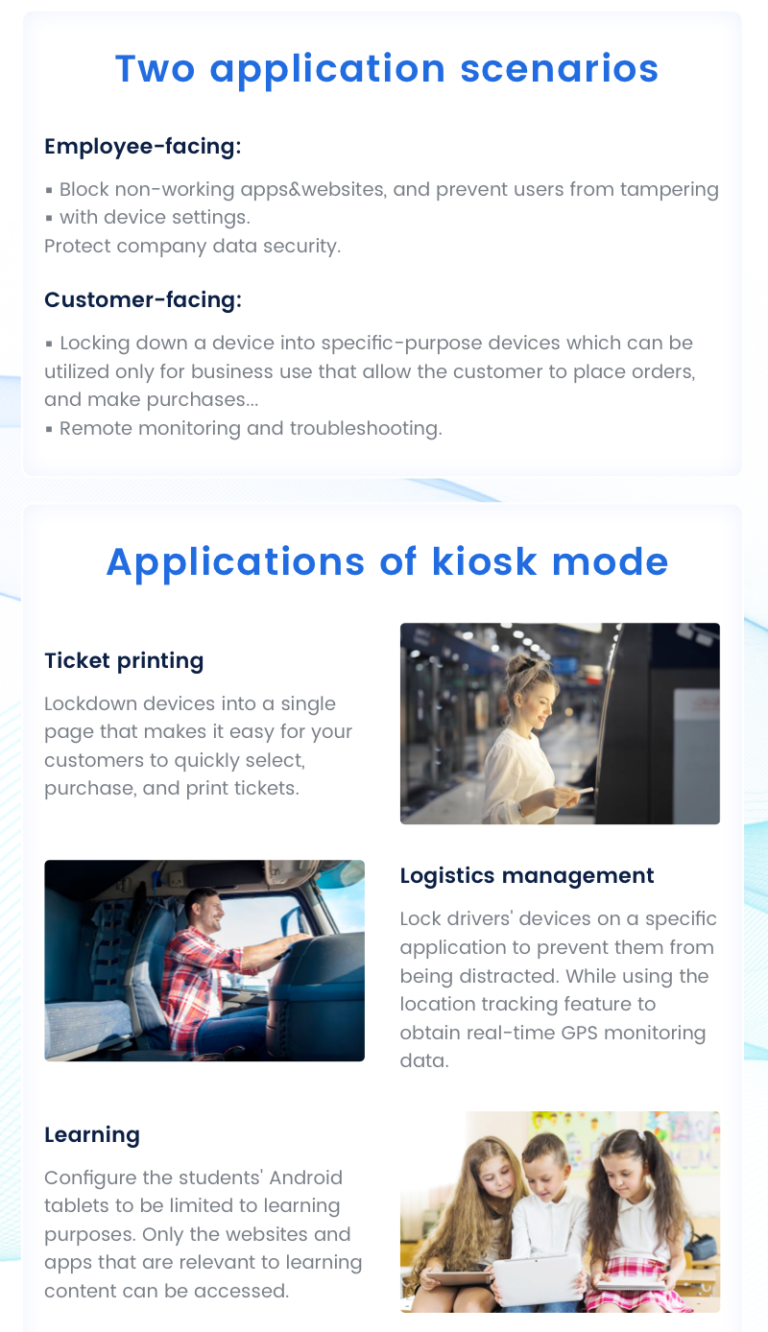
- Device lending: When you lend your device to someone for tasks like taking a picture or making a call, kiosk mode keeps your device locked within a specific app, preventing access to other content on your device.
- Help you child focus: Many students rely on Android tablets for their learning tasks, but parents worry about their children's self-discipline. Kiosk mode can lock the tablet to educational website(s), aiding children to concentrate on their assignments.
Android Kiosk Mode for Businesses
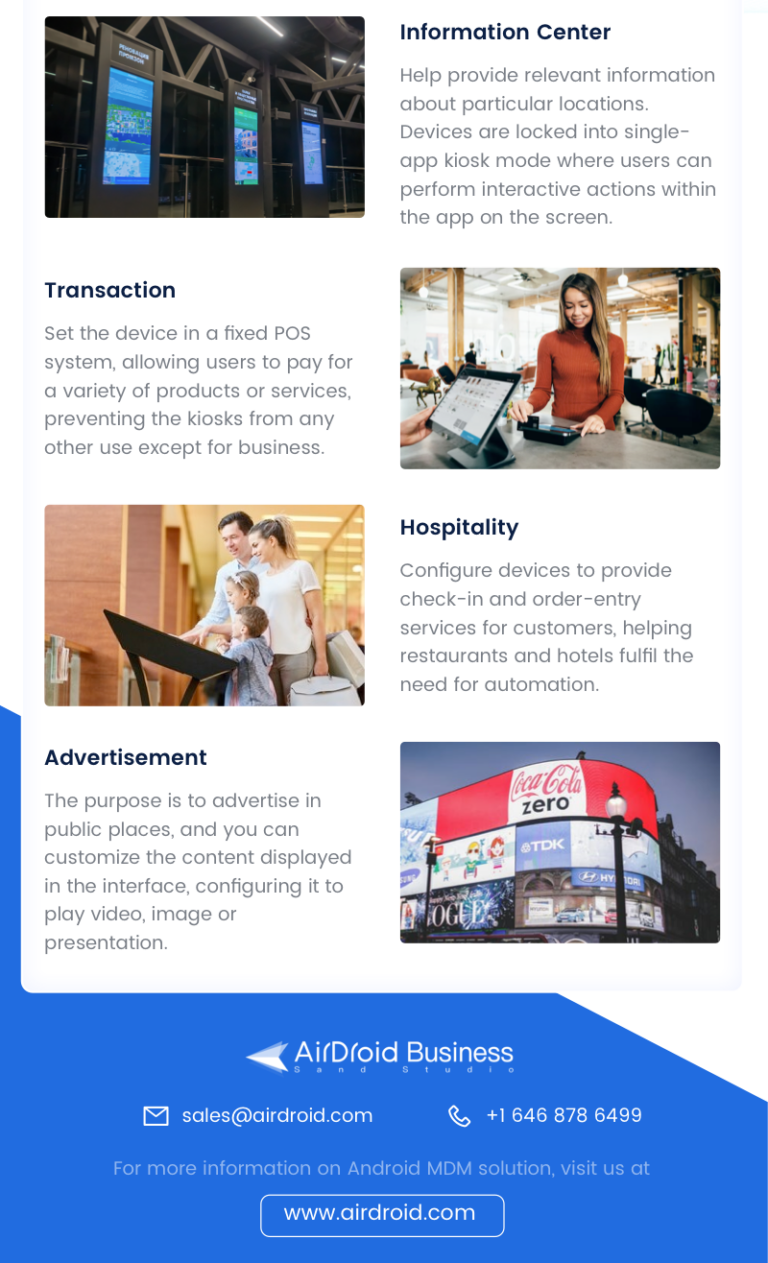
- Quick-service Restaurants: In fast-service restaurants, Android devices are configured as self-ordering Kiosks so that consumers may place orders for rapid service.
Similarly, there are Android tablets set up in Kiosk mode to handle transactions and create invoices. Customers may order and get meals without interacting with workers. It aids in reducing mistakes and enhancing the user experience. - Retailers: Retailers use Android tablet Kiosk to enhance customer experience and streamline operations.
In electronic retail, tablets are set up as demos with limited apps, such as the camera, allowing customers to test features.
In supermarket, tablets enable product selection, price viewing, online purchasing, and bill payment, restricted to retail services only. - Hospitality: Hotels providing high-quality services use Android Kiosk to save customers time for check-in and check-out. These Kiosks can also help check the details of all the services that a specific hotel provides, like the type of rooms, prices, and other services.
With this Kiosk workload of the hotel management will be reduced, and secondly, the customer will also be satisfied with the quick and managed services of the hotel.
1.2 Common Settings Provided by MDM Kiosk Mode
Single-app/Multi-app/Browser Lockdown
MDM Kiosk mode provides the facility to apply single-app or multi-app mode on Android devices to limit the users only to those selected apps. And kiosk browser provides a safe browsing environment by setting the website permission lists and customizing the browser setting.
Custom Brand and Layout
Kiosk mode also helps in the advertisement of company brands. Some Kiosks are developed specifically to promote a brand or a product. Businesses can set an interface with a company theme or play a video to promote their products using a Kiosk mode.
Devices System Settings
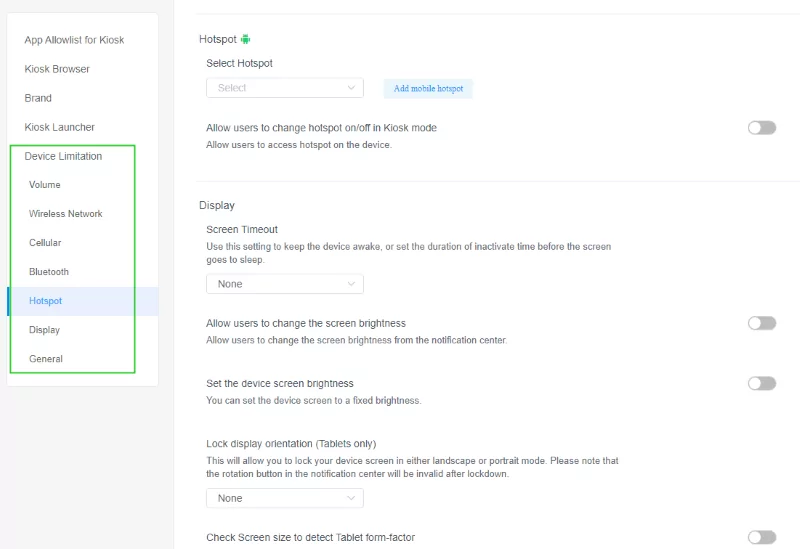
The admin can manage the system settings remotely on the Kiosk devices. When Android kiosk mode is enabled, administrators have the ability to disable user access to settings and other device functionalities. They can choose to grant or restrict basic setting rights to the user, including Wi-Fi, Hotspot, Bluetooth, volume control, and more.
2 How to Set Up Kiosk Mode on Android Tablets and Phones?
In this section, we will introduce two methods to restrict Android device(s) into Kiosk mode. The first method is the built-in feature of Android devices - Screen Pinning, which is more suitable for personal use.
The second method employs a more secure and powerful Kiosk mode offered by an MDM solution, making it the preferred choice for business device lockdown.
| Screen Pinning | MDM Kiosk Mode | |
|---|---|---|
| Single-app Mode | ✔️ | ✔️ |
| Multi-app Mode | ❌ | ✔️ |
| Security | Without comprehensive security features | Advanced security features️ |
| Scope | Temporary control | Long-term |
| Full-screen Mode | ❌ | ✔️ |
| Customize Device Functions | ❌ | ✔️ |
| Auto-launch Kiosk App | ❌ | ✔️ |
| Block Access to Device Settings | ❌ | ✔️ |
2.1How to Set Up Android Kiosk Mode for Individuals
Most Android tablet or smartphone has a built-in Screen Pinning feature in its Settings. This method is probably a temporary way like used at home when parents have to hand over their smartphones to their kids for a specific purpose.
It enables the user to set a single-app kiosk mode and restrict the device to run only one approved app unless it is un-pinned using a specific code selected.
How to Set Up Screen Pinning?
To enable Screen pinning on an Android device, follow the following steps:
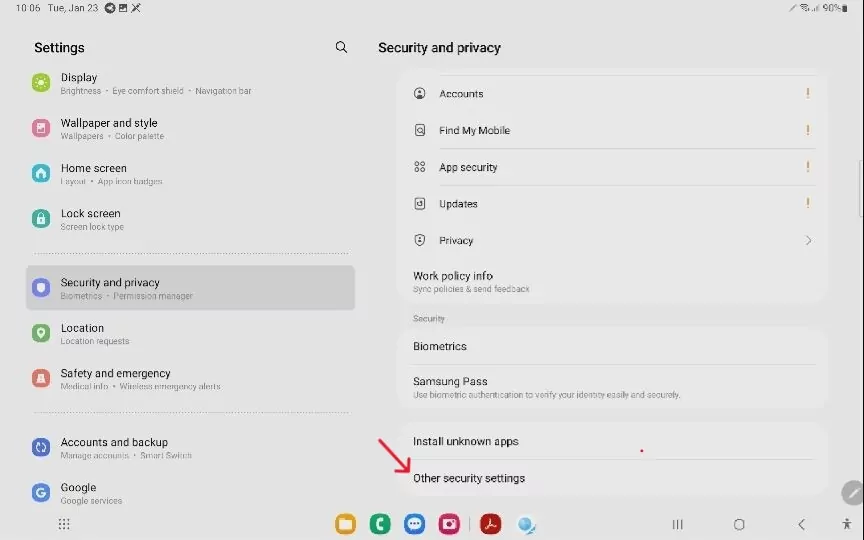
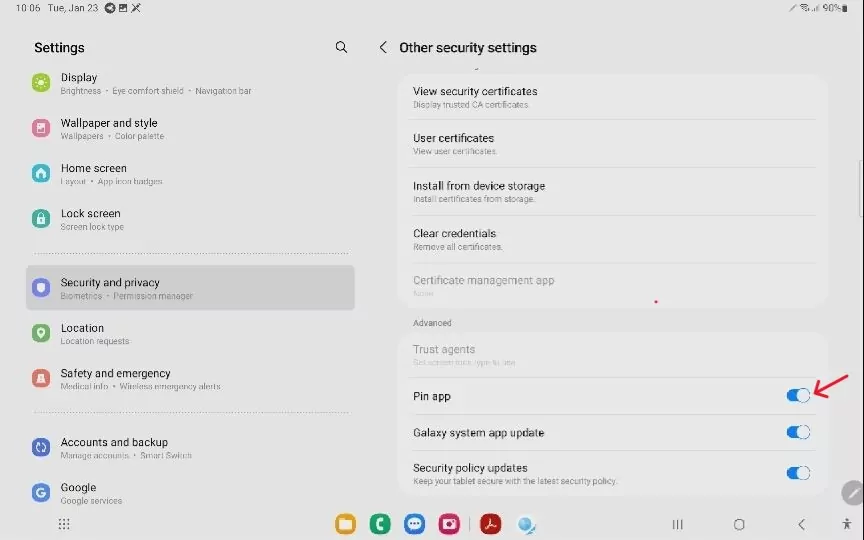
Go to “Settings” app on the Android device and then click on the “Security”/"Security & Privacy" tab. Then click on “Other Security Settings” to select “Screen Pinning” /"Pin Windows"/"Pin App".
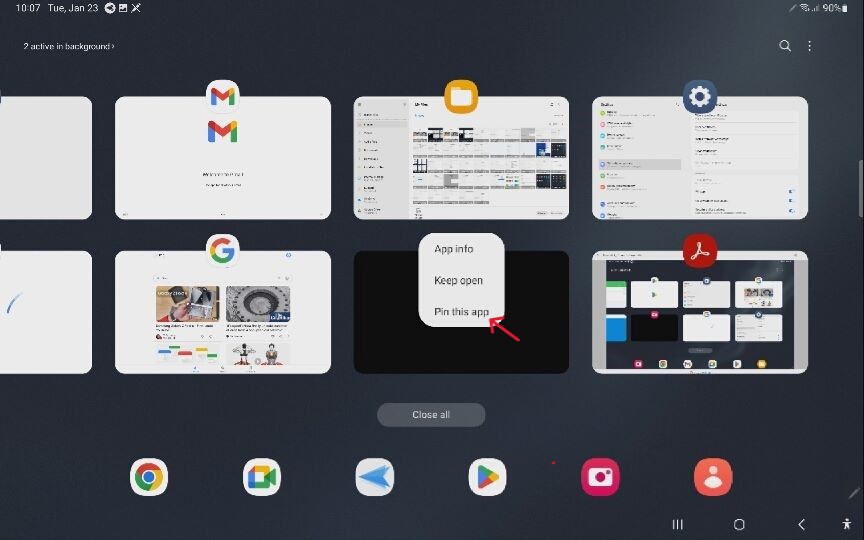
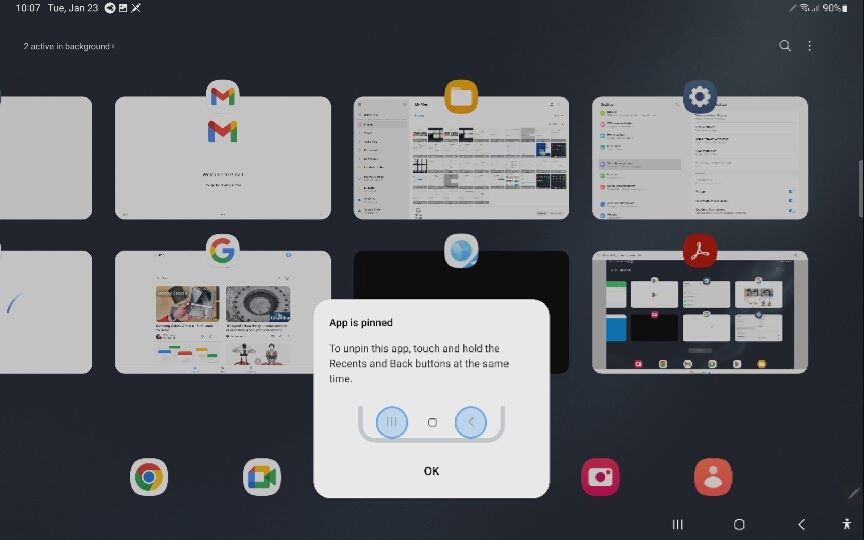
Click "Recents" button and click the app's icon that you want to pin.
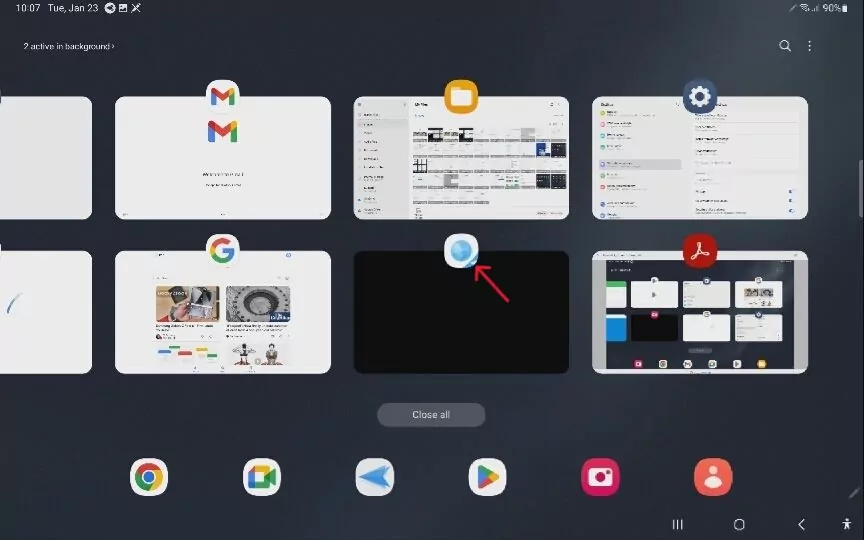

Click on the pin icon, then your Android tablet will be locked into kiosk mode.
- Businesses need a secure and permanent source for enabling Kiosk mode, while screen pinning is a temporary source with no security measures. Businesses need full security as they are attacked by expert hackers, so a secure system is always preferred.
- In screen pinning, users still can have the option to access other apps beyond the app we have selected, and secondly, app can move to the background to access the notifications. Confidential data can be breached quickly, even in Screen Pinning mode. Hence, the corporate sector is never recommended to use this method.
You can use gesture, two-button, or three-button navigation to unpin the device.
If the pop-up appears to enter the code or pattern, enter the code or pattern set while enabling the screen pinning. Screen Pinning will disable instantly.
To disable this feature, move to the “Settings” app and select “Security”. Then find the "pin app" button, and switch to disable the screen pinning on the device.
Sign up an AirDroid account and log into AirDroid Business admin console.
According to the device enrollment guide, please add all the Android devices you need to configure into kiosk mode to the dashboard of AirDroid Business and name the device group to facilitate subsequent management.
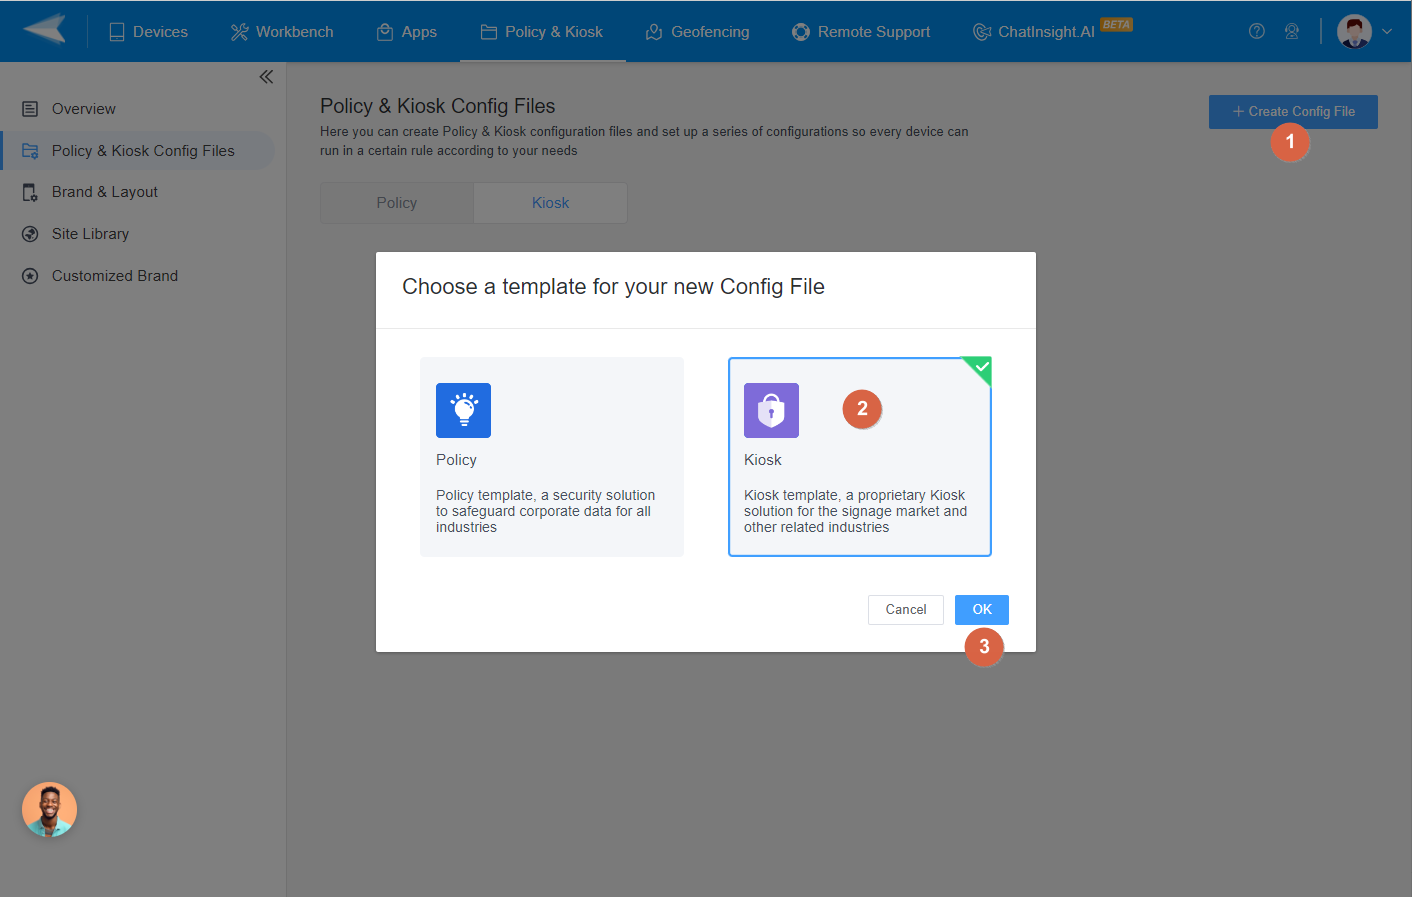
Navigate to the "Policy & Kiosk Config Files" tab and click "Create Config File." Choose "Kiosk" here.
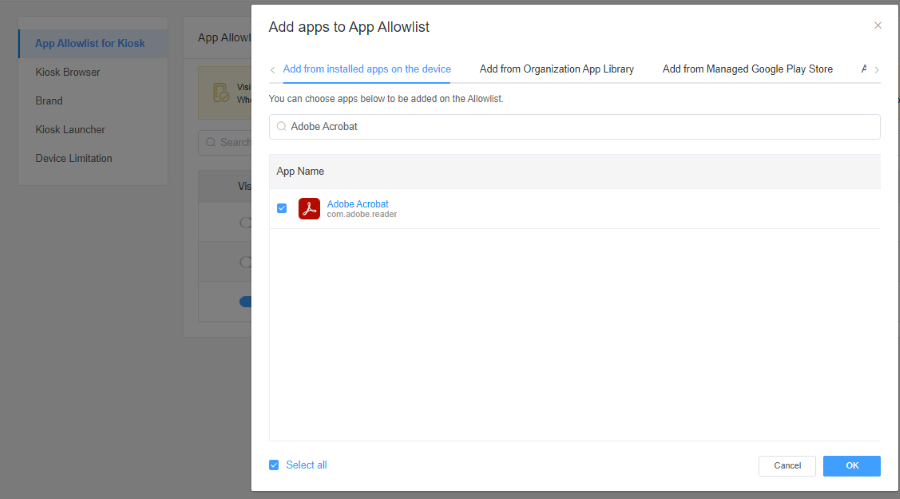
Click on the "Add App" icon to select the desired apps for the kiosk mode. You can navigate through the pages or use the search function to find the apps by name. Once you find the required app, click the select button to add it to the kiosk mode. Click "OK" to finish adding apps to the kiosk.
AirDroid Business enables the admin to select a single-app (Such as Chrome browser)/multi-app or specific websites to operate on Android devices under Kiosk mode.
Now specify device settings in the "Device Limitation." You can provide users with the basic rights for Volume, Wireless Network, Cellular, Hotspot, and more. Click "Next" and give a name and remark to this Config File. Set up a secure code that will be used to exit the configuration. Click "Save and Apply."
To assign the kiosk settings to your Android devices, find "Apply Config File to the following devices/groups." Tap on the "add" button and choose a device group. Once saved, the kiosk settings will be applied to all devices in the selected group. At the device end, the biz daemon app will automatically open and activate the kiosk mode. Your device will now function as kiosks with the configured apps and settings.
As Kiosks provide limited access, it's very important to focus on the first display on the Kiosk device. For example, in ATMs, the first display on the screen is a short introductory video of the bank and its basic information or includes the latest information about any promotion or service; after that user can access the account and perform further transactions.
Depending upon the Kiosk services and usage, guess an estimate of the number of users that need it at a certain time. Mostly one Kiosk device is operated by a single user at a time. There must be more than one Android Kiosk tablet in a restaurant to receive orders from the customers if there are many customers to deal with.
While using Android Kiosk mode, it's obvious to know where to store the data. Mostly the Kiosk devices are connected online, and the data is directly stored in the database for further processing. So, before setting up, it's necessary to finalize the data management process.
Many Kiosk devices are connected to a printer or external hardware to perform other operations like generating bills. Depending upon the use of the Kiosk, it's necessary to find out which hardware component is needed.
Why Is Screen Pinning Not Suitable for Business Purposes?:
How Do I Turn off Pinned Screen?
2.2 How to Set Up Android Kiosk Mode for Businesses
AirDroid Business MDM is an all-in-one solution that helps organizations fully control and manage their Android devices. IT admins can transform devices into single or multi-app kiosk modes, or a kiosk browser to run only approved content.
[Video Tutorial] Lock Android into Kiosk Mode with AirDroid Business
Setup Android Kiosk Mode with AirDroid Business
Single app mode: When creating the Kiosk Config File, select Kiosk Launcher and select “Single app”. Choose your target app from the app list and enable the 'Run Consistently' option to ensure that the app autostarts with the device reboot and restricts the user from exiting the app interface.
Website kiosk: To lock an Android tablet to a single website, first set your preferred browser (e.g., Chrome, Firefox) as the default app for single-app mode. Then, add the site link to the website allowlist.
Multi app mode: When creating the Kiosk Config File, select "App Allowlist for Kiosk" and add a group of apps that you want to run on your Android tablets.
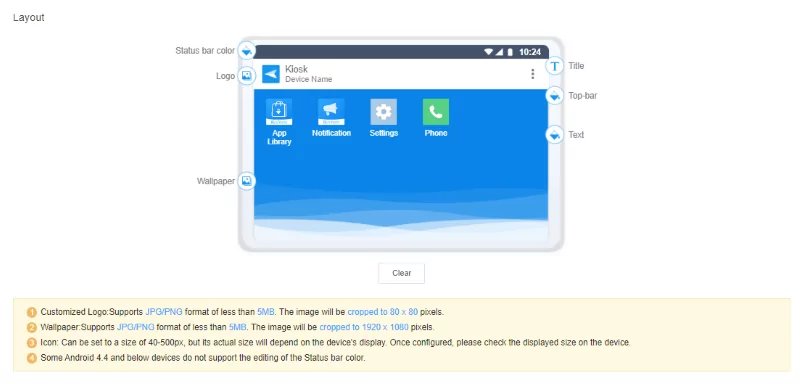
IT admins can also customize the device screen for brand promotions using company logos and themes in the background. With this Android kiosk software, System Settings are also efficiently configured remotely by the administrator.
3 Considerations for Setting Up Kiosk Mode on Android
Let's discuss the five crucial points that need to be considered before setting up the Android MDM kiosk mode:
5 FAQs
Closing
We outlines two methods for enabling kiosk mode on Android devices, each suited to different scenarios. Screen Pinning is an integrated Android feature that allows a single-app kiosk mode, ideal for personal use where security is not a concern.
The other method, AirDroid Business MDM, is better suited for enterprises. AirDroid Business allows organizations to configure and manage mobile devices to meet all operational needs. Besides Kiosk mode, it provides various management and control features to support mobile operations.
INFOGRAPHIC


Leave a Reply.