How to Whitelist Websites: A Step-by-Step Guide for Different OS, Browsers, and Third-Party Apps
Finding a straightforward way to manage website access across devices can feel like a struggle. Whether you’re trying to keep kids safe online or lock down a company network running Windows, macOS, and mobile platforms, controlling web traffic is essential yet complicated.
Malicious websites, phishing scams, and pop-ups add to the frustration, so you need a reliable solution. Website whitelisting delivers precisely that: it allows only approved URLs to load and blocks everything else. In this guide, we’ll explore why whitelisting matters and walk you through steps to implement it, making administration simpler and strengthening your security.
To whitelist websites on Android, there are generally three main approaches:
- Browser-Specific Settings/Extensions: Best for personal devices or light management, allowing you to whitelist sites directly within browsers like Chrome or Firefox using their permission settings or ad-blocker exception lists.
- Third-Party MDM or Security Software: Ideal for comprehensive control in enterprise scenarios (e.g., AirDroid Business), enabling device-wide restriction of website access across all browsers.
- System Parental Controls/Digital Wellbeing: Built-in Android features that can offer website whitelisting, though their availability and capabilities depend on the Android version and device manufacturer.
1How to Whitelist Websites on Different Systems?
Now that you know a thing or two about how to whitelist websites, you’re probably wondering how you can implement this restriction on your device.
Let’s look at some of the best methods to whitelist websites on Android, Windows, macOS, and iOS:
For Windows:
If you are targeting a Windows device, you can whitelist websites through firewall in built-in settings. In this method, firewall built-in features let you whitelist a website on Windows by adjusting the inbound and outbound rules specific to that website. The steps are illustrated below.
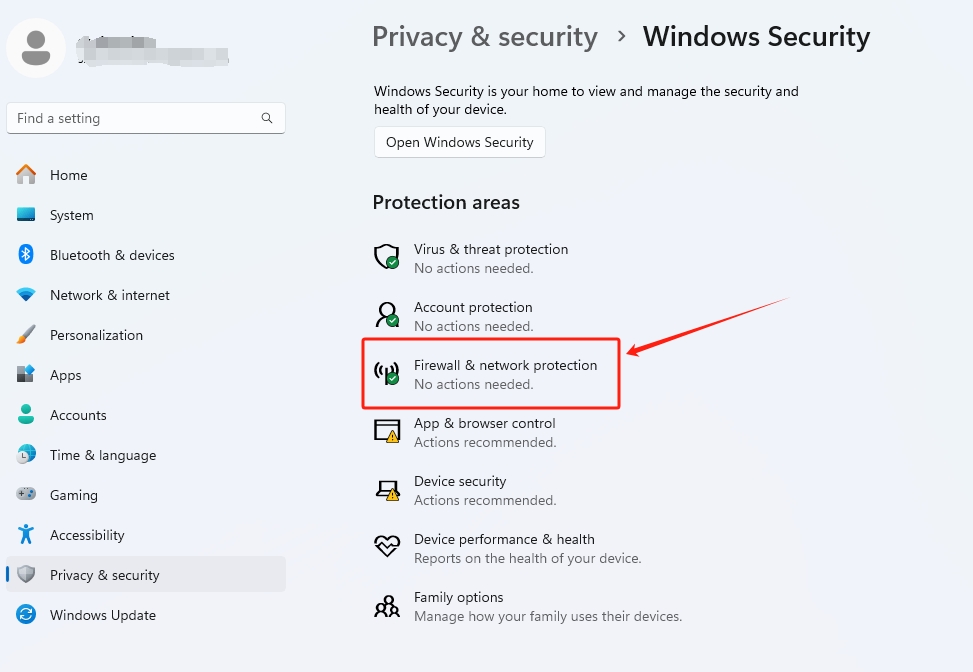
Step 1. Open the Startup menu on your Windows then proceed to the “Windows Security” section. In the Windows Security screen, choose the “Firewall & Network Protection” option.
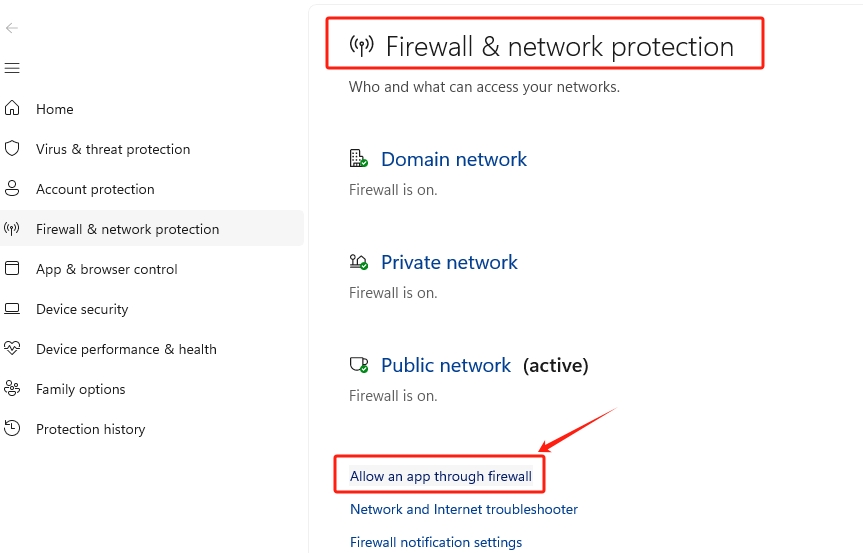
Step 2. Now, click the “Allow an app through the firewall” option to access and modify the websites allowed by the firewall.
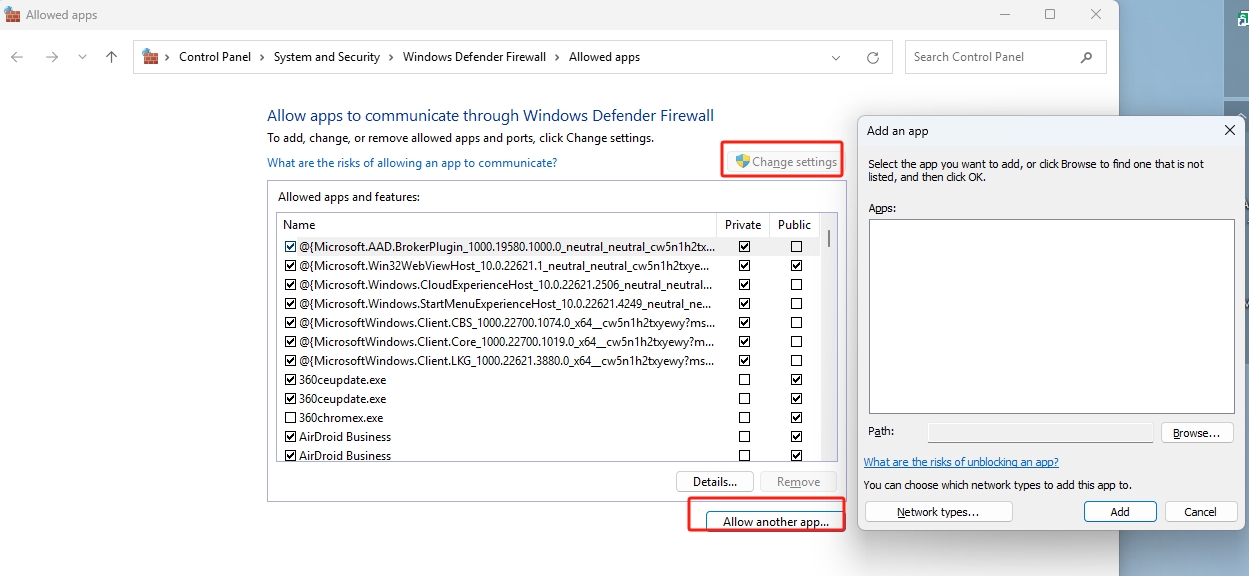
Step 3. Select the “Change Settings” link then click the “Allow another app” option. Now browse and choose the browser you want to put in the list.
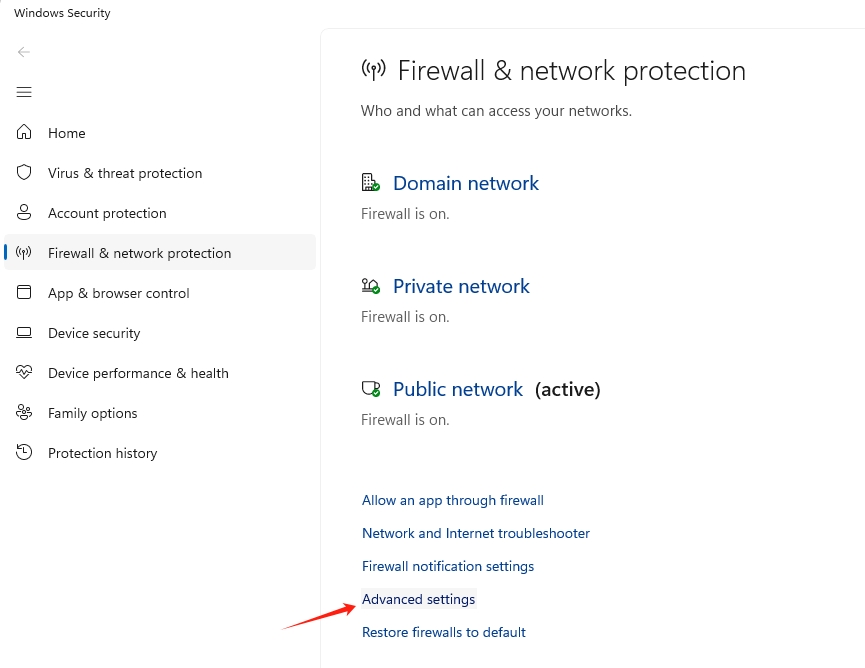
Step 4. Go back to the Windows Security screen and click the “Advanced Settings” link. Create inbound and outbound rules for the specific URL of the website you want to whitelist and give permissions.
- Step 1
- Step 2
- Step 3
- Step 4
For Android:
Using Built-In Android Settings (Indirect Whitelisting)
Some Android versions include content-restriction options buried in Settings—often under Security & Privacy, Digital Wellbeing, or a content filter or browser restriction section. These tools usually let you block unwanted sites or whole content categories. If you block the websites you don’t want, anything left unblocked becomes your whitelist. One catch: feature names and menu locations vary widely across manufacturers and different Android releases, so you might need to do some digging to find them.
Remember to test your settings after setup to make sure only approved sites load.
For iOS & macOS(Through Screen Time):
Screen Time is the feature in iOS and macOS built-in settings that allows you to set limits for app usage. You can also use it to whitelist websites on your iOS and macOS as illustrated below.
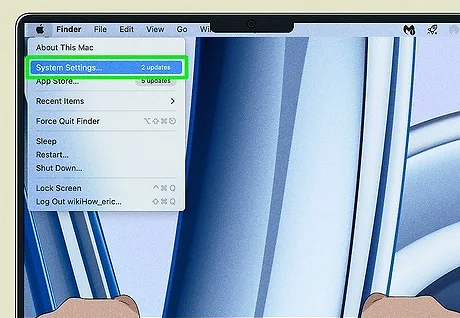
- Step 1.On your Mac, click the “Apple” icon and choose “System Settings”.
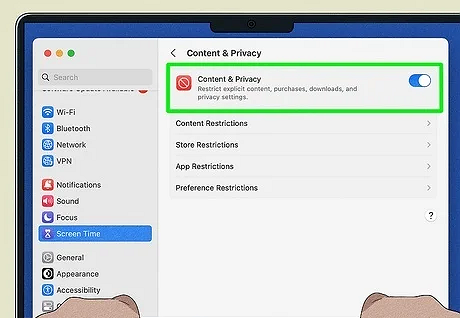
- Step 2.Select “Screen Time” followed by “Content & Privacy” and then “Content Restrictions”.
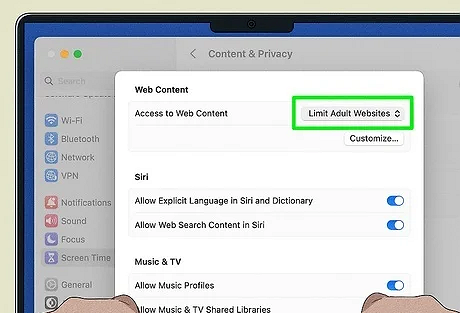
- Step 3. In the “Web Content” screen, choose “Allowed Websites Only” or “Limit Adult Website” followed by “Customize”.
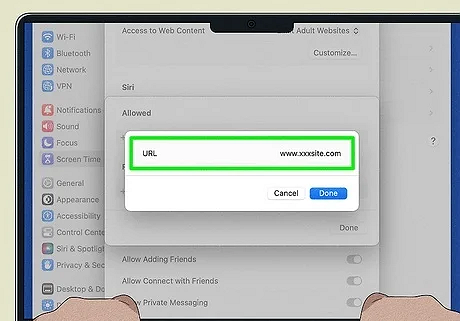
- Step 4. Next, click the “Add” button to add the URL of the website you want to whitelist. Click “Done” to complete.
- Step 1
- Step 2
- Step 3
- Step 4
2How to Whitelist Websites on Different Browsers?
1Whitelist Websites in Chrome
Google Chrome browser provides a simple way to put a website into Chrome whitelist websites. This method uses the Chrome settings as illustrated.
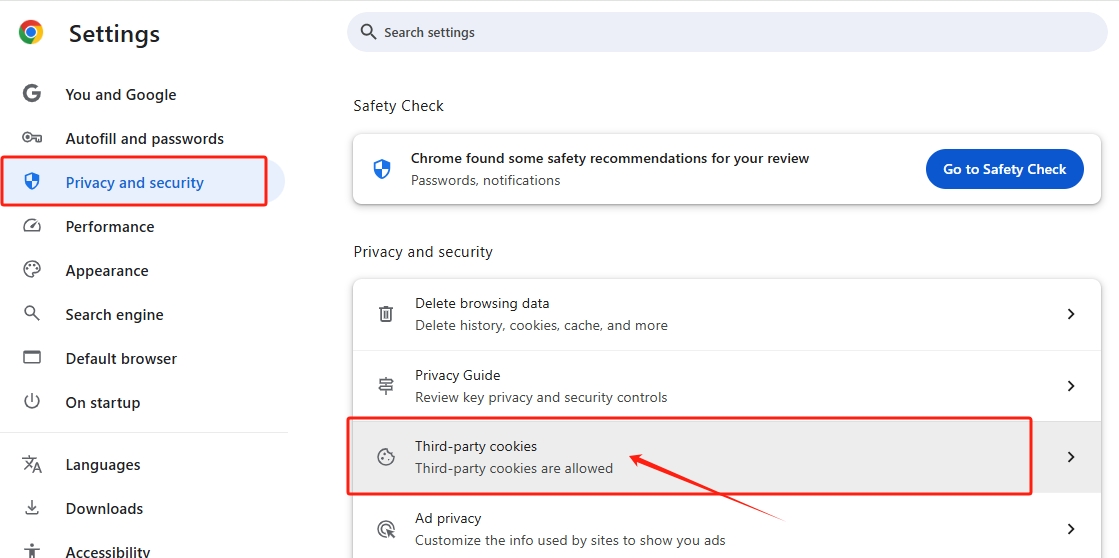
- Step 1. Open Google Chrome on your target device. Click the three vertical dots in the top-right corner and select “Settings” from the dropdown menu. In the Settings window, scroll down the left pane and click the “Privacy and Security” tab. Next, select “Third-party cookies”.
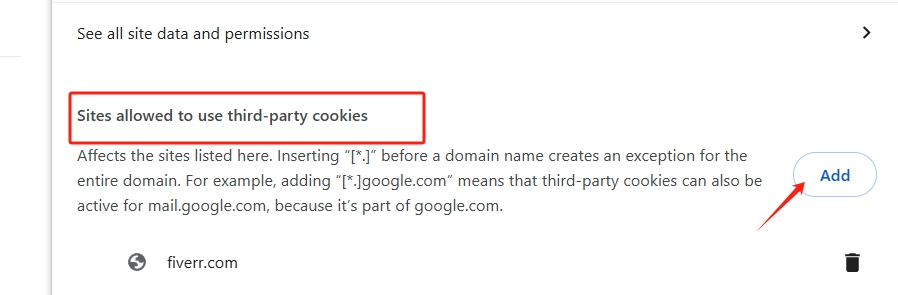
- Step 2. Next, select “Sites allowed to use third-party cookies” and click the “Add” option.
- Step 3. Paste the URL of the site you want to whitelist in the format illustrated below then click “Add” to add this website to your whitelist on your Chrome browser.

- Step 1
- Step 2
- Step 3
2Whitelist Websites in Microsoft Edge
Microsoft Edge is one of the most popular browsers that provide built-in features to whitelist websites. Just like in Chrome, you will use this browser’s settings to add desired websites to your whitelist. The most popular way to whitelist websites in Microsoft Edge is through the Family mode. This makes it suitable to protect kids from accessing malicious or inappropriate websites. The steps are illustrated below.
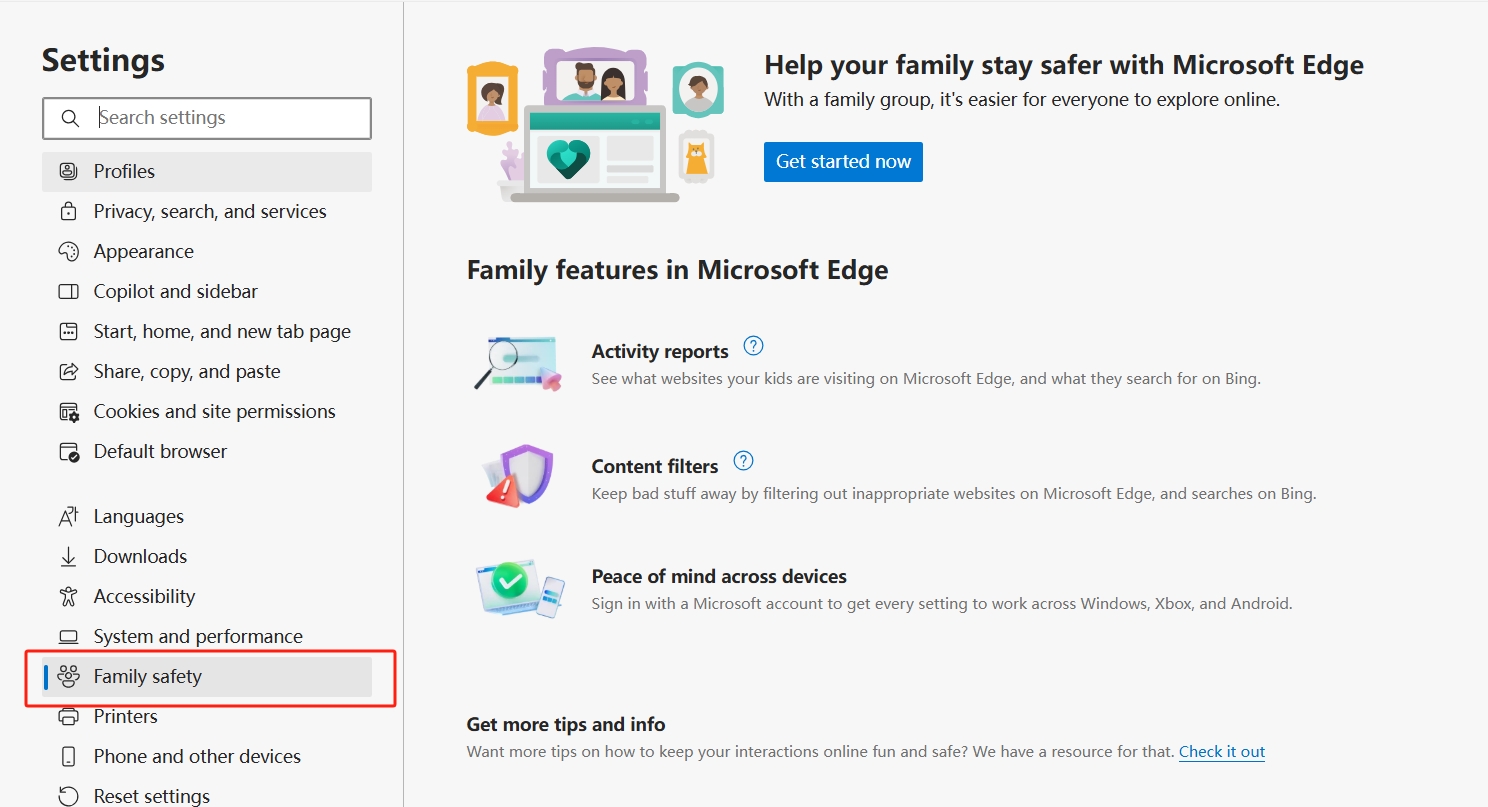
- Step 1. Open the Microsoft Edge browser and your computer and click the three horizontal dots at the top-right corner. On the left edge of the next window, click the “Family” tab then choose the “Managed allowed sites in kids mode”.
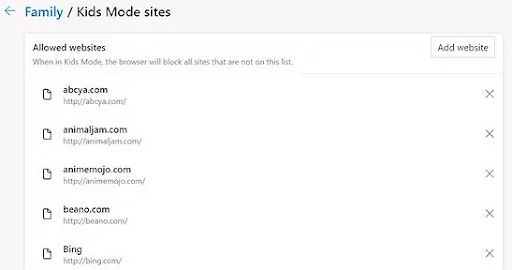
- Step 2. You should now enter the “Family/Kids Mode sites” section. Here, just click the “Add website” button and enter the URL of the website you want to whitelist.
- Step 1
- Step 2
The website should now enter into your edge whitelist websites.
3Whitelist Websites in Firefox
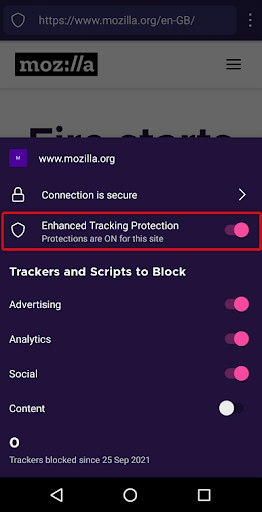
Firefox browser provides one of the easiest ways to whitelist websites. Here, you turn off the enhanced tracking protection feature on the website you want to add to the blacklist. With this feature off, the tracking protection on Firefox will remain off as long as you are using a whitelisted website. The following steps show how to put a website into Firefox whitelist websites whitelist.
- Step 1. Open the Firefox browser on your device and visit the website you want to add to your white list.
- Step 2. Click the icon that resembles a shield on the left of your address bar.
- Step 3. From the options displayed, toggle to disable the “Enhanced Tracking Protection” option. This will turn off the protection to that site and you can visit it without restrictions.

4Whitelist Websites in Safari
If you are targeting a Mac or IOS device browser, Safari is probably the browser you will want to deal with. While Safari browser does not provide “Trusted Sites” settings like other browsers, you can still navigate and add a website to your whitelist by removing some restrictions like pop-up windows as illustrated below.
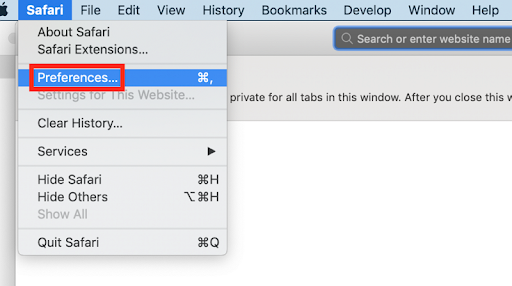
- Step 1. Open the website you want to whitelist in Safari. Click the “Safari” tab and choose the “Preferences” option.
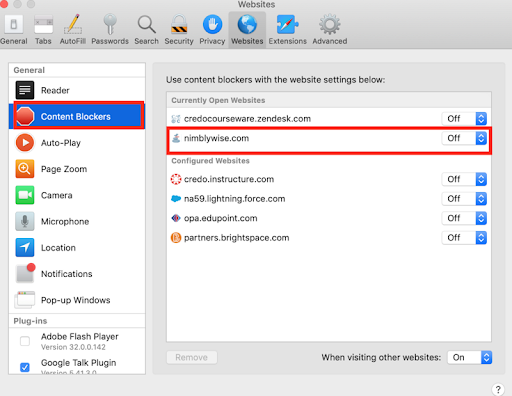
- Step 2. In the next screen, choose the “Content Blocker” tab and select the active website you want to add to your whitelist. Click the drop-down arrow and turn it off.
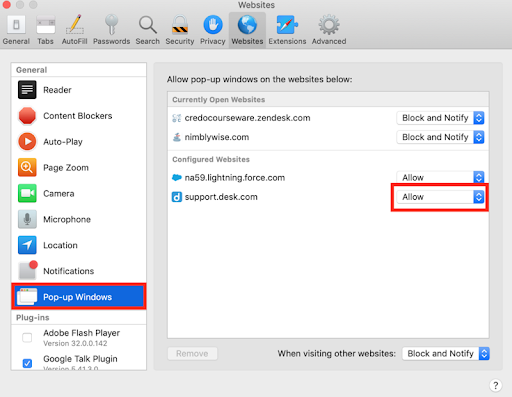
- Step 3. Next, click the “Pop-up Windows” tab and select the “Allow” tab on the name of the respective website.
This will allow pop-up windows on this website whenever you visit it. You won’t be restricted when visiting this website and hence fall into your allow list.
- Step 1
- Step 2
- Step 3
3Beyond Basic Settings: Limitations of Manual Whitelisting
While setting up whitelists directly in browsers (like Safari, Chrome, etc.) or through basic OS settings seems straightforward, these methods carry significant limitations and risks, especially in complex or organizational environments.
Inconsistent & Incomplete Coverage
Rules you create in one browser won’t apply to others, and matching configurations across Windows, macOS, Android and iOS is almost impossible. You end up with management blind spots that attackers can exploit.
Easily Bypassed
Relying on browser settings alone is risky. Tech-savvy users may disable extensions, alter settings, install an alternative browser or use VPNs to circumvent the restrictions, rendering your whitelist ineffective.
Manual Management Burden
Every approved site has to be added one by one. It’s time-consuming and prone to errors—miss a needed URL and legitimate services get blocked, forcing users to file requests and slowing down productivity.
Difficulty with Dynamic Needs
Modern business workflows often demand quick access to new tools and websites. Constantly updating your whitelist leads to delays, higher maintenance overhead and strained IT resources.
These challenges underline why basic, manual whitelisting often falls short and drive the shift toward more robust, centrally managed solutions. For these reasons, many teams are rapidly adopting centralized platforms that automate policy enforcement and reduce manual work.
4Recommended Whitelisting Tools: Personal and Enterprise Solutions
Choosing the right whitelisting approach depends on whether you’re securing a household or managing a wide fleet of devices in an enterprise. Below are my top recommendations for each scenario.
1Personal & Home Use
Using DNS Filter Apps (like personalDNSfilter)
You can use personalDNSfilter to manage DNS requests and whitelist specific websites by allowing only selected domains, while blocking or filtering others through downloaded lists or manual rules.
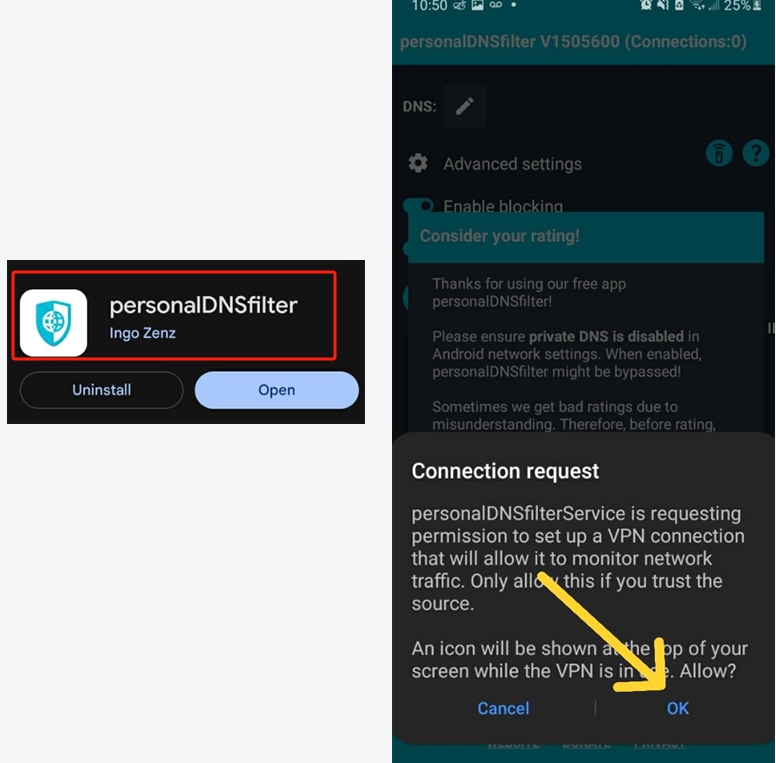
1. Install and Grant VPN Permission: First, head over to Google Play—find and install personalDNSfilter. Open it, and when that “Connection request” pop‑up appears, tap OK.
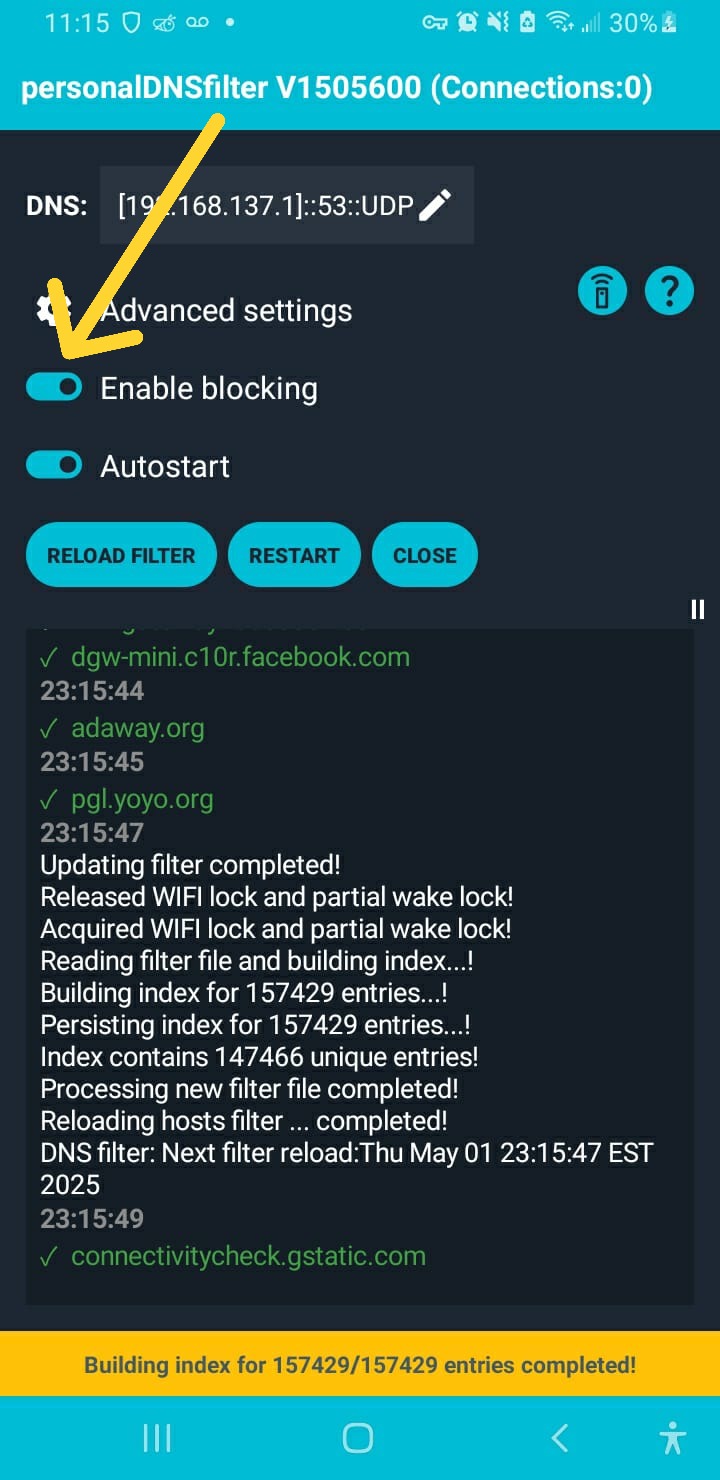
2. Enable Filtering & Check Private DNS: On the app's main screen, ensure the main "Enable blocking" toggle switch is turned ON.
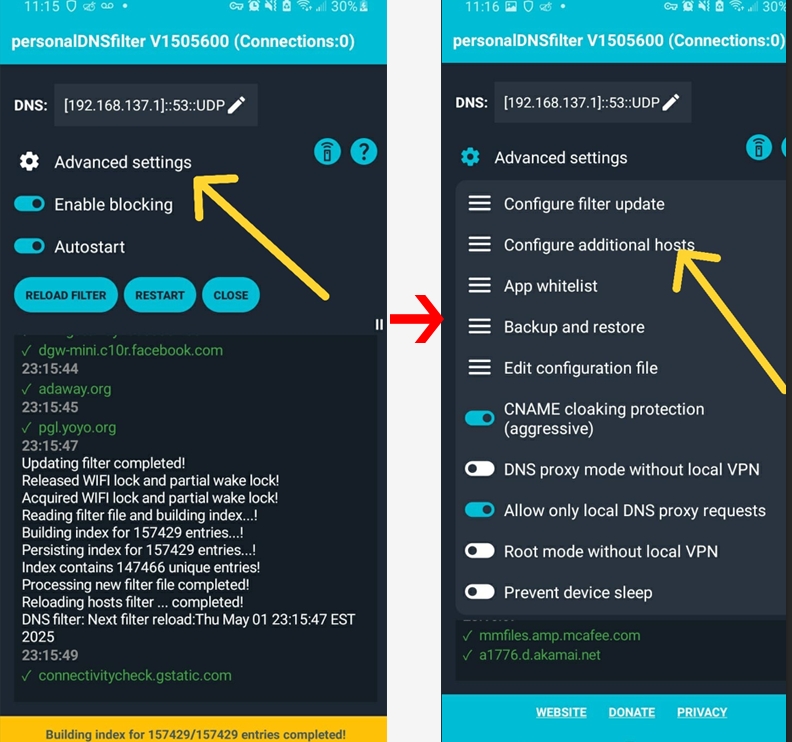
3. Access Manual Host Configuration: From the main interface, tap Advanced settings, then select “Configure additional hosts.” A simple editor screen will pop up; this is where you customize your DNS rules.
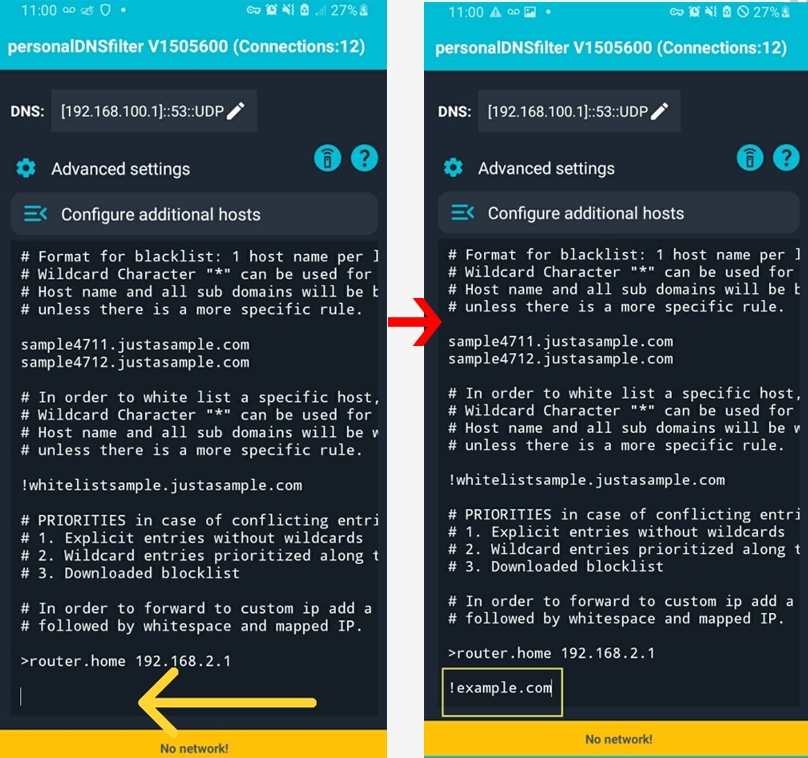
4. Add Whitelist Rules: To whitelist a domain, add a new line starting with an exclamation mark (!) immediately followed by the site name—no spaces. Each entry goes on its own line.
Example: !example.com
- Step 1
- Step 2
- Step 3
- Step 4
How it Works
personalDNSfilter sets up a VPN tunnel on your device, intercepts all DNS lookups, and applies filter lists you’ve downloaded. The Configure additional hosts screen lets you override those filters:
● Prefix with (!) and the domain is always allowed.
● No prefix means the domain is blocked.
● Prefix with (>) reroutes queries to the IP you specify.
● Keep Private DNS off—otherwise, your custom rules won’t apply.
2Enterprise-Grade Solutions
If you’re running an organization and you’re using mobile devices for work, then you can use a good MDM (Mobile Device Management) software to whitelist websites.
How can an MDM Solution help?
- MDM solutions like AirDroid Business let you create and deploy rules in Kiosk browser or Chrome browser for convenient website whitelisting.
- You can control your Android devices from different locations from a central computer. This gives you the visibility and flexibility to control and manage your enterprise Android devices.
- Besides, you can also use it to whitelist websites for your Windows devices, whether you are using Windows 10 or 11.
Option 1. Kiosk Browser: Full Control in Custom Browser Environments
When implementing website whitelisting, Kiosk Browser is more suitable for scenarios like public information displays or enterprise kiosks where a highly controlled browsing environment is needed, allowing only specific sites to be accessed. It creates a locked-down browser interface that prevents users from navigating to any websites not on the whitelist, ensuring focus on designated content.
- Step 1. Sign up your account in AirDroid Business and enroll the devices that you want to whitelist the websites.
- Step 2. Go to Admin Console > Policy & Kiosk to create a kiosk file.
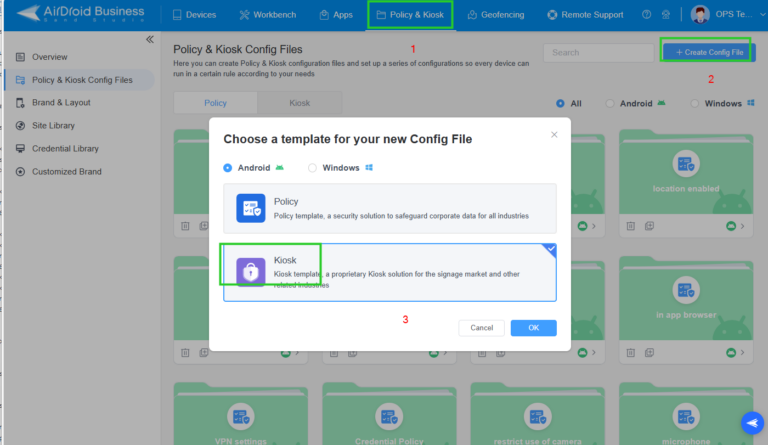

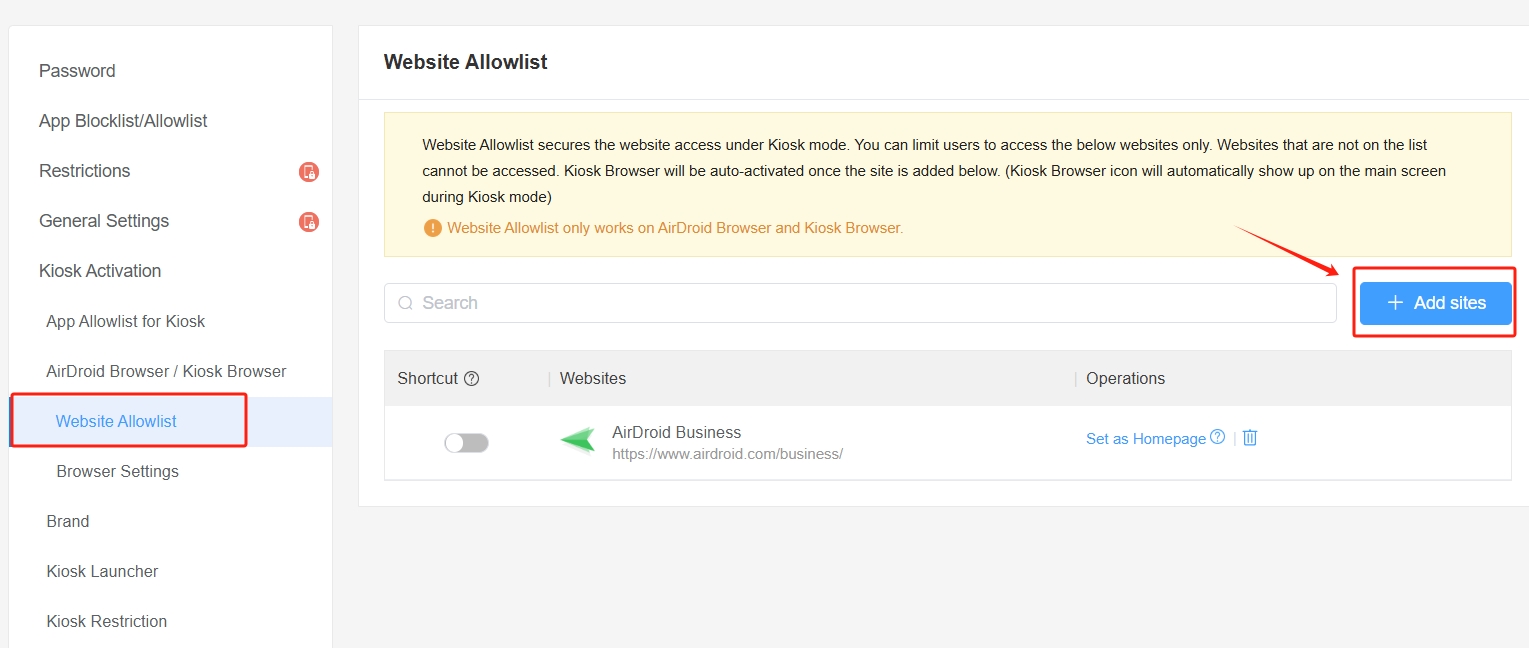
- Step 3. Navigate to Kiosk Browswer to add sites that you can to whitelist.

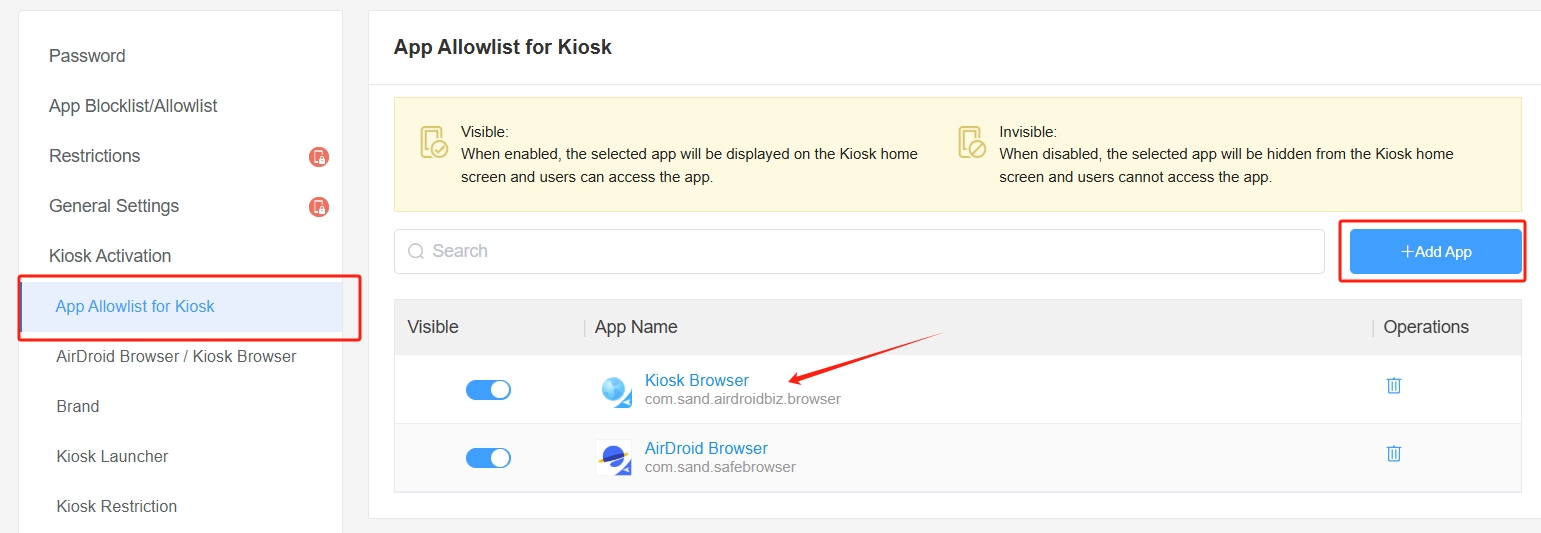
- Step 4. Add Kiosk Browser app to the allowlist, then save and apply the file to the devices.

Option 2. Chrome via Managed Play: Whitelisting Approved Websites
On the other hand, Managed Google Play with Chrome is better for enterprises that prefer to use the familiar Chrome browser while maintaining security and compliance. It allows IT admins to configure Chrome to only access approved URLs, blocking all others. This method is ideal when organizations want to leverage Chrome's features yet restrict access to certain websites.
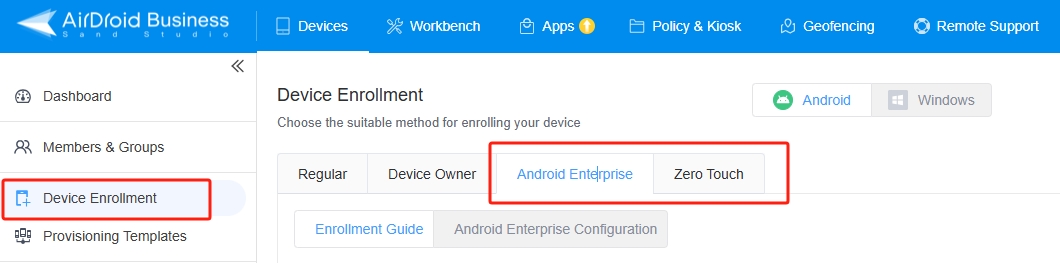
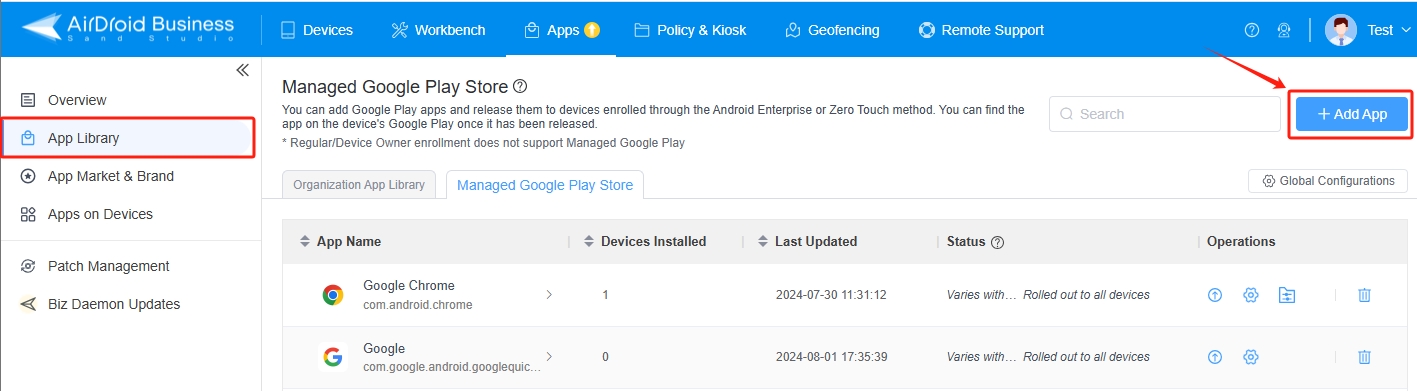
- Step 1. Enroll Devices via Android Enterprise or Zero-Touch enrollment.

- Step 2. Approve Chrome in the Managed Google Play Store as the only browser available.
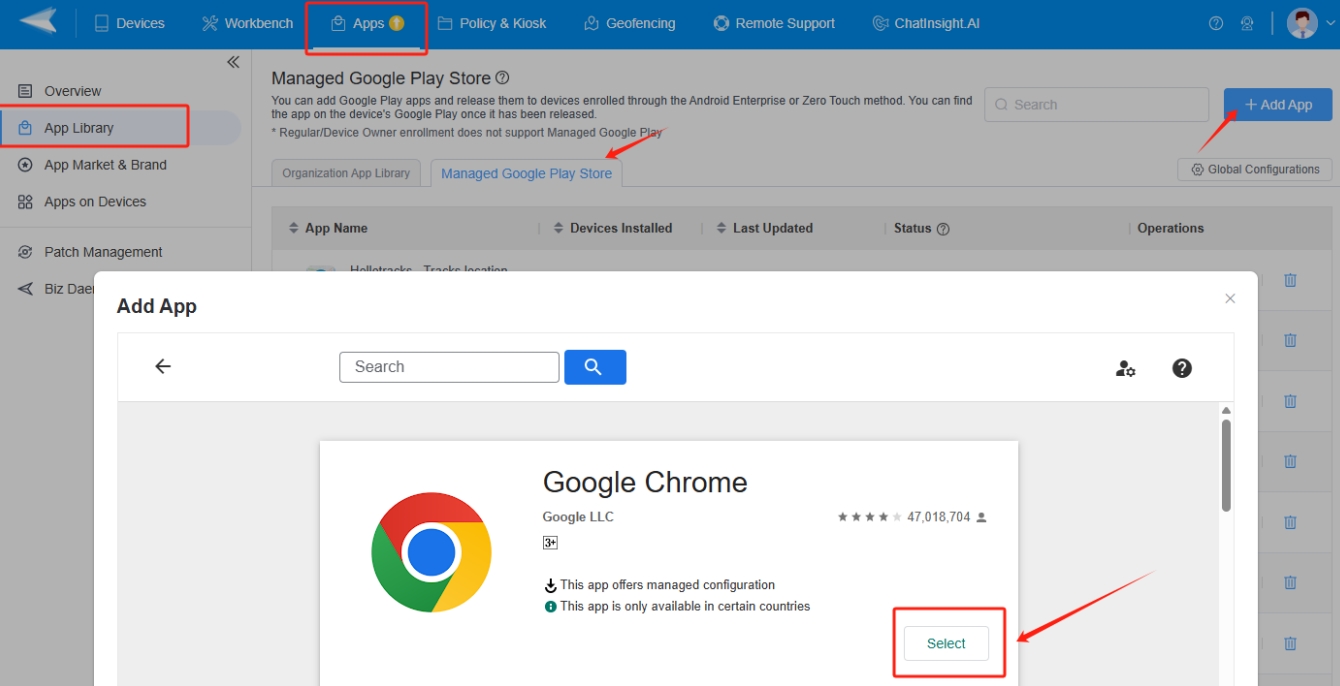

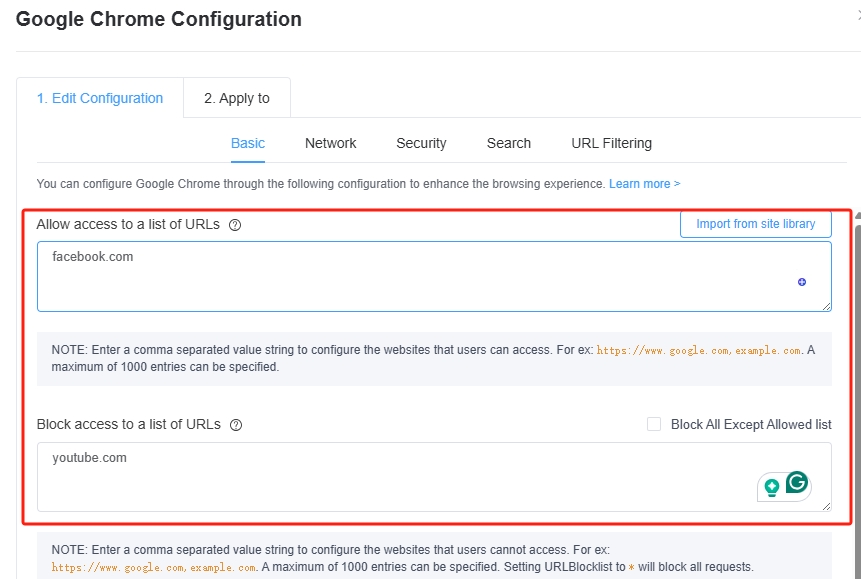
- Step 3. Configure Whitelist/Blacklist settings in the managed Play Store configuration for Chrome—list allowed URLs, block the rest.


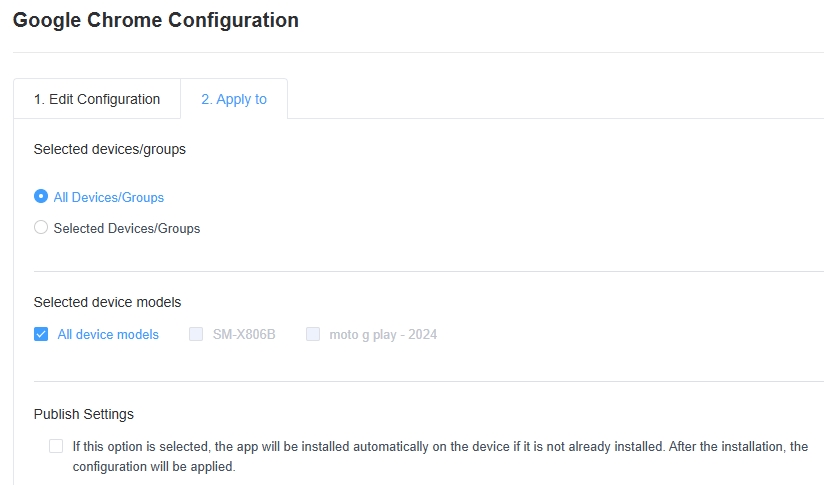
- Step 4. Deploy Policies from the AirDroid dashboard so every device receives the same rules instantly.

This setup locks down browsing, prevents unauthorized app installs and ensures policy consistency without manual work on each device.
By matching your environment to the right tool, you’ll cut down on administration overhead, improve compliance, and keep browsing safe wherever users roam.
5Bottom Line
Whitelisting websites on devices come with several benefits, especially, if you’re an enterprise looking to boost your cybersecurity defense and ramp up productivity. There are many ways to whitelist websites right from options like doing so directly from a browser. As an enterprise you can also use a good MDM solution like AirDroid Business to conveniently whitelist websites on multiple mobile devices at a go!
Related Questions about Whitelisting Websites
Whitelisting is often considered a more restrictive but potentially more secure approach because it only allows what is explicitly approved, reducing the attack surface for potential threats.


Leave a Reply.