How to Temporarily Disable Apps on iPhone
Apps are not turned off when you close them on the iPhone. These apps keep running in the background so that you can have live feedback on where you left off. It also means that your battery, memory, internet connection, other apps, and features on your phone linked to the app will remain active. To prevent these apps on your phone from working, you can temporarily disable them. Hence, you will find here 8 ways to disable apps on iPhone without uninstalling them.
- 8 Ways to Temporarily Disable Apps on iPhone
- Disable Apps vs. Delete Apps vs. Remove Apps on iPhone
- How to Enable Disabled Apps on iPhone
8 Ways to Temporarily Disable Apps on iPhone
To ensure that apps are thoroughly closed and they are not running in the background, this section of the article discusses how to temporarily disable them. These methods require different settings and are applicable for variant use cases.
1Offload the Apps
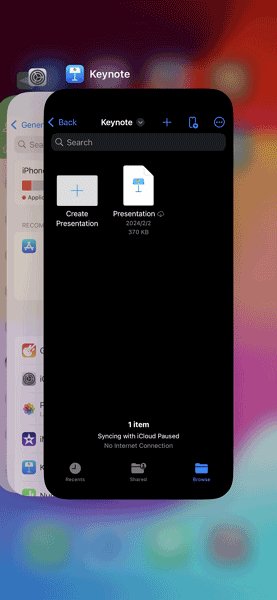
Offloading the app helps the user to free up space. It means uninstalling or deleting the app. However, the app's data is preserved. So, when you reinstall the app later, its information will not be lost. This method is best for freeing up space on your iPhone. This does not mean that the app is removed entirely. You will still see its icon on your device with a cloud icon on it. Here is how to offload apps.
- Open the Settings app on your device.
- Select the General option > iPhone Storage option.
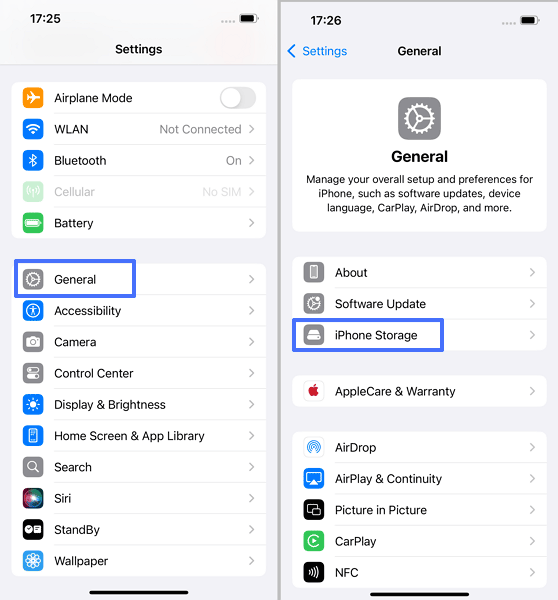

- Select the app you want to offload, for example, Keynote, tap the Offload App to complete the process. offload app Keynote
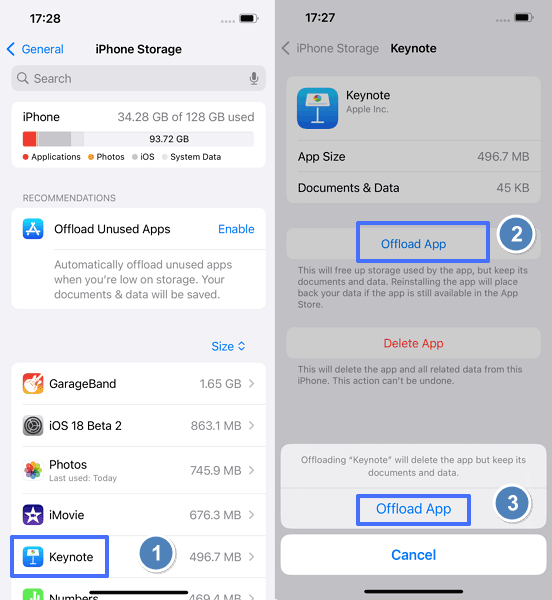

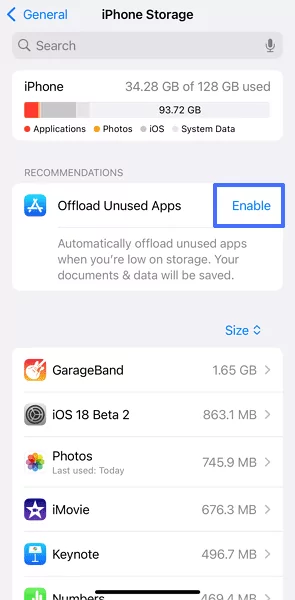
- You can also tap Enable beside Offload Unused Apps when you are in low storage.

2Force Quit the App and Turn Off Background App Refresh
Two processes are combined in this approach. First, you have to convincingly close running apps. That way, the apps will not be running in the background and they will not be consuming any resources. Thereafter, you will turn off the background app refresh feature. That way, you will ensure that apps are not restarted in the background. Below are the steps to follow.
Force Quit iPhone X and later versions
- Swipe up from the bottom of your screen and pause in the middle. You will see all apps that are runnuing.

- Swipe right or left to find the app among the reviews.
- Swipe up on the app’s preview to close it entirely.
Force Quit iPhone 8 and earlier versions
- Double-tap the Home button.
- Swipe right or left to find the app among the reviews.
- Swipe up on the app’s preview to close it entirely.
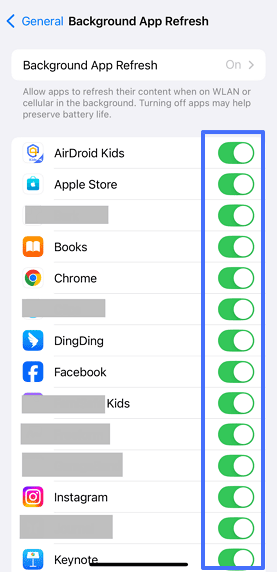
Turn Off the Background App Refresh
- Open the Settings app on your device and select the General option.
- Scroll down until you find the Background App Refresh option, tap on to open it.

- Click on Off to turn off Background App Refresh for all apps.
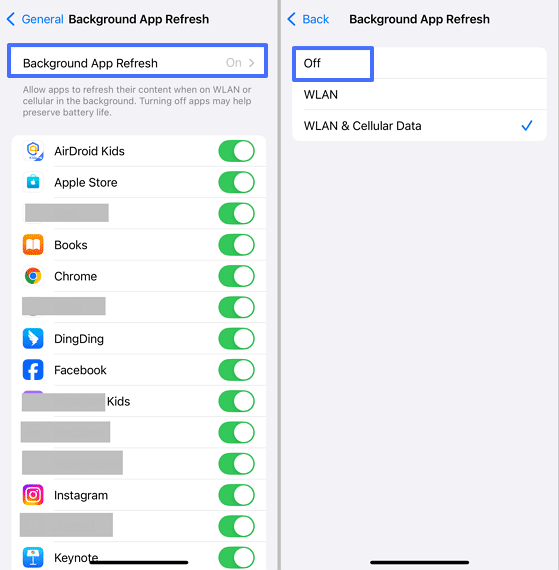

- If you only want to disable certain apps, toggle off the swith beside them.

3Disable App Permissions
This approach does not directly turn off an app like previous methods. However, it limits to the barest minimum the functions of the app by restricting its permissions. For instance, if a background app cannot access storage and cellular data, it may not work. By disabling permission, the app will be restricted in its background function. Here is how to disable security and privacy permission.
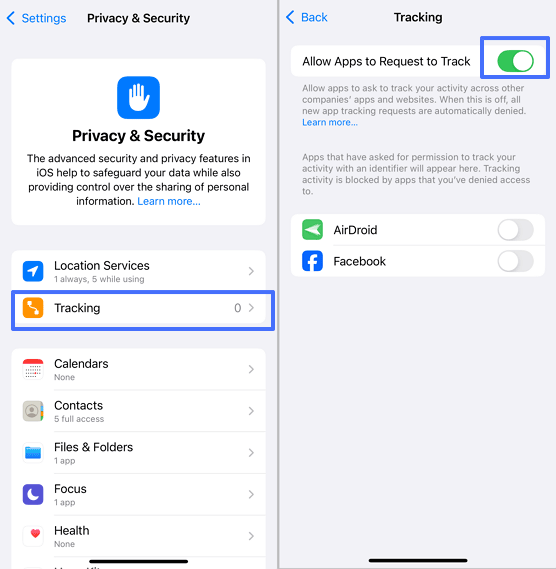
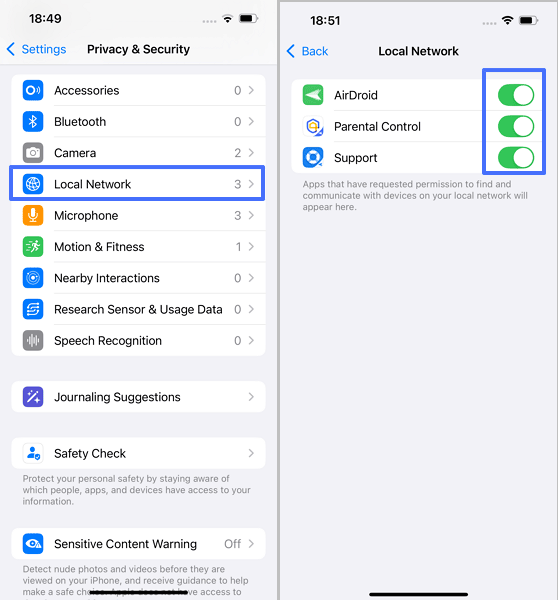
- Open the Settings app on your device and scroll down to select the Privacy & Security option.
- Select the permission type like Location Services and Tracking. You’d better tap Tracking to turn off “Allow Apps to Request to Track.” This will block apps from tracking your activity.

- You can also scroll down to customize other permission like Camera, Local Network, etc.
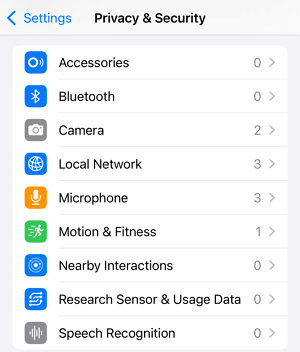

- For example, if you want to disable apps from accessing your Local Network. Tap on it and you will see all apps with that permission. Toggle off the switch beside the apps that you want to disbale.
4Focus Modes
Focus Mode helps you to turn off notifications and all forms of app alerts. Hence, you can use this feature by hiding notifications and limiting access to specific apps during certain periods. You can use it to set schedules or triggers for it to activate automatically. You can choose from any of the available options or create a custom profile that works for you. Here is how to use Focus Mode to deactivate apps on iPhone.
- Open the Settings app on your device.
- Select the Focus option.
- Select a Focus Mode profile like Do Not Disturb, Work, Driving, Custom, etc.
- Customize the profile to your desire.
- Click on Silence Notifications From to add apps you want to silence.
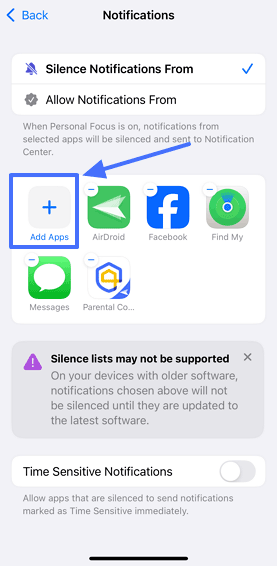

- Click on Back at the top left conner to complete the process.
5Remove Apps from Spotlight and Siri Suggestions
This method is best for keeping apps private. It will hide apps from being used frequently by preventing them from appearing in search results and suggestions. For instance, these apps will not appear in Spotlight search results when you search from the home screen. It will also not be suggested by Siri when you ask a question or give a request. Here is how to initiate this feature.
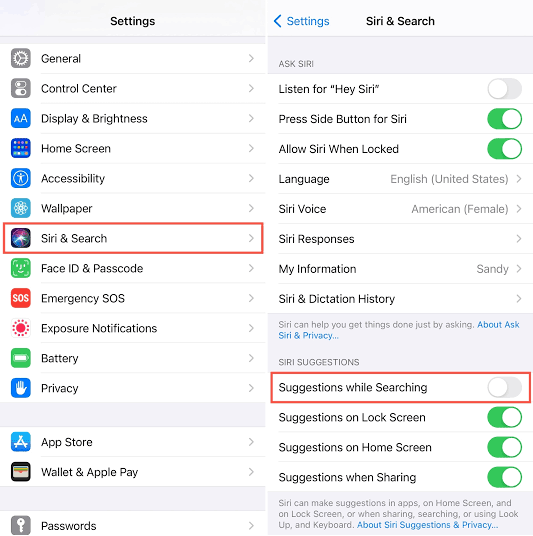
- Open the Settings app on your device.
- Select the Siri & Search option.
- Navigate to the Siri Suggestions option and toggle off Suggestions while Searching.

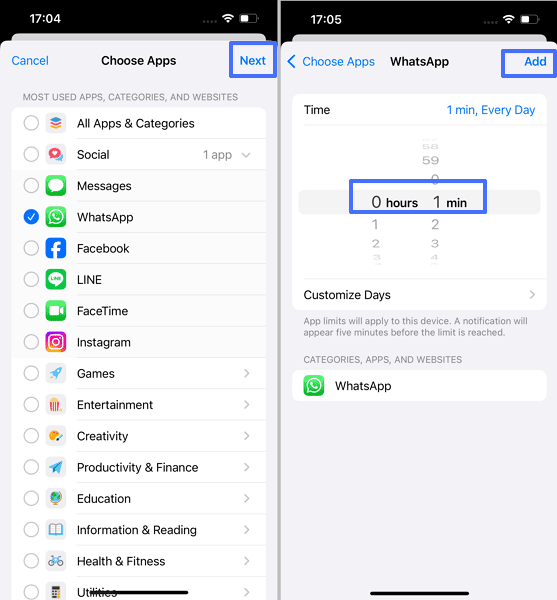
6Set the Apps' Limits to 1 Min
Using the Screen Time feature, you can temporarily deactivate an app by limiting its use time. The app limit feature sets the duration you can use an app each day. Hence, the app will be turned off automatically once the set duration has been exhausted. Its best-case scenario is that parent can use it to limit the screen time of their children on an app. Here is how to use the App's limit.
- Open the Settings app on your device.
- Select the Screen Time option.
- Select the App Limits option and tap on Add Limit.
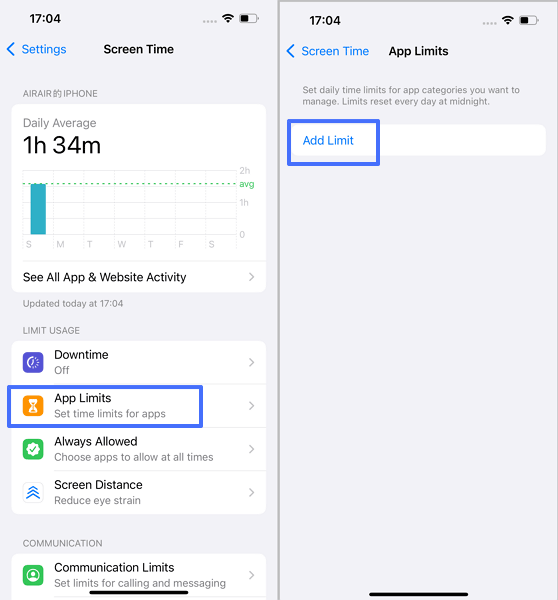
- Select the apps you want to disable, for example Facebook, then tap Next. Then set the limit for the app to 1 minute.

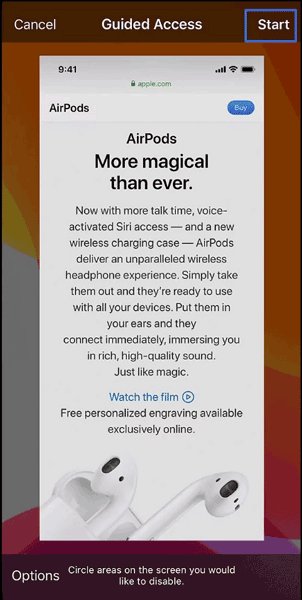
7Use Guided Access to Restrict to One App
Use this method to lock your device to a single app and disable other apps temporarily. This approach is useful for focusing on a specific work. Parents also use it to help their kids concentrate when they are reading or studying with their phones. Furthermore, you can set a passcode to prevent kids from exiting Guided Access. Here is how to use the feature on your iPhone.
- Open the Settings app on your device.
- Select the Accessibility option.
- Scroll down until you find Guided Access. Tap on it and toggle on the switch to enable it.

Tips: You can also tap on Passcode Setting to set up a passcode.
- Open the app you want to use and triple-click the side or Home button.
- Complete the process by tapping start to begin Guided Access.

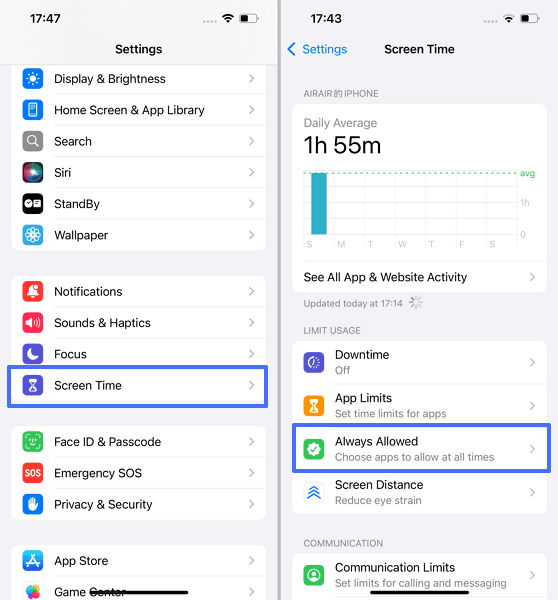
8Remove Them from Allowed Apps (If They Are In)
If an app is part of the Allowed Apps list, this app will not concur with Screen Time settings like App's Limit. To ensure an app is not avoiding Screen Time settings, you need to remove it from Allowed Apps. Here is how to remove these apps from Allowed Apps.
- Open the Settings app on your device.
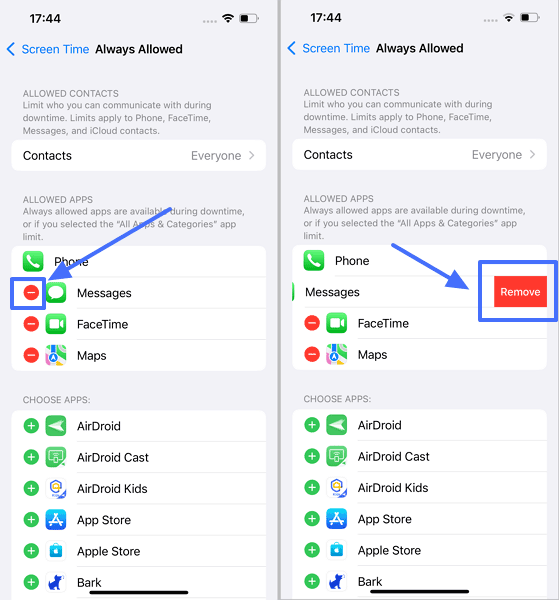
- Select the Screen Time option to open it, then select the Allowed Apps option.
- Top the “-” icon beside the app you want to disable and confirm it by tap Remove.

Disable Apps vs. Delete Apps vs. Remove Apps on iPhone
Aside from disabling your iPhone apps temporarily, there are some terms with similar connotations to Disable Apps such as Delete Apps or Remove apps.
Disabling apps temporarily restricts the app's functionality without deleting it. The data of the app is still on your device, which makes it easy to revoke the decision to disable the app after a short period.
On the contrary, deleting an app requires uninstalling the app and deleting its data from your device. This is a lasting solution for freeing up unused apps and freeing up more space.
By removing apps, you make them invisible on the home screen but still accessible through search or settings. In other words, deleting an app deletes it and its data, while removing it just hides the apps.
How to Enable Disabled Apps on iPhone
You may need to enable a disabled app on your iPhone if you need it for an important reason. To do so, the most direct approach is to undo the method you have used. For instance, if you turned on a Screen Time feature turn it off. Hence, the steps below show you how to undo the process of an app that was temporarily disabled.
- Open the Settings app on your device.
- Select the Screen Time option.
- Select the Content & Privacy Restrictions option.
- Select the Allowed Apps option.
- Toggle off the apps back on.
Concluding Thoughts
Temporarily disabling apps on your iPhone can help manage resources like storage, cellular data, and battery. It can also help you improve your focus on a task and keep some apps private. Hence, this post has covered various ways to suit your needs.
It also shows how you can enable an app that you have previously disabled. To maximize the discussion of this article, it compares disabling, deleting, and removing apps and how they can help you maintain better control over your phone apps.


Leave a Reply.