How to Stop Spam Messages on Facebook Business Page
Facebook is a fantastic online platform for personal and business, but there are spam messages on Facebook that can be very annoying. Facebook spam messages are irrelevant and can be a security risk containing phishing links or malware.
This distracts from real interactions with your fans and their experience browsing your page which can negatively impact your online presence or brand image. Luckily, there are plenty of tools you can use to help stop spam messages on Facebook Business Page.
- Way 1: Hide Spam Comments with Profanity
- Way 2 :Hide Spam Comments Containing Certain Words
- Way 3: Restrict Who Can Send Messages to Your Page
- Way 4: Via Message Filtering
- Way 5: Report and Block Spammers
- Way 6: Try Third-Party Facebook Message Managing Tool
- Tips: Use AI Chatbot to Auto Reply to Your Inbox Messages
Method 1: Hide Spam Comments with Profanity
The first method to stop spam messages is a built-in feature to Facebook Pages that allows you to automatically tag and hide any comments or posts with profanity. Facebook utilizes its own database of commonly used 'offensive words and phrases' and automatically removes them from your page.
Here's how to hide spam messages on Facebook by enabling the 'Hide posts and comments with profanity' feature:
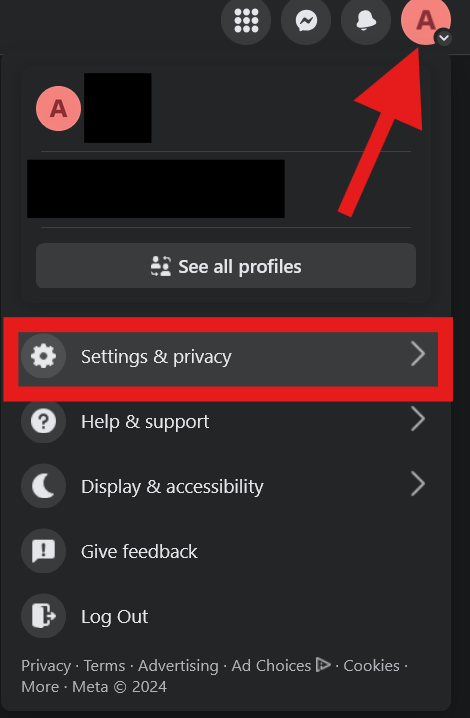
- Step 1.Go to Facebook and switch over to the Facebook Page in the top-right corner.
- Step 2.Once on your Facebook Page account, select 'Settings and privacy' from the drop-down menu. Select 'Settings'.
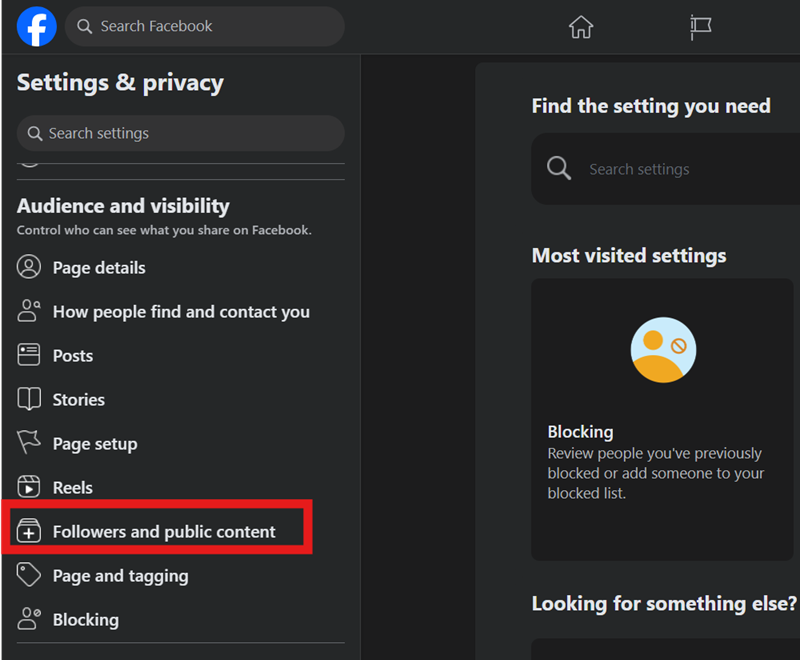
- Step 3.Scroll down and select 'Followers and public content' on the left.
- Step 4.Enable the 'Hide posts and comments with profanity' option.
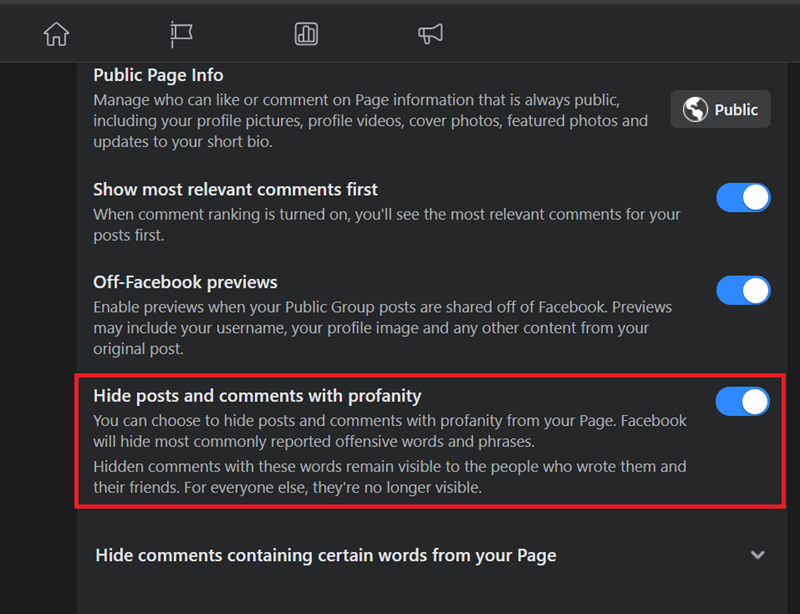
By doing so, any spam comments containing profanity will be automatically detected and removed by the platform and you can avoid spam messages on Facebook.
This is a good first step to counteract any profanity or offensive words made by visitors to your page, but it's not all-encompassing. There will be workarounds to circumvent the automatic profanity detection such as words in other languages, or that utilize different symbols within the word to avoid detection.
In that case, continue to further stop spam messages on Facebook in the next parts.
Method 2: Hide Spam Comments Containing Certain Words
As mentioned above, there are methods where people can manually avoid Facebook's profanity detection by using alternative words, symbols, and numbers. Since Facebook's database might not categorize these words as 'profanity', it won't be able to automatically remove them.
To counteract this, you'll need to use another feature that allows you to hide comments containing certain words. This gives you an added layer of control since you can manually include variations of words using symbols, numbers, and letters that usually avoid detection.
Here's how to stop spam comments containing certain keywords on Facebook:
- Step 1.Switch over to the Facebook Page in the top-right corner on Facebook.
- Step 2.Select 'Settings and privacy' from the drop-down menu. Then select 'Settings'.
- Step 3.Scroll down and select 'Followers and public content' on the left.
- Step 4.Scroll down and select the 'Hide comments containing certain words from your Page' option.
- Then type in keywords and variations of profanity that you'd like blocked from the comments on your page, such as 'act now,' 'limited time,' or 'urgent'.
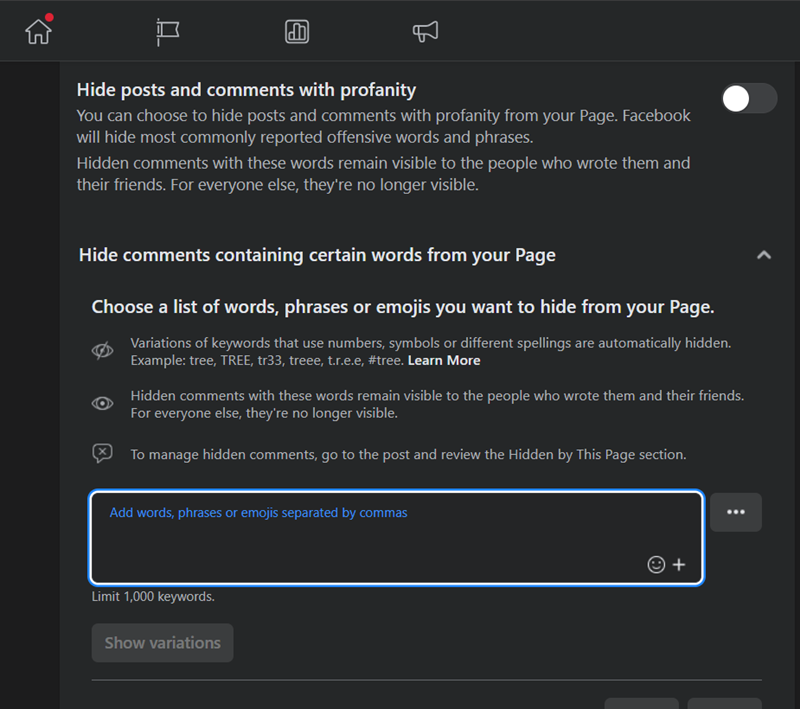
You can also enter the emojis that you think is spammy. The keyword length is under 1,000 keywords and emojis. So it's pretty enough for you to enter most keywords and hide them from your comments.
Method 3: Restrict Who Can Send Messages to Your Page
For the next method, we're taking things a step further by limiting who can comment or post on your Page by using two features on the Facebook Page settings. This allows you to select whether commenters on public posts can be anyone who sees the post or select groups of people such as your friends or friends of friends.
That said, here's how to enable both of these features:
- Step 1.Go to Facebook and switch over to the Facebook Page in the top-right corner.
- Step 2.Select 'Settings and privacy' from the drop-down menu. Then select 'Settings'.
- Step 3.Select 'Followers and public content' on the left.
- Step 4.Select 'Public' on the 'Who can comment on your public post?' section and change it to 'Friends', 'Friends of Friends', or 'Public'.
- Step 5.Next, scroll down to the bottom to find 'Country Restrictions', then click 'Edit'.
- Step 6.Then type in the countries that you find the frequent spam comments come from, and choose 'Hide from certain countries'. Then click 'Save'.
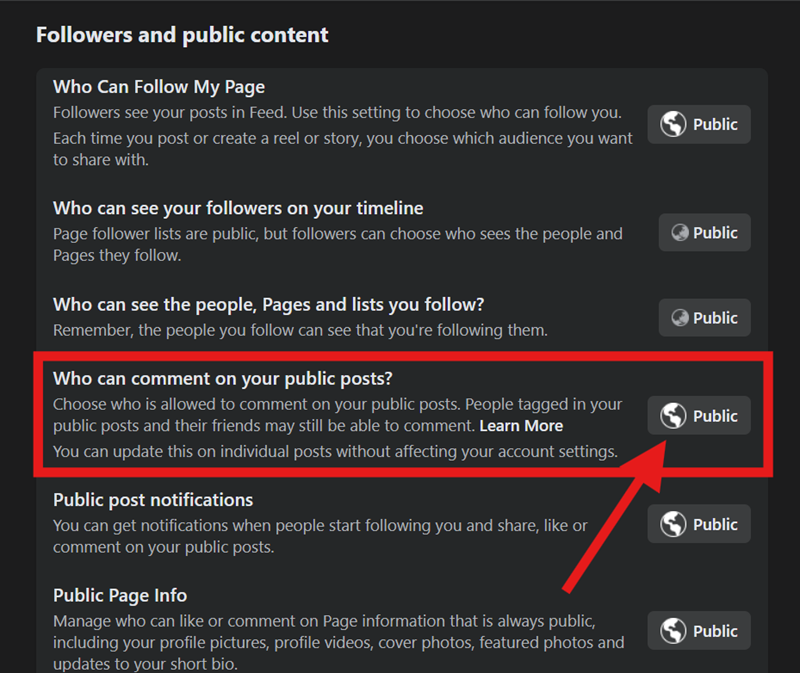
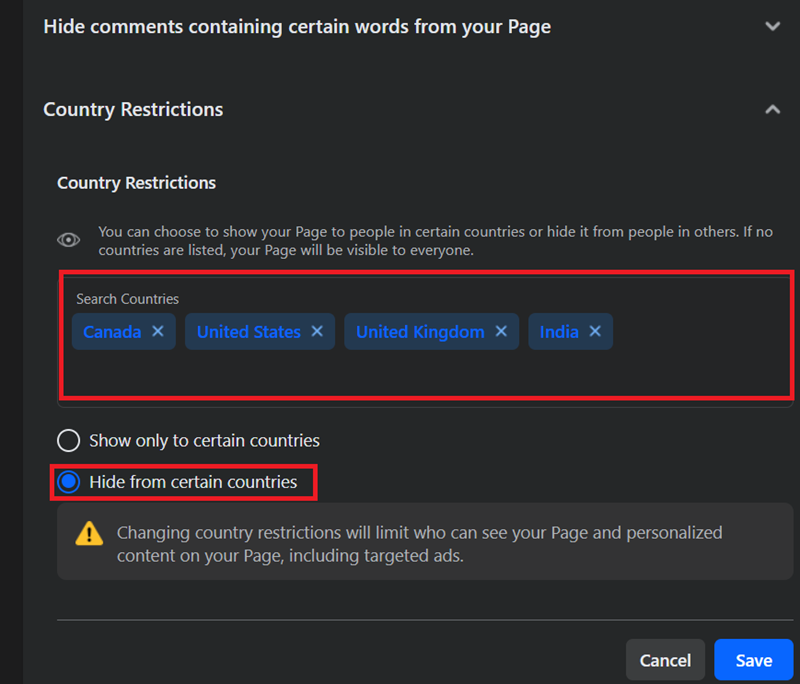
This is a great way to limit your audience to people who will really engage and resonate with your content and business, especially if it's more niche and specific to your country/area.
Method 4: Via Message Filtering
This next method is to help manage your Facebook Page inbox to automatically filter out messages that appear to be spam or scams. Essentially, any messages that are dubious or clearly not within the scope of your Page's content and theme.
To use this method, you'll need to access the Meta Business Suite. As long as you have a Facebook Business Page, you can also access the Meta Business Suite.
Follow these steps to stop Facebook spam messages via Meta Business Suite:
- Step 1.Select 'Inbox' in the left on the Meta Business Suite page.
- Step 2.Select the 'Automations' icon.
- Step 3.Click Create Automation > Start from scratch.
- Step 4.Name the automation something like 'Spam Message Filtering', select 'Messenger' for Channel, and select 'New message received' for 'When this happens'.
- Step 5.Add a 'Condition' and select 'Keywords'.
- Step 6.Type in example text of 'spam messages' you'd like to filter out.
- For example, a common 'spam message' you see on Facebook is those that claim to violate copyrights/trademarks. Add words like 'Copyright', 'Trademark', etc. Or phishing messages often contain keywords such as 'links', 'deal', 'discount', or 'free'.
- Step 7.Under 'Take this action' select 'Mark as' then select 'Move to spam'.
- Step 8.Click 'Save changes' to finalize the automation.
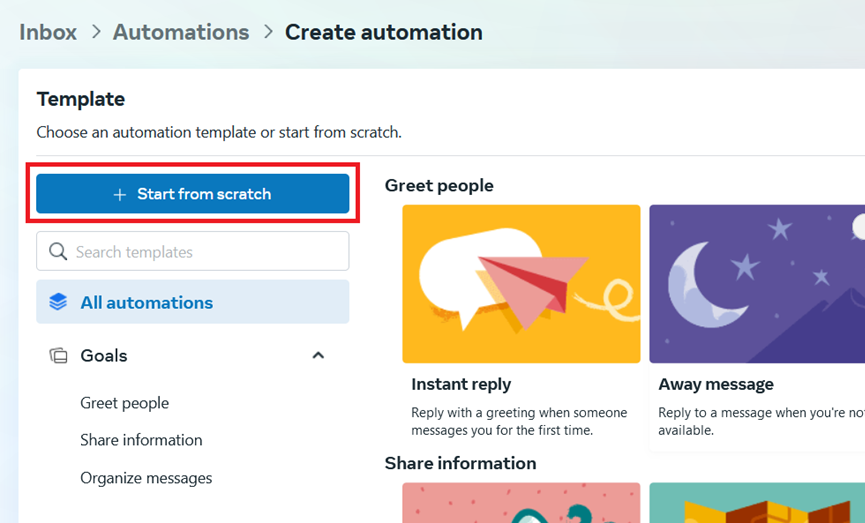
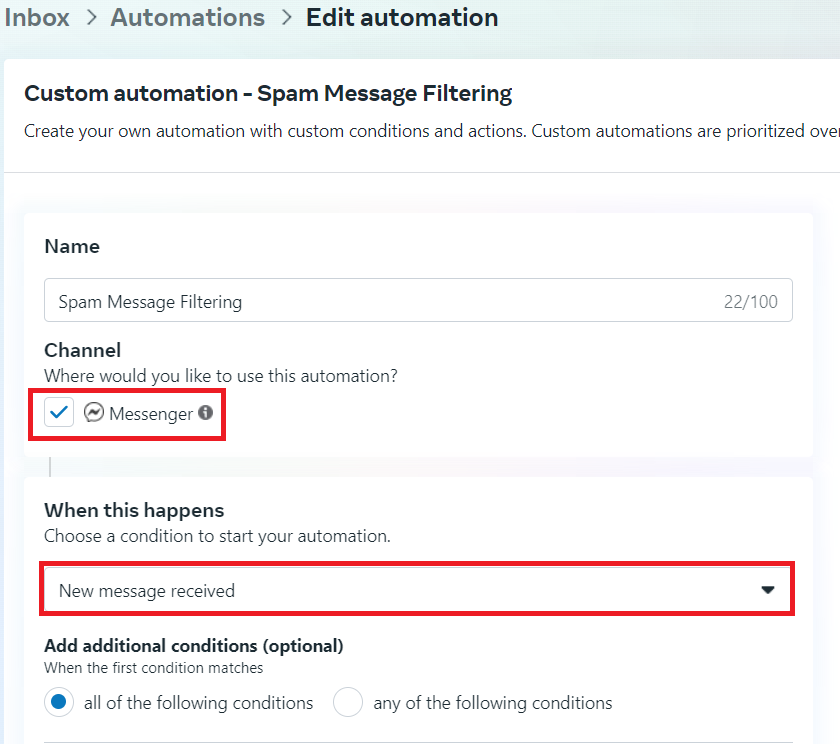
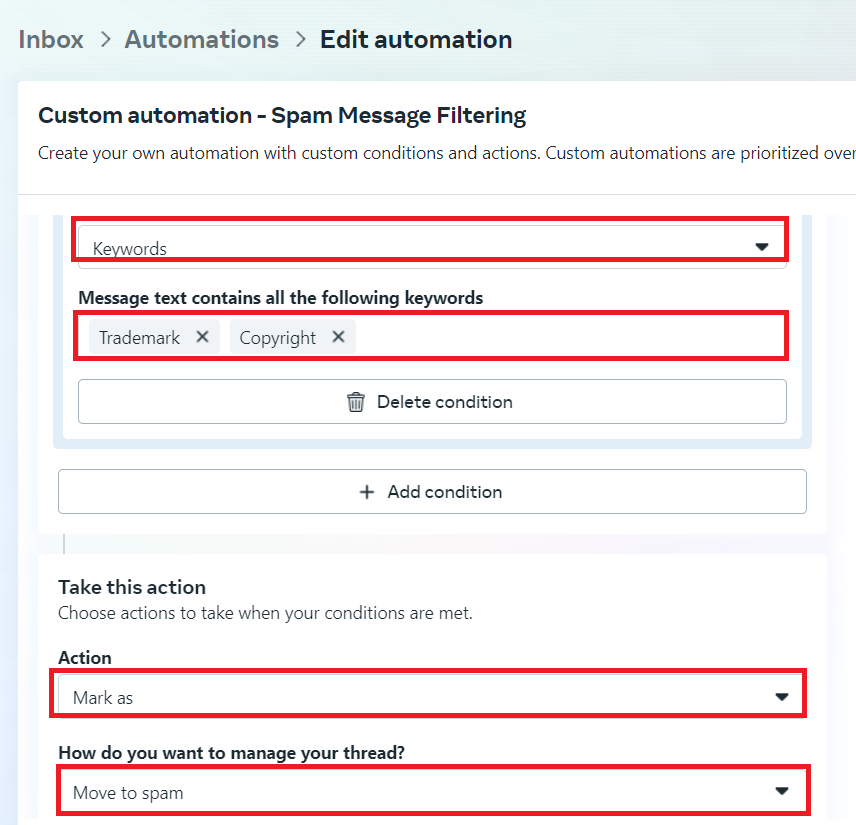
Once done, the spam messages that come to your Facebook Messenger will be moved to the Spam filter in Inbox. However, this may also mark some normal messages as spam, so it's recommended to check the spam inbox constantly, in order to recognize the normal messages and get connected with these customers.
Method 5: Report and Block Spammers
Your next step is to simply report and block any spammers you come across: whether it's on your Page or in your Page's Inbox. This is the best course of action for repeat offenders who refuse to listen to reason and stop spamming your Page.
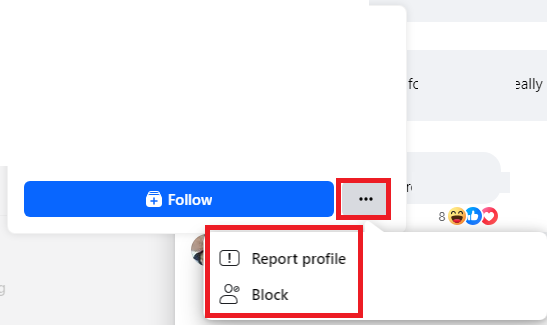
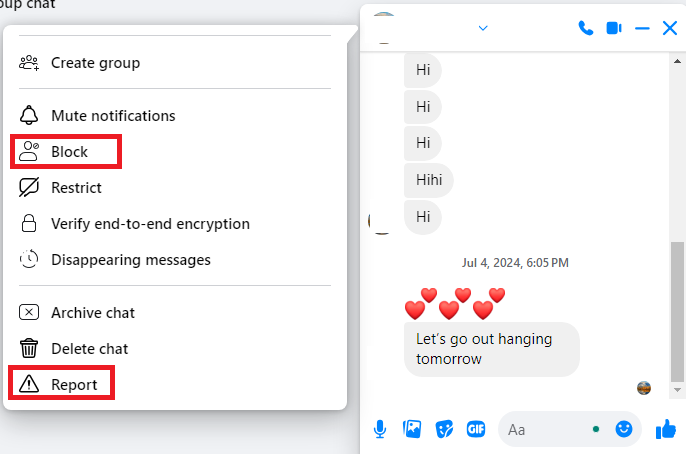
There are multiple ways you can do this. You can report and block spammers directly in your Facebook Page Inbox or you can select the post on your Page, then report profile or block them from there.
The differences between reporting and blocking are that reporting someone will have to wait for Facebook to take action and that person can still comment or message you before action is taken, while blocking will take action immediately and that person can't see your post, comment, and start a conversation with you.
Report or block spam messages or comments from Facebook Post:
Report or block spam messages from Messenger:
Additionally, you can also block them from your Page entirely by entering their name manually to the Facebook Page settings block list. Here's how to do that:
- Step 1.Switch over to the Facebook Page in the top-right corner.
- Step 2.Select 'Settings and privacy' then select 'Settings'.
- Step 3.Under 'Audience and visibility' on the left, select 'Blocking'.
- Step 4.Select 'Block users' or 'Blog Pages' depending on your situation. Click 'Edit'.
- Step 5.Select 'Add users to blocked list'.
- Step 6.Type the name of the spammer you'd like to block.
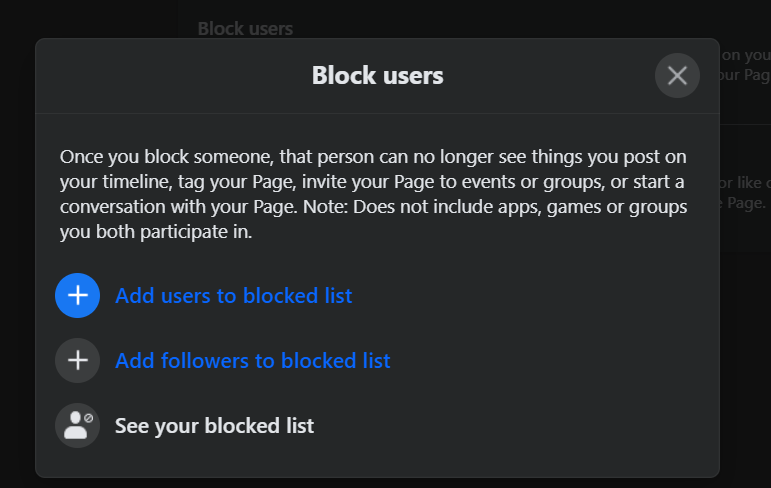
By doing so, you can block spam messages directly, which is a fast and easy way to stop receiving spam messages on Facebook. The person you block can no longer see your posts, tag your page, or message you on Facebook.
Method 6: Try a Third-Party Facebook Message Managing Tool
The last method to stop spam messages on Facebook is to try a third-party social media management tool, like Sprout Social, to automatically setup hide spam message automations and much more.
Unlike Meta Business Suite, this works for both your Page Inbox, Facebook groups, and published posts so it's convenient to manage your page.
- Step 1.Open Sprout Social and log into your account. Ensure to subscribe to the its Advanced plan.
- Step 2.Click Account and settings > Settings.
- Step 3.Click 'Automated Rules' under 'Global Settings'.
- Step 4.Click 'Create new rule'.
- Step 5.Type a title for your rule and a description.
- Step 6.For the 'Rule Type', select 'Inbox message' or 'Published post' depending on your need.
- Step 7.Select 'has word or phrase', and enter the words and phrases you want to automatically hide.
- Step 8.For 'Then take these action' section, select 'Hide message'.
- Step 9.Click Save.
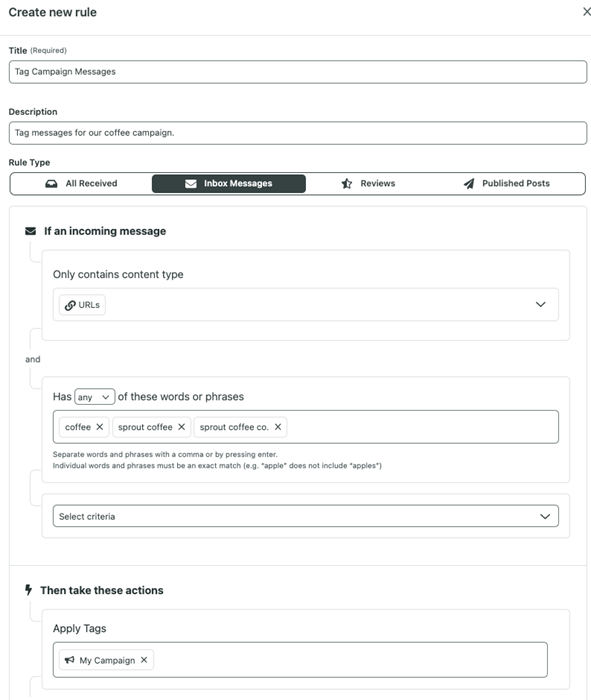
This tool has a more powerful filtering feature and more flexible rules. You can even use it to manage LinkedIn and X.
Sprout Social also has a feature that allows you to set up automatically complete incoming messages. Messages that contain a keyword, is of a specific type (such as link), or is received by a specific profile, can be automatically marked as complete, thereby you don't have to spend time to deal with these messages.
Tips: Use AI Chatbot to Auto Reply to Your Inbox Messages
To supplement your Facebook Business Page, there are different ways where you can more conveniently reach out to customers and respond to any messages to your Page. And that's by using an AI chatbot, like from ChatInsight.
ChatInsight's AI chatbots can streamline communications by automating the messaging process. Include a link or QR code to your AI chatbot on your Facebook Page, from which your customers can directly access your chatbot.
Once there, the chatbot can handle the bulk of your daily messages by responding with human-like & intelligent messages based on custom knowledge bases geared to your business.
Here are the detailed steps to do so:
- Step 1.Create an account for ChatInsight AI for free, and then log into platform.
- Step 2.Once logged, create an AI chatbot by following this guide.
- Step 3.After creating, you can generate a link to your AI chatbot.
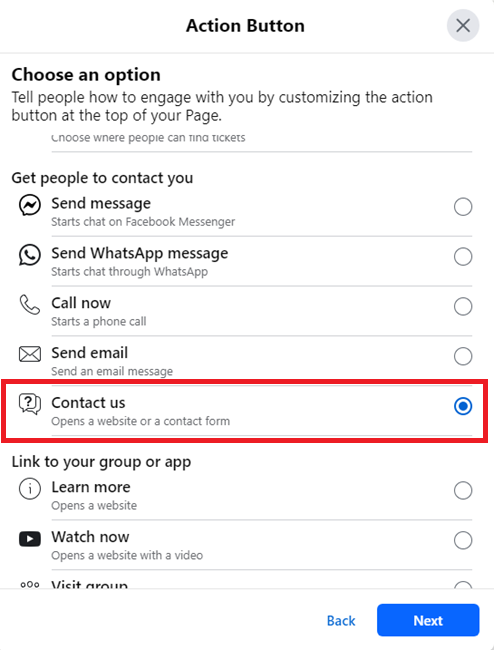
- Step 4.Now, you can add this link to your Facebook Page. Simply navigate to your Facebook Page > Edit Action Button > Change Button > Contact us > Add website link.
- Step 5.Then enter the link to your AI chatbot.
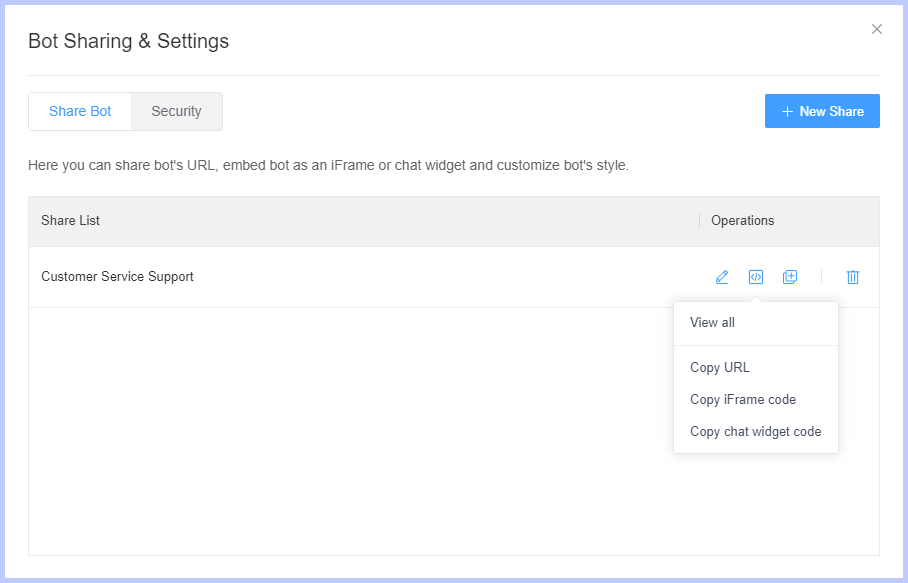
Besides being a great support tool for your customers, ChatInsight's AI chatbots can also help gather a tonne of valuable insights and metrics. With these insights, you can better understand your audience's preferences to tailor your marketing strategies and product development.
Summary
That said, we've reached the end of our guide and we hope you have a better idea one how to stop spam messages on your Facebook Page. They're an annoying and tricky to handle but utilizing all the features and methods we've listed above, you should notice a drastic decrease in spam clogging your Page and Inbox!




Leave a Reply.