Work devices such as Windows computers are designed for work. You don’t want hundreds of these enterprise-deployed Windows devices coming back loaded with Steam games, torrents, unauthorized apps, or worse: spyware and viruses. Intune kiosk mode is a surefire way to keep distractions out and productivity in.
Ready to give it a chance? Let's explore how to configure kiosk mode with Intune MDM. If you find that the guides provided by Microsoft are not clear enough and are making it difficult for you to perform operations, then I hope this guide can be of assistance to you!
1 What Is Intune Kiosk Mode?
Kiosk Mode transforms a Windows device into a task-specific terminal. It’s like assigning a job title to a machine—no distractions, just focused functionality.
Intune Kiosk Mode is a device configuration provided by Microsoft Intune that limits user access to only approved applications. It’s widely used in public areas (like digital directories or info booths), by frontline workers (where simplicity boosts efficiency), and on self-service devices such as check-in stations. The idea is simple: users see only what they need, nothing more.
Supported Windows Devices
Intune Kiosk Mode is available on Windows 10 and later, including Enterprise and Education editions, starting with build 1809.
It also supports Windows Holographic for Business, enabling kiosk-like control on HoloLens for use cases like training or remote assistance.
Types of Intune Kiosk Mode
Intune supports multiple kiosk configurations:
- Single-app, full-screen kiosk: The device runs one app in full-screen mode. There’s no taskbar, no Start menu, no exit options, which is perfect for locked-down terminals.
- Multi-app kiosk: Displays a customized Start menu with a curated list of apps. Users can switch between them but can’t access other system functions. Ideal for shared devices or role-specific use.
Each mode offers a different level of control based on how much user flexibility you need.
2 Configure Single-App, Full-Screen Kiosk with Intune
Locking a device in a single app is the cleanest way to ensure consistent, focused usage. It’s perfect for frontline operations, public-facing terminals, or anywhere you need a purpose-built interface.
Let’s walk through the exact configuration, based on what’s shown in the admin console setup videos.
Create a Policy Profile
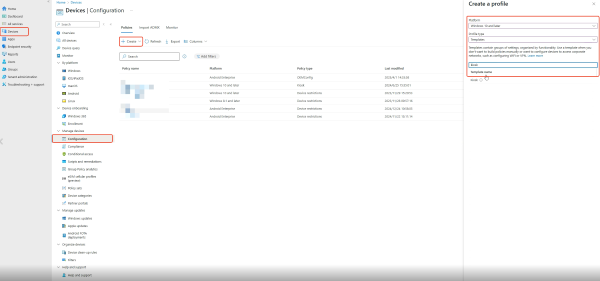
Head to the Intune admin center, and follow this path:
Devices > Configuration profiles > Create profile
- Platform: Windows 10 and later
- Profile type: Templates
- Template name: Kiosk
When prompted, choose Single app, full-screen kiosk. Use descriptive naming (e.g., "Reception_Kiosk"), and consider using the description field to document its use case, as it’s very useful for future audits or troubleshooting.
User Logon Type
Next up is deciding who should be able to sign in and how.
- Auto logon: The user automatically signs in using a designated local standard user account with no interaction required. This is ideal for fully unattended setups like information displays or check-in kiosks.
- User logon (Azure AD): This requires authentication from a specific Azure AD user. It’s great when you need session tracking, personalization, or compliance accountability.
Public terminals typically use auto logon, while employee-facing devices benefit from Azure AD user logon for accountability.
Application Type
This is the core of your Intune kiosk configuration: the app your device will run.
In the Kiosk app section, you’ll see a dropdown with these supported application types:
- Microsoft Edge browser (Chromium-based)
- Microsoft Edge Legacy browser
- Kiosk browser (a minimal web shell for single-URL access)
- Store app (UWP from Microsoft Store)
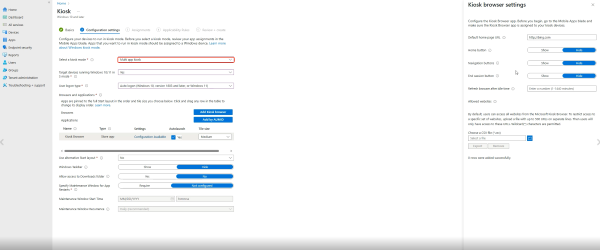
For example, if you have Microsoft Edge (Chromium), you can configure it with the “Public browsing experience” mode. You’ll also see the Start URL field, where the kiosk’s home page is defined—perfect for web-based portals or internal apps.
Note : Win32 apps are not supported in single-app full-screen kiosk mode. If you need legacy desktop app support, consider using multi-app kiosk configurations instead.
Specify Maintenance Window for App Restarts
Kiosks aren’t meant to restart mid-use, unless you plan for it.
The setup interface lets you define a Maintenance window, specifying:
- Day of the week
- Start time
- Duration (in minutes)
Use this to schedule restarts for app updates or state resets during low-traffic hours. In the video, no window is defined, which means the system may apply updates at any time. That’s risky, so always set a maintenance window unless you’re working in a controlled or lab-only environment.
Pro tip : For round-the-clock deployments, stagger maintenance times across device groups to avoid system-wide interruptions.
Applicability Rules
Applicability rules ensure your kiosk profile only targets appropriate devices. This is essential in mixed-hardware environments or phased rollouts.
Supported condition types include:
- OS version
- Device manufacturer
- Device model
- Minimum RAM
- Storage space
These rules ensure your profile reaches only compatible devices, avoiding unnecessary errors or misconfigurations.
3 Configure Multi-App Kiosk with Intune
Multi-app kiosks are where functionality meets control. They allow users access to multiple predefined apps without the freedom to stray outside their configured environment.
Create a Policy Profile
Start in Intune > Devices > Configuration profiles, and create a new profile with:
- Platform: Windows 10 and later
- Profile type: Templates
- Template: Kiosk
When the kiosk settings appear, select Multi-app kiosk. This unlocks options like app whitelisting, Start layout customization, and taskbar behavior. Name your profile clearly, especially if you're managing multiple kiosk types across departments or locations.
Target Devices Running Windows 10/11 in S Mode
Intune will ask if you're targeting devices in S mode:
- Yes: Limits to Store apps (UWP). More secure, less flexible.
- No: Supports Win32 apps and custom AUMID entries.
If you require classic desktop apps, choose “No.”
User Logon Type
Multi-app kiosks offer several sign-in models:
- Auto logon
- User logon (Azure AD)
- Public account (resets at logout)
- HoloLens visitor
- Local user
Public account is useful for shared kiosks with high turnover, as there are no credentials needed and sessions clear on logout.
Browser and Applications
This stage defines exactly which apps users can access within the kiosk environment. Multi-app mode supports a mix of web apps, desktop programs, and modern UWP applications, depending on your setup needs.
The Kiosk Browser is designed for simplified web-only interfaces. You can set a default homepage (like http://bing.com) and toggle visibility for the home button, navigation controls, and the end session button.
There's also an idle timeout setting that reloads the browser after a specified period. If access should be restricted to specific websites, you can upload a .csv file listing up to 500 allowed URLs. Intune Windows kiosk mode will block anything outside that list.
For traditional desktop apps, Win32 application support is included. You'll need to specify the app name, provide the full path to the .exe file, and enter the Application User Model ID (AUMID) if the app requires it. These fields must be exact, as any misconfiguration can prevent the app from launching.
Also, be cautious, as many legacy apps weren’t built with kiosk environments in mind. Test them thoroughly to catch unexpected dialogs or services that may interrupt the experience.
You can also add apps using just the AUMID, which is useful for referencing installed UWP apps or system utilities like Calculator. To add a traditional desktop app:
- Specify the Application name
- Provide the local path to the .exe file (e.g., C:\Program Files\TimesheetLOB\ts32.exe)
- Enter the Application User Model ID (AUMID) if required
Not all Win32 apps handle kiosk environments well. Try testing for pop-ups, background services, and startup timing.
Use Alternative Start Layout
The default Start menu places app tiles alphabetically. For a better UX, import a custom XML Start layout:
- Layout defines tile placement, size, and grouping
- Generated using PowerShell or exported from a reference device
- Uploaded during the configuration process
Organize apps logically. Group them by role, department, or function. Larger tiles and central positioning can highlight critical apps.
Windows Taskbar
The taskbar provides quick access to pinned applications and system functions. In multi-app kiosks, you can control their behavior.
Enabling the taskbar allows users to switch between running applications more easily. Disabling it creates a more locked-down experience where users must return to Start to switch apps.
You can also control specific taskbar features, such as Cortana, Task View, and system tray icons. Each enabled feature increases functionality but potentially adds complexity for users.
Allow Access to Downloads Folder
Should users be able to download and access files? This seemingly small decision has significant security implications.
Allowing download access means users can save and retrieve files within their session. This helps with workflows involving document creation or reference materials.
Restricting downloads creates a more ephemeral experience where nothing persists between sessions. This enhances security but limits functionality.
Consider your kiosk's purpose carefully before enabling downloads. For many public kiosks, disabling this feature is safer.
Specify Maintenance Window for App Restarts
As with single-app kiosks, defining when applications can restart helps prevent disruptions.
Multi-app kiosks benefit especially from well-defined maintenance windows. With multiple applications running, the chance of one needing to restart increases.
Consider setting this window during known low-usage periods. Overnight works well for business kiosks, while early morning might be better for retail scenarios.
Applicability Rules
Use Applicability Rules to target only the right devices:
- Filter by model, manufacturer, OS version, or RAM/storage thresholds
- Skip deployment on non-matching devices
- Ideal for managing multiple hardware classes with different kiosk profiles
Applicability rules ensure the configuration hits only where it's relevant, minimizing errors and optimizing performance.
People Also Ask
How to set up Kiosk mode by deploying PowerShell through Intune?
You can deploy PowerShell scripts in Intune by navigating to Devices > Scripts and remediations > Platform scripts, then selecting Windows 10 and later. From here, upload your .ps1 script and assign it to your target device group. This method is useful for pushing registry changes, enforcing configuration tweaks, or enabling kiosk mode via script-based automation.
Example PowerShell references:
- Set up assigned access via PowerShell
- Example PowerShell script for configuring Assigned Access:
Set-AssignedAccess -AppUserModelId
"Microsoft.WindowsCalculator_8wekyb3d8bbwe!App" -UserName "kioskuser" - How to deploy PowerShell scripts through Intune
What are the browsing modes & settings available when using Intune to lock Edge kiosk mode?
When configuring Microsoft Edge in kiosk mode via Intune, you can select between public browsing (session resets after use) or normal browsing (persistent session). Additional settings include homepage URL, fullscreen enforcement, print blocking, and tab restrictions—ideal for shared terminals or secure browsing stations.


Leave a Reply.