Android Single Application Mode: Definition & Configuration Guide
1What is Android Single App Mode?
Android single application mode is used to lock devices into running a solo application. It stops the users from opening other applications or system settings. This mode is generally used in both personal and commercial settings.
Enterprises mostly apply Single App Mode to devices like smartphones, tablets, and POS terminals to deliver specific services, reduce distractions, and prevent unauthorized access.
According to industry reports, 83% of enterprises experience data breaches due to improper device use. Locking devices into a single app using Single App Mode is a proactive step to reduce such risks and ensure both the security of devices and data.
23 Methods to Enable Single App Mode
1Method 1: Native Android Kiosk Mode — App Pinning (Free Basic Option)
Overview:
A built-in Android feature that lets users temporarily lock the device to a single app. Activated via system settings or a shortcut, with optional PIN unlock.
Target Audience:
Personal users or small-scale, short-term use cases with restricted devices and least security needs
Prerequisites:
- Android 5.0 (Lollipop) or above
- (Note: Device encryption is not required, but security is limited)
- Users must access the system settings or the quick access shortcut
Key Features:
- Locks the device to one foreground app
- Optional PIN unlock
- Status/navigation bar hiding may be supported depending on the OEM
Pros
- Free
- No extra software needed
- Easy to set up for a single device
Cons
- Easily bypassed: Users can force reboot or exit with PIN
- Very limited functionality: No control over settings, USB, notifications
- Manual setup required per device
- Inconsistent experience across OEMs and Android versions
- Low security: Not suitable for enterprise or public-facing use
Example Use Case:
Temporarily giving a phone to a child for a game, or displaying one app during a meeting.
Conclusion:
Only suitable for temporary, low-security, small-scale scenarios. Not recommended for enterprise or customer-facing deployment.
2Method 2: Lock Task Mode APIs — Developer Solution
Overview:
Android provides a system-level Lock Task Mode API that can be embedded into apps, When configured as a device owner or profile owner, the system enforces strict single-app mode.
Target Audience:
Enterprises or ISVs with Android development teams that need tight integration of kiosk mode into a custom app.
Prerequisites:
- Android 5.0+
- Device must be configured as “Device Owner” or “Profile Owner” (requires factory reset and specific setup methods like NFC or ADB commands)
- Lock Task Mode APIs must be integrated in the app code
- Understanding of Android Enterprise is required
Key Features:
- Enforces app locking even after reboot
- Full control over UI visibility (status bar, nav keys, etc.)
- Can block access to settings, USB, notifications
- Deep integration with app logic (can conditionally unlock)
Pros
- Very secure and reliable
- Highly customizable
- Fine-grained system control
Cons
- High development cost
- Complex setup for device ownership
- Manual configuration unless paired with MDM
- Fragmentation across OEMs may require extra testing
Example Use Case:
A logistics app that locks driver devices during delivery, or a museum guide app offering immersive, exit-restricted interaction.
Conclusion:
This method is best for enterprises with strong dev teams needing secure, deeply integrated kiosk experiences. It has high cost and complexity making it unsuitable for small-scale use.
3Method 3: MDM/EMM Solutions — e.g., AirDroid Business (Recommended for Enterprises)
Overview:
Mobile Device Management (MDM) platforms like AirDroid Business offer visual interfaces to configure and manage Single App Mode (a.k.a. Kiosk Mode). These use Android’s enterprise capabilities but abstract the complexity.
Target Audience:
Enterprises handling many devices across retail, healthcare, education, and field services typically used by IT administrators.
Prerequisites:
- Devices must support Android Enterprise
- Enrolled in an MDM/EMM platform (like AirDroid Business)
- Subscribed to a kiosk licensing plan if required
Key Features:
- One-click app locking via GUI
- Remote bulk configuration and updates
- UI control over status/navigation bars and hardware keys
- Lock devices to specific websites or web apps
- App/URL whitelisting and blacklisting
- Auto-launch on startup
- Anti-bypass enforcement (lock remains after reboot)
- Remote monitoring, screenshots, and support tools
- Integrates with app deployment, file pushing, location tracking, etc.
Pros
- User-friendly setup via web dashboard
- Scales easily across thousands of devices
- Advanced security and customization
- Centralized control saves IT time
- Vendor support available
Cons
- Paid subscription required
- Admin training needed for platform usage
Use Case Example:
Restaurant tablets locked to ordering apps, courier devices locked to sorting systems, hospital terminals restricted to EMR apps, or public kiosks for interactive info.
Conclusion:
For most enterprise use cases, MDM/EMM solutions like AirDroid Business offer the best balance of control, ease of use, and security, Ideal for mid-to-large scale deployments where reliability, efficiency, and centralized management matter.
[Video Guide]Set Up Android Single App Mode with AirDroid Business
Comparison Table
| Feature | Native App Pinning | Dedicated API (Lock Task Mode) | MDM/EMM (e.g., AirDroid Business) |
|---|---|---|---|
| Core Mechanism | Built-in system feature | Developer-integrated system API | Enterprise-level management via MDM platform |
| Cost | Free | High (development cost) | Medium to High (subscription-based service) |
| Setup Complexity (Single Device) | Simple | Very complex (requires configuration & code) | Simple (via web console) |
| Setup Complexity (Multiple Devices) | Extremely difficult (manual setup) | Difficult (needs MDM or scripting) | Simple (bulk configuration via policies) |
| Management Style | Local manual | Mostly local / needs tool integration | Cloud-based centralized remote management |
| Bypass Resistance | Very weak (reboot disables) | Strong (auto-restart post-reboot) | Strong (auto-restart + policy enforcement) |
| Security Control | Minimal | High (deep control available) | High (rich policy controls) |
| Feature Richness | Very limited (basic lock only) | High (customizable UI/behavior) | High (GUI configuration with multiple options) |
| UI/Key Control | Limited (depends on OEM/Android version) | Fine-grained (code-level) | Fine-grained (GUI-based) |
| Multi-device Efficiency | Not applicable | Low (needs extra tools) | Very high (batch operations, remote control) |
| Auto-Launch Support | No | Yes (requires coding) | Yes (via configuration options) |
| Whitelist/URL Locking | No | Possible (requires coding) | Yes (via settings) |
| Use Case Scale | 1–2 temporary devices | Custom core apps (any scale) | Dozens to thousands of enterprise devices |
| Target User | Individuals / Temporary Use | Developers / Technical Teams | IT Admins / Enterprise Decision Makers |
3Summary: Choosing the Right Method
When to Choose Method 1: Native Android Kiosk Mode
Native Android Kiosk Mode, or App Pinning, is ideal for small-scale, budget-free, and low-risk scenarios, such as using 1 to 3 devices in a single-store cash register or for a short-term, less-than-7-day event like displaying a restaurant menu.
However, it's not suitable for unattended public areas where the mode can be bypassed, devices with fragmented systems like Samsung or Xiaomi that require special adaptation, or situations needing to disable USB debugging or the notification bar.
When to Choose Method 2: Dedicated APIs (Lock Task Mode)
The Dedicated APIs (Lock Task Mode) are best suited for industrial applications involving embedded devices, like AGV navigation systems, and for teams with at least two Android developers who can handle the complexity.
It meets high-performance demands, offering microsecond-level response times. But be aware of the significant costs and time investments: API integration alone costs over $15,000 and takes 8 to 12 weeks, with additional expenses and time for device adaptation and OTA system setup.
When to Choose Method 3: MDM Solutions (AirDroid Business)
MDM solutions like AirDroid Business shine in large-scale deployments of five or more devices across different regions, especially when dynamic policies such as time-locking, geofencing, and compliance with standards like HIPAA or PCI DSS are required.
Compared to self-developed API solutions, it offers a much better ROI for 50 devices per year, with zero initial cost during the 14-day trial period, lower annual operation and maintenance costs at $1,800 (versus $12,000), and faster issue resolution in just 18 minutes per device.
Its key features include console-based single-app locking with crash recovery and advanced controls like time-based locking, geofence-triggered apps, and biometric emergency unlocks.
4How to Set up Android Single App Mode
How to Set up Android Single App Mode by Using App Pinning?
This Method Suits:
- Individual user
- Home users
- Small business users who do not require stringent device-locking
Applicable Scenarios
- Temporarily lending a device to children or guests
- Locking a phone to a single app during events or demos
- Small offices needing occasional kiosk-like functionality
Pros
- Built into Android (no extra tools required)
- Free and easy to set up
- No technical knowledge needed
Cons
- Weak security: can be bypassed by reboot or knowing the PIN
- Manual setup per device
- No remote management or automation
- Not reliable for professional or enterprise use
1. Start by opening the Settings on your Android device.
2. Navigate to the "Security" or "Password & Security" section.
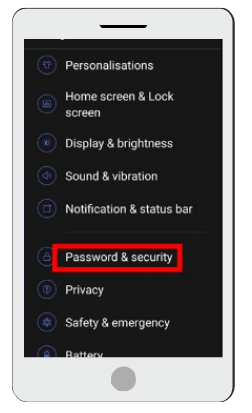
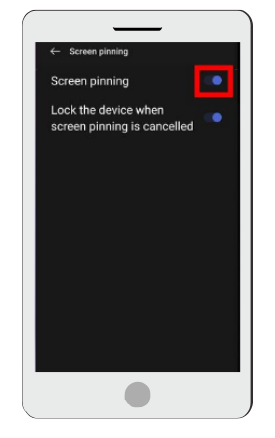
3. Look for the "Screen pinning" or "App pinning" option and tap on it. Toggle the switch to enable the App Pinning feature.
4. Open the app you want to pin to the screen. Swipe up from the bottom of the screen to access the Overview screen (recent apps). Locate the app you want to pin and swipe up on its card to pin it. A pin icon or message will appear, and the application will be locked to the screen.

How to Set up Android Single App Mode via Dedicated APIs?
This Method Suits:
- Developers
- IT teams in enterprises
- Independent software vendors (ISVs)
- Organizations needing strict kiosk control integrated with their own app
Target Users
- App developers
- Tech teams in enterprises
- Independent software vendors (ISVs)
Applicable Scenarios
- Custom business apps that require strict access control
- Logistics, education, or delivery apps with deep kiosk needs
- Environments where the device must auto-lock and restart in the app
Pros
- High security: cannot exit without admin permission
- Auto-launch after reboot
- Full control over UI elements and system behavior
- Deep integration with app logic
Cons
- Requires Android development knowledge
- Complex setup (Device Owner provisioning, code integration)
- Not suitable for non-technical users
- May require MDM tools for large-scale deployment
Before you can start implementing the lock task mode, you need to make sure the following prerequisites are met by your device:
- The app must be device owner (set during provisioning or via EMM/MDM).
- Minimum Android version: 5.0 (Lollipop) for basic lock task; 6.0+ for full lockdown.
- Use Android Device Policy Controller (DPC) or develop your own with DevicePolicyManager.
Steps to Implement Lock Task Mode (Developer API Method):
- Step 1: Start by telling your device that your selected app is allowed to be locked via lock task mode if whitelisted. To do this, use the following code in your app’s AndroidManifest.xml:
<activity android:name=".MainActivity" android:lockTaskMode="if_whitelisted"> <intent-filter> <action android:name="android.intent.action.MAIN" /> <category android:name="android.intent.category.LAUNCHER" /> </intent-filter> </activity> - Step 2: Now set your app as device owner. You must provision the device with your app as the Device Owner. This can’t be done after the device is set up normally.
Use adb (during setup) to provision your DPC app:
bash
adb shell dpm set-device-owner com.example.myapp/.MyDeviceAdminReceiver
If this command doesn’t work, it means you should factory reset your device first. - Step 3: Now it’s time to enable Lock Task Mode in your code
Use the following code in your main activity or service:if (devicePolicyManager.isLockTaskPermitted(getPackageName())) { startLockTask(); // enters single-app (lock task) mode } else { Log.e("LockTask", "App is not permitted to enter Lock Task Mode"); }To exit Lock Task Mode, use the following:
stopLockTask(); - Step 4: Now, you need to grant the lock task permission and tell the system that your app is allowed to call startLockTask()
DevicePolicyManager dpm = (DevicePolicyManager) getSystemService(Context.DEVICE_POLICY_SERVICE);
            ComponentName adminComponent = new ComponentName(this, MyDeviceAdminReceiver.class);
dpm.setLockTaskPackages(adminComponent, new String[] { getPackageName() });
Once done, it's time to check the behavior of the app. Run the app on the device. It should now be locked into single app mode, hiding the status bar, home button, and recent apps. Exiting will only be possible via admin access or programmatic conditions.
- This method requires developer knowledge and coding.
- The device must be enrolled properly as a Device Owner, typically with the help of an MDM tool or provisioning process.
- Lock Task Mode offers stronger security and automatic app relaunch after reboot compared to App Pinning.
How to Set up Android Single App Mode via AirDroid Business?
AirDroid Business allows you to manage and set the kiosk mode for batch devices instantly. This method is especially suitable for business devices, which streamline the device management process of the IT team.
Target Users
- IT administrators
- Mid-to-large businesses
- Schools, hospitals, logistics firms
Applicable Scenarios
- Managing many Android devices across multiple locations
- Customer-facing kiosks in retail, healthcare, or education
- Need for remote control, updates, and monitoring
Pros
- Centralized remote management
- Graphical UI for policy setup
- Supports batch deployment, URL locking, auto-start
- Includes additional features: app updates, GPS tracking, file pushing
Cons
- Subscription-based (cost varies by scale)
- Requires onboarding with an MDM platform
- Admins need some training to use the system effectively
- Step 1.Distribute the App into Target Devices/Device Groups
For Company-owned App:
Click on the Apps - Organization App Library option, and tap on the “Add App” button, which is available on the top right side. Here you can upload the APKs of your company's self-developed apps and release them into your managed devices.
Next, upload the APK that you want to launch; uploading will take time. Add app info like a short description, and press the next option. After that, select devices to roll out your desired app and release it remotely.
For Web App:
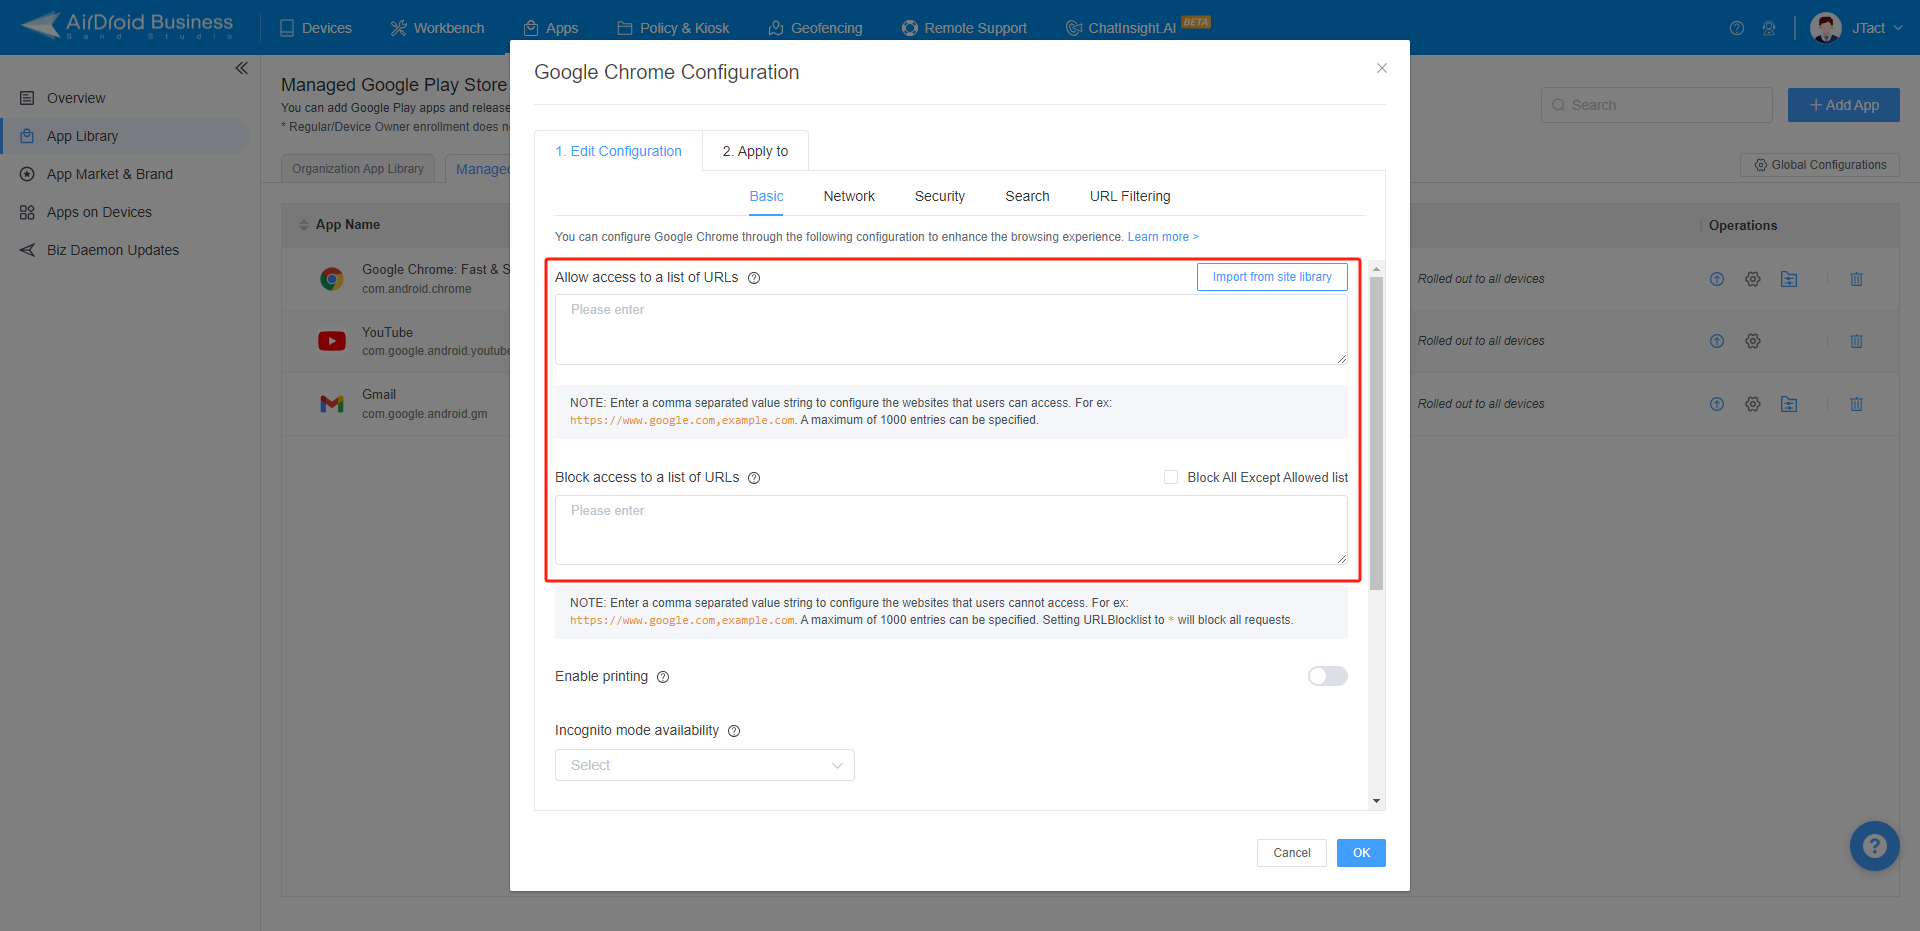
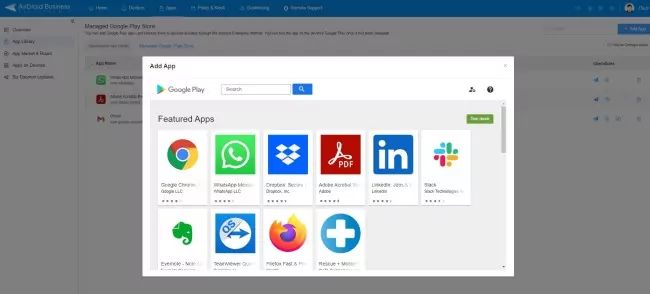
You need to publish a browser app onto your devices and lock the browser into your web app link. Here we will take Chrome browser as an example: Tap on Managed Google Play Store - click the Add App option - pick Google Chrome from the Google Play Store, and roll out it on desired devices.
Go to configure distribution settings of Chrome app, add your web app link in "allowed URL" and finish other security settings.
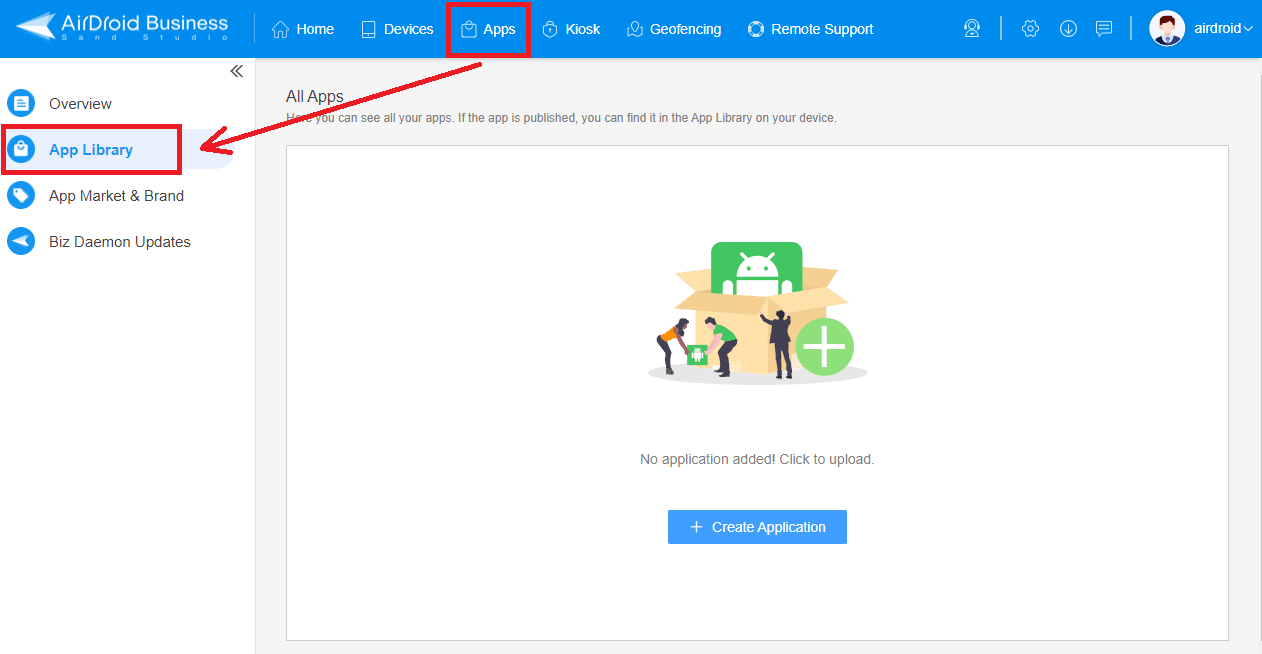
For Google Play Store App:
Tap on Apps - App Library - Managed Google Play Store, and next click on the “Add App” option; search the app with the name and select it. Now, you have to add a specific device or a team to roll out this app and release it; you will get a pop-up when the app is released successfully.
- Step 2.Lock down Android devices into single app mode
Tap on the "Policy & Kiosk" option, next click on the blue kiosk button and create a kiosk config file.
Choose the kiosk launcher - Single App Mode, select your desired app and save settings. Apply this config file to your target devices/device groups. Now, the group of devices you configure is turned into a fully single app kiosk.
Tips: Advanced Settings for Businesses Under Single App Kiosk Mode
After setting up single app kiosk mode, if you want to configure your company devices to meet the following conditions:
- When the device boots, it must automatically load your preset application.
- There must be no way to exit the application unless you enter the safe password, which will allow you access to the device.
AirDroid Business is your best choice. Once devices are locked into kiosk mode by AirDroid Business, they cannot be exited unless the user enters the preset safe passwords set by the admin.
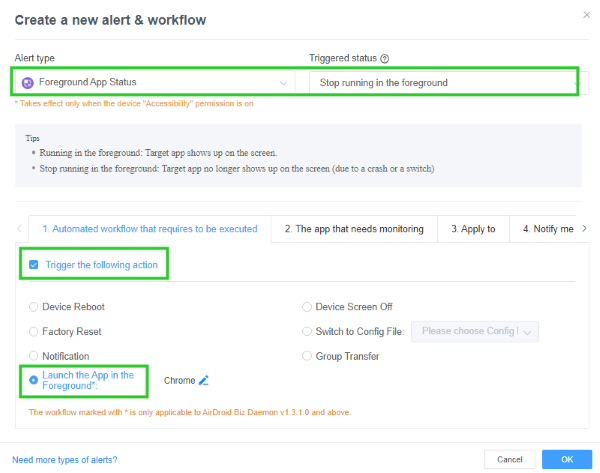
Additionally, you have the option to select the app to "run consistently", Enabling this feature ensures that the kiosk mode can only be exited from the Admin Console, You can also create an alert to detect if the target app is running in the foreground and implement a workflow to automatically restart the app if it is turned off.
5How to Disable Android Single App Mode?
Steps to Disable AirDroid Business Single App Mode
Exiting Android Single App Mode follows the simple steps given below from both the management end and the device’s end.
From device end: Click the three-dots icon in the upper right corner of the device and choose the 'About' tab. Then click on Exit kiosk at the bottom of the screen and then enter the passcode provided by the admin. After entering the passcode, the device will exit the single-app kiosk mode.
From the management end:
To disable the single app mode on your managed device groups, navigate to the "Policy & Kiosk" tab on the MDM dashboard, select the kiosk profile you want to remove, click the 'delete' button, and enter the required passwords. The profile's deletion will automatically disable the mode.
Steps to Exit App Pinning
- 1. Press and hold the Recent App button on the Android device, depending on your device, this button is usually located at the bottom of the screen or on the navigation bar
- 2. After holding down the button for a few seconds, a list of recently used applications will be displayed on the screen
- 3. Find the application you have locked, and swipe left or right to exit the lock mode
- 4. When you brush away the application, It will no longer be locked, letting you use other applications on your device freely.
6Closing
Android Single App Mode is a powerful way to lock devices to a single application, helping businesses and individuals reduce distractions, protect data, and streamline operations.
In this guide, we covered what Single App Mode is, why it’s useful, and three methods to enable it, ranging from simple App Pinning to advanced solutions like Lock Task Mode and AirDroid Business. We also explained how to exit kiosk mode securely when needed.
Whether you're managing a few devices or thousands, there's a solution to match your needs. For centralized control and scalability, consider trying AirDroid Business, you can get started with a free 14-day trial.
FAQs


Leave a Reply.