- Part 1 : 6 Times Tap
- Video Tutorial
- Step 1: Factory reset your device and enter the Welcome page
- Step 2: Select the Provisioning Template on the Admin Console
- Step 3: Complete the initialization and grant permissions for Biz Daemon
- Step 4: Grant necessary permissions for Biz Daemon
- Part 2 : Enrollment via USB
- Video Tutorial
- Step 1: Log out all accounts on the system setting
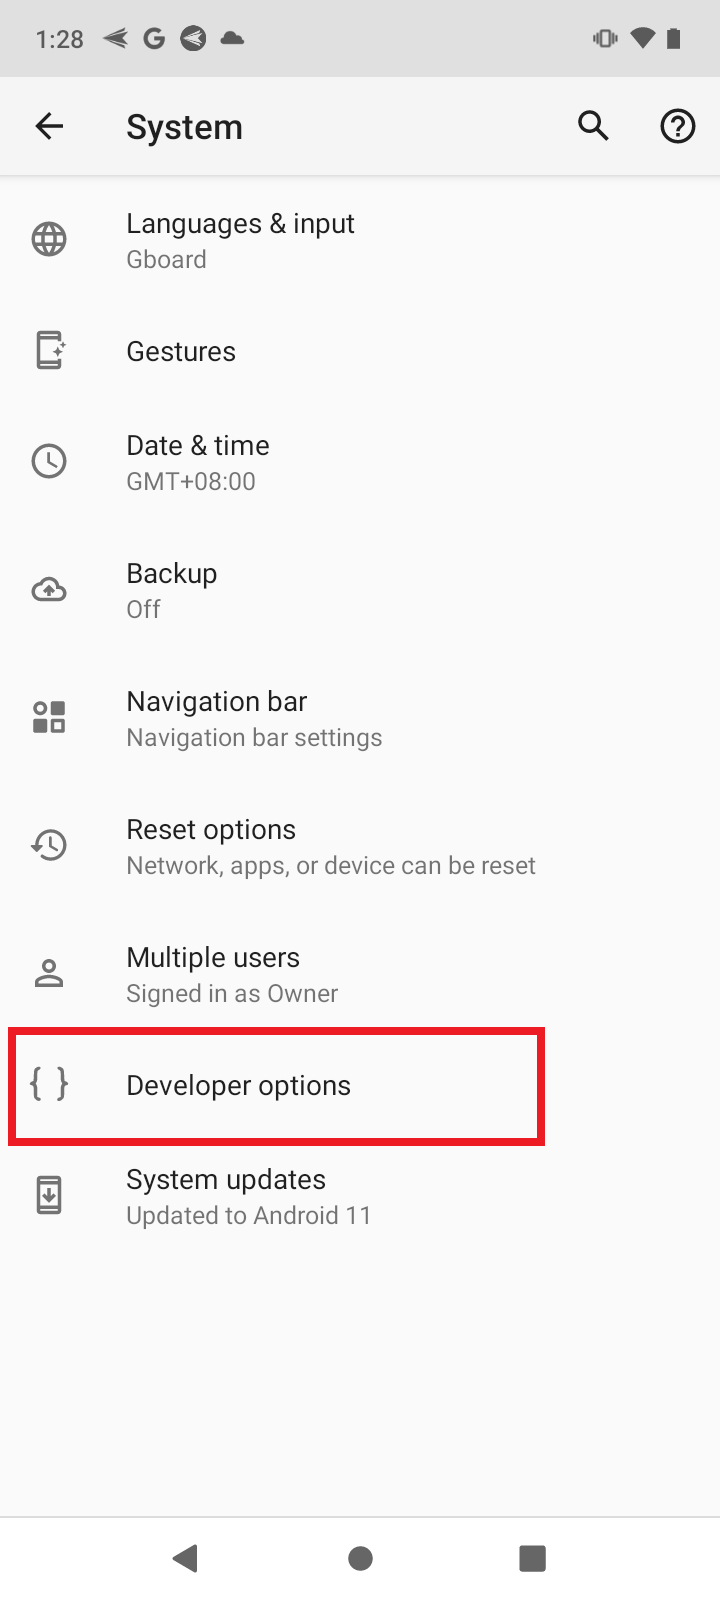
- Step 2: Activate Developers Options from your device
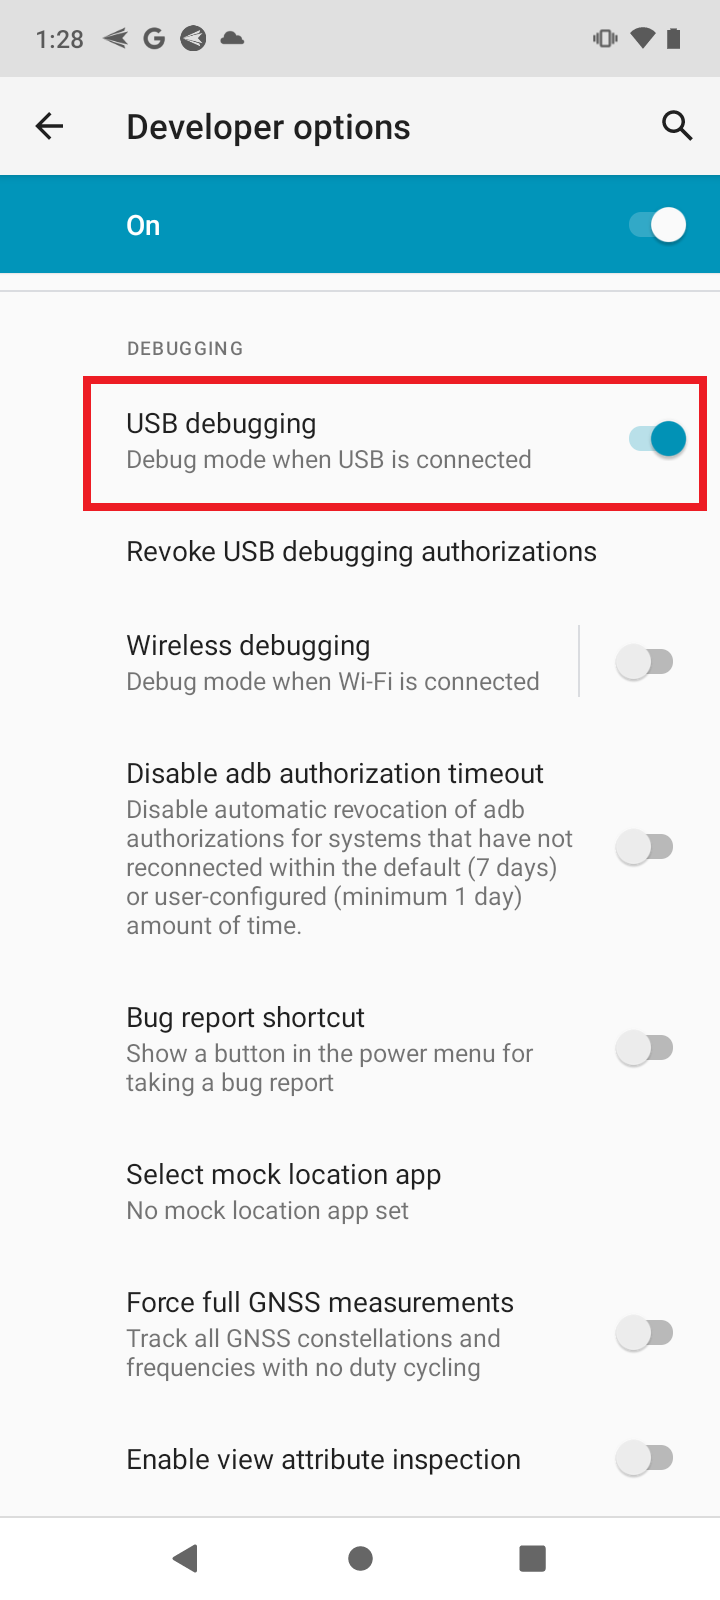
- Step 3: Enable USB Debugging
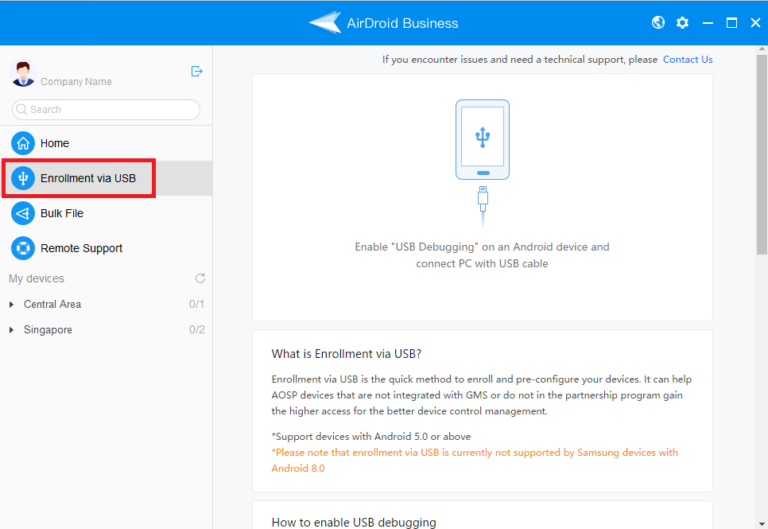
- Step 4: Connect your device to your computer and enroll it via USB
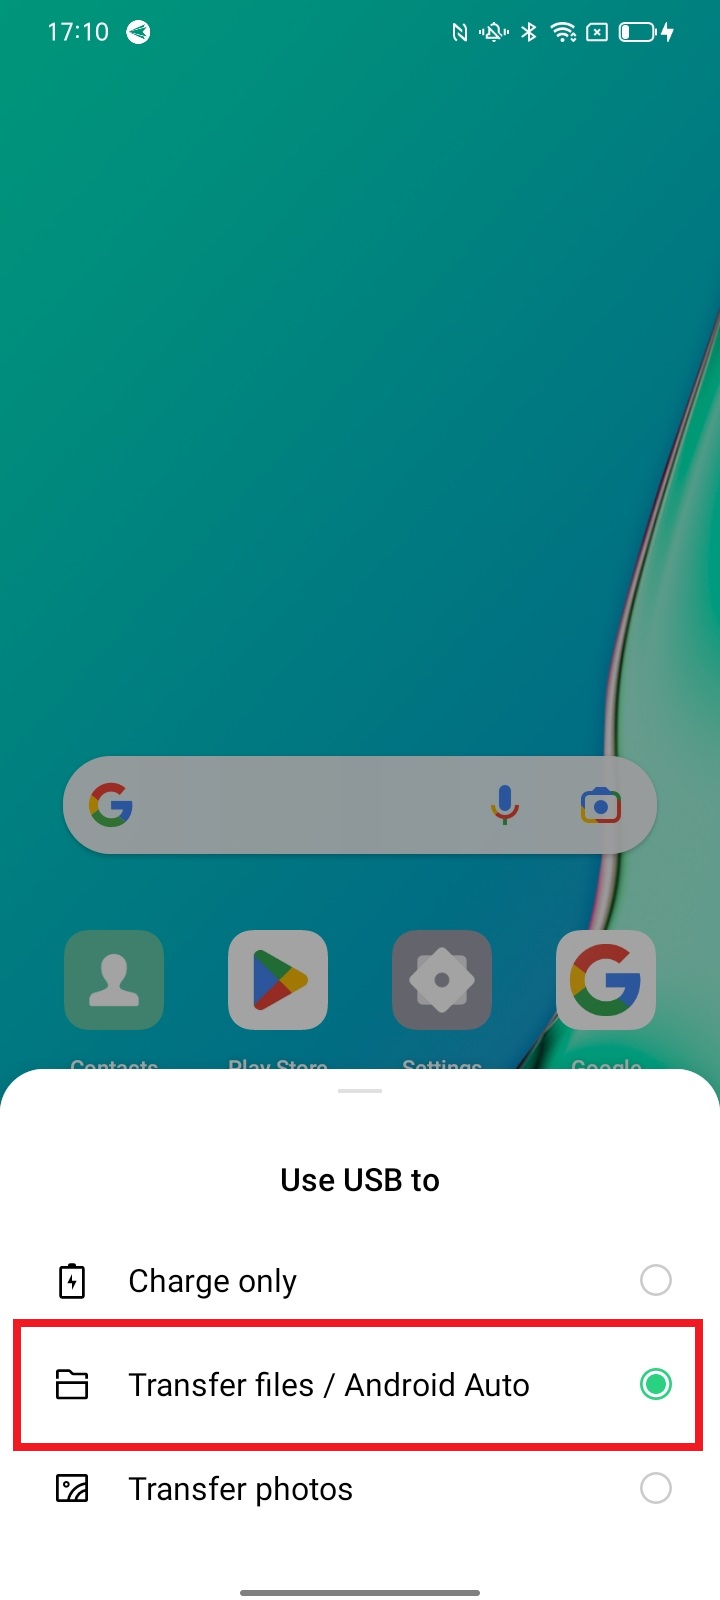
- Step 5: Select File Transfer file on the USB settings
- Step 6: Select the device for Enrollment via USB
- Step 7: Initiate the USB Enrollment process
- Step 8: Apply Provisioning Template
- Step 9: Complete the USB enrollment
- Step 10: Grant necessary permissions for Biz Daemon


How to use The Enrollment via Device Owner?
- Part 1 : 6 Times Tap
- Video Tutorial
- Step 1: Factory reset your device and enter the Welcome page
- Step 2: Select the Provisioning Template on the Admin Console
- Step 3: Complete the initialization and grant permissions for Biz Daemon
- Step 4: Grant necessary permissions for Biz Daemon
- Part 2 : Enrollment via USB
- Video Tutorial
- Step 1: Log out all accounts on the system setting
- Step 2: Activate Developers Options from your device
- Step 3: Enable USB Debugging
- Step 4: Connect your device to your computer and enroll it via USB
- Step 5: Select File Transfer file on the USB settings
- Step 6: Select the device for Enrollment via USB
- Step 7: Initiate the USB Enrollment process
- Step 8: Apply Provisioning Template
- Step 9: Complete the USB enrollment
- Step 10: Grant necessary permissions for Biz Daemon
Enrolling your device through The Enrollment via Device Owner allows the Biz Daemon on your device to obtain Device Owner permission. This will enable you to experience a more stable Kiosk and other Policy Config File settings.
In this section, we will introduce 2 methods to enroll with your devices and grant the Device Owner permission, which are 6 Times Tap and Enrollment via USB.
16 Times Tap
We have created a YouTube video to help you understand this guide better and faster.
Video Tutorial: How to Use 6 Times Tap Enrollment with AirDroid Business
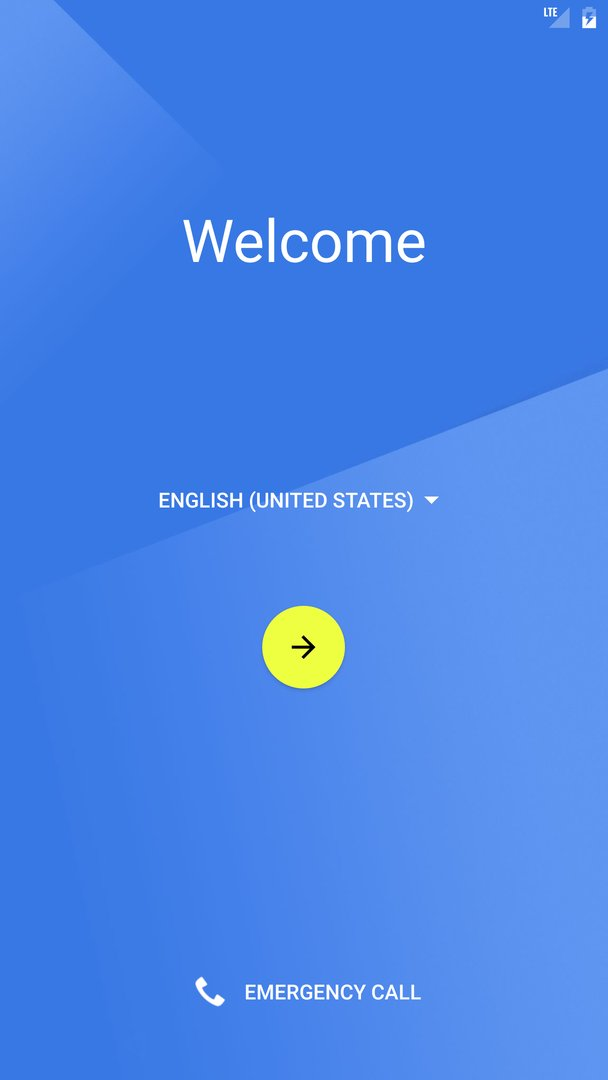
- Step 1Factory reset your device and enter the Welcome page
- Quickly tap the screen 6 times in the “blank space” of the welcome interface of the new device (the interface of different models may be different).
- If your device is already in use, please go to the settings on the device to factory reset your device.
- Note: If necessary, back up or sync all necessary app data before factory reset.
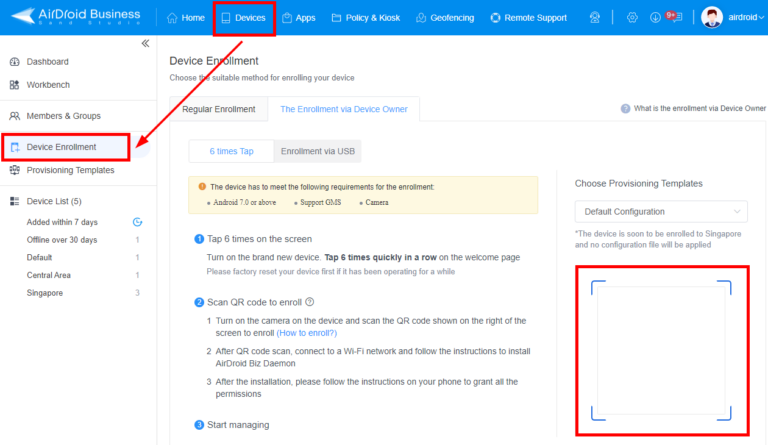
- Step 2Select the Provisioning Template on the Admin Console
- Go to Admin Console > Devices > Device Enrollment > The Enrollment via Device Owner > 6 Times Tap, and use the device's camera to scan the QR Code on the right side of the Admin console enrollment page.
- Please make sure that you have finished setting the Provisioning Templates. If you have not completed the Provisioning Templates settings, please refer to this article to complete your Provisioning Templates settings.
- Step 3Complete the initialization and grant permissions for Biz Daemon
- After scanning the QR code, it will initialize your device.
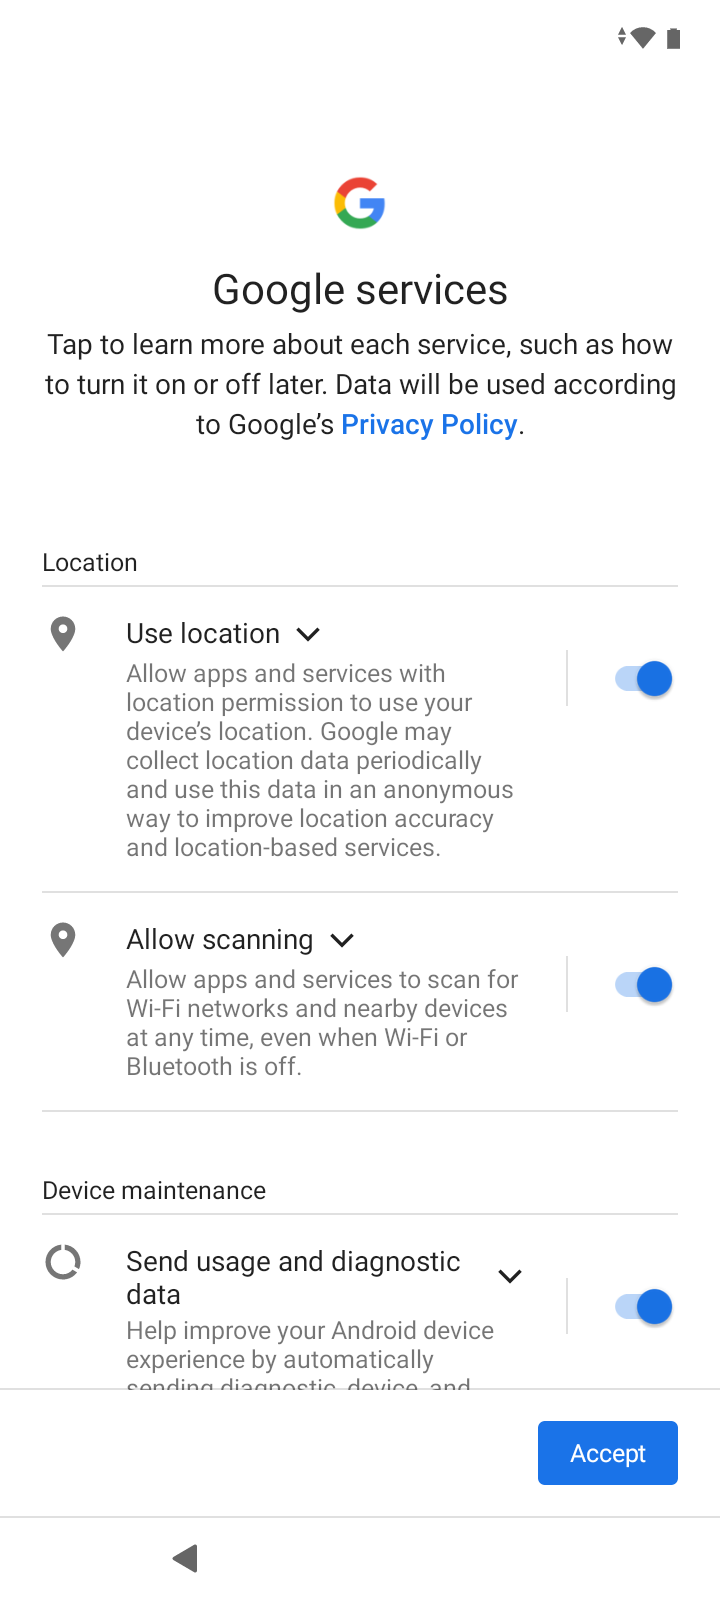
- Then, click Continue to grant basic permissions, and agree with the terms of use to proceed (the interface of different models may be different).
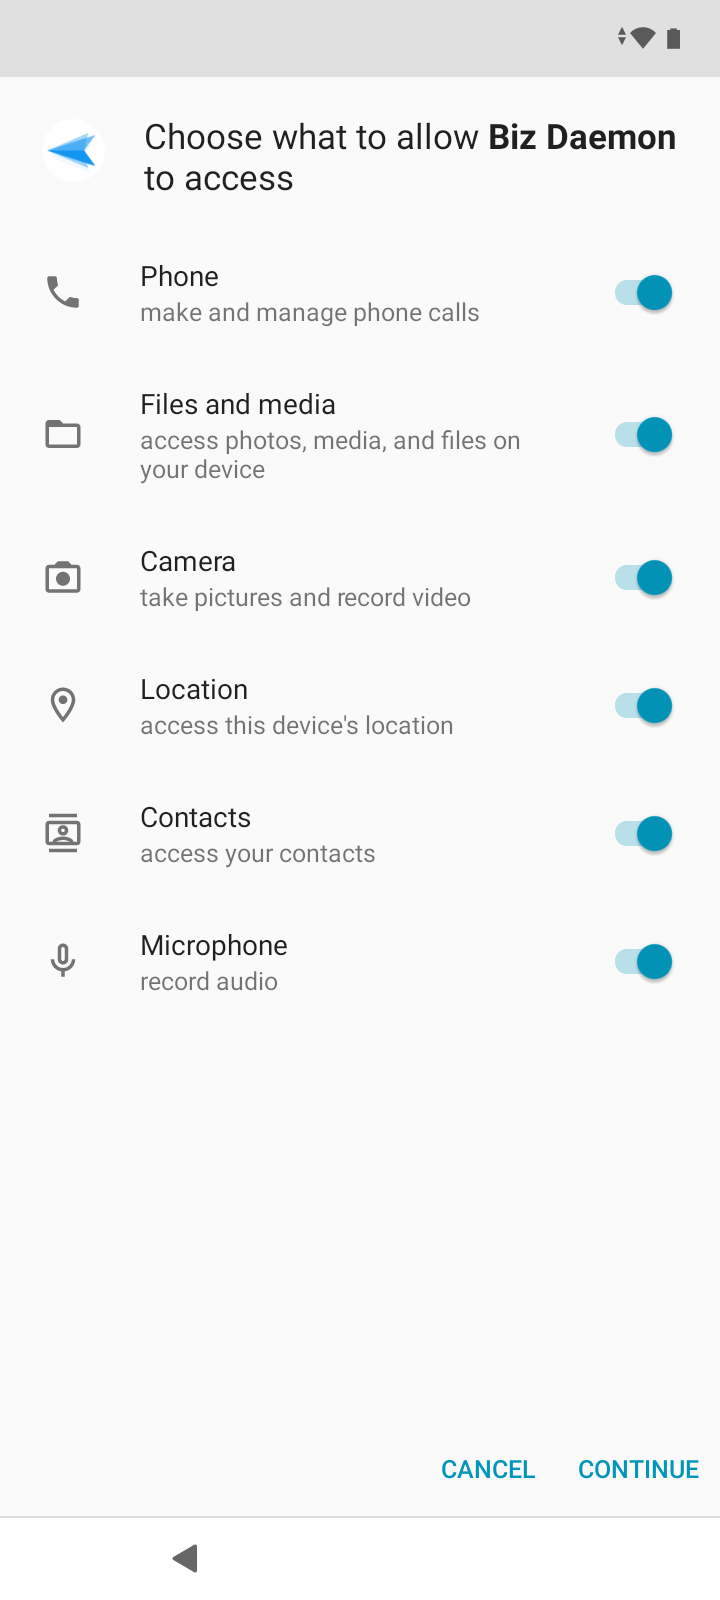
- Step 4Grant necessary permissions for Biz Daemon
- After all the service terms are completed, and you reach the device desktop, open Biz Daemon on the device and check this article to authorize Biz Daemon permissions.

2Enrollment via USB
We have created a YouTube video to help you understand this guide better and faster.
Video Tutorial: How to Use Enrollment via USB in AirDroid Business
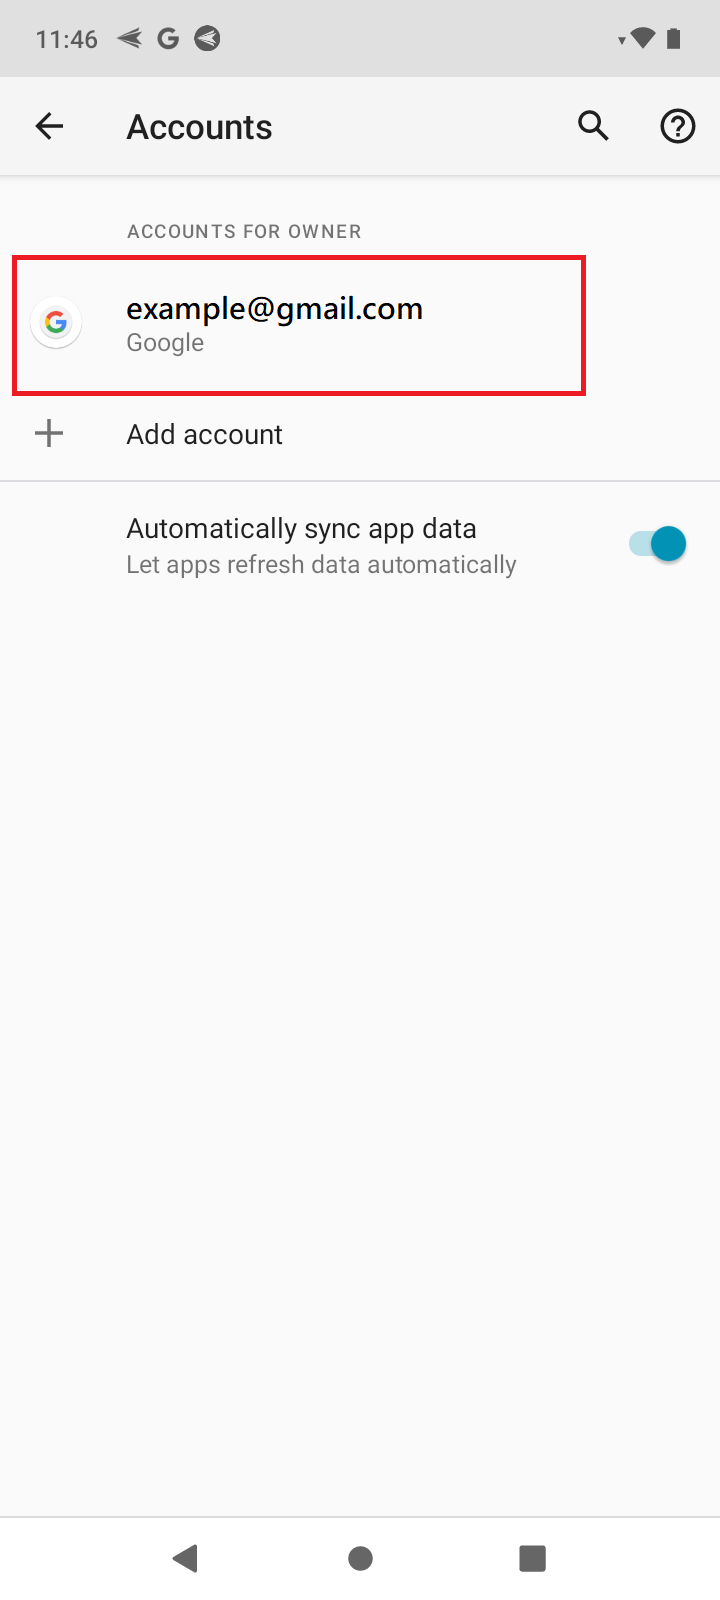
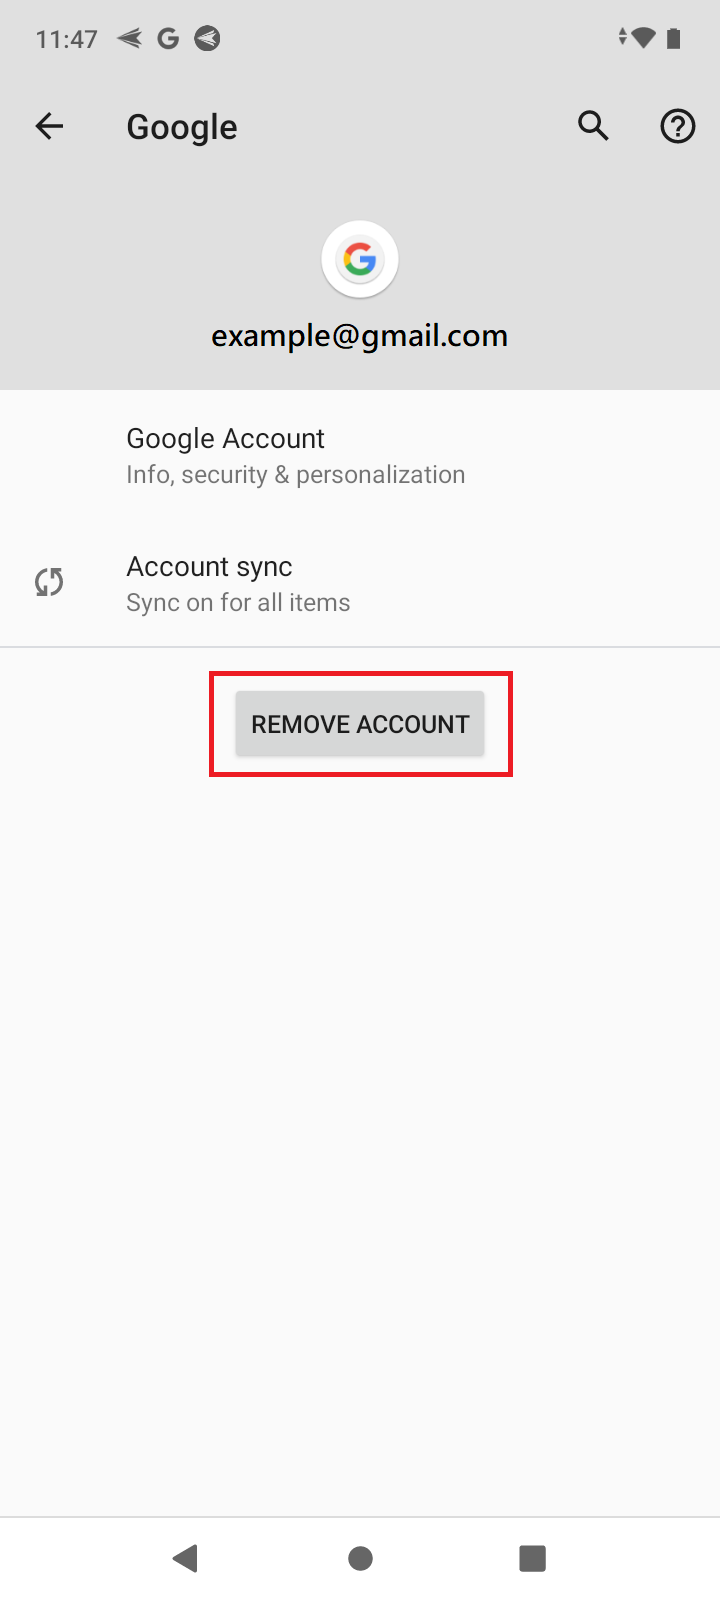
- Step 1Log out all accounts on the system setting
- Please go to the Settings > Accounts on the device, and make sure all accounts, such as Google, Outlook, etc., have been logged out.
- You can log in to your account after completing the USB deployment.
- Note: If necessary, back up or sync all necessary app data before deleting your account.
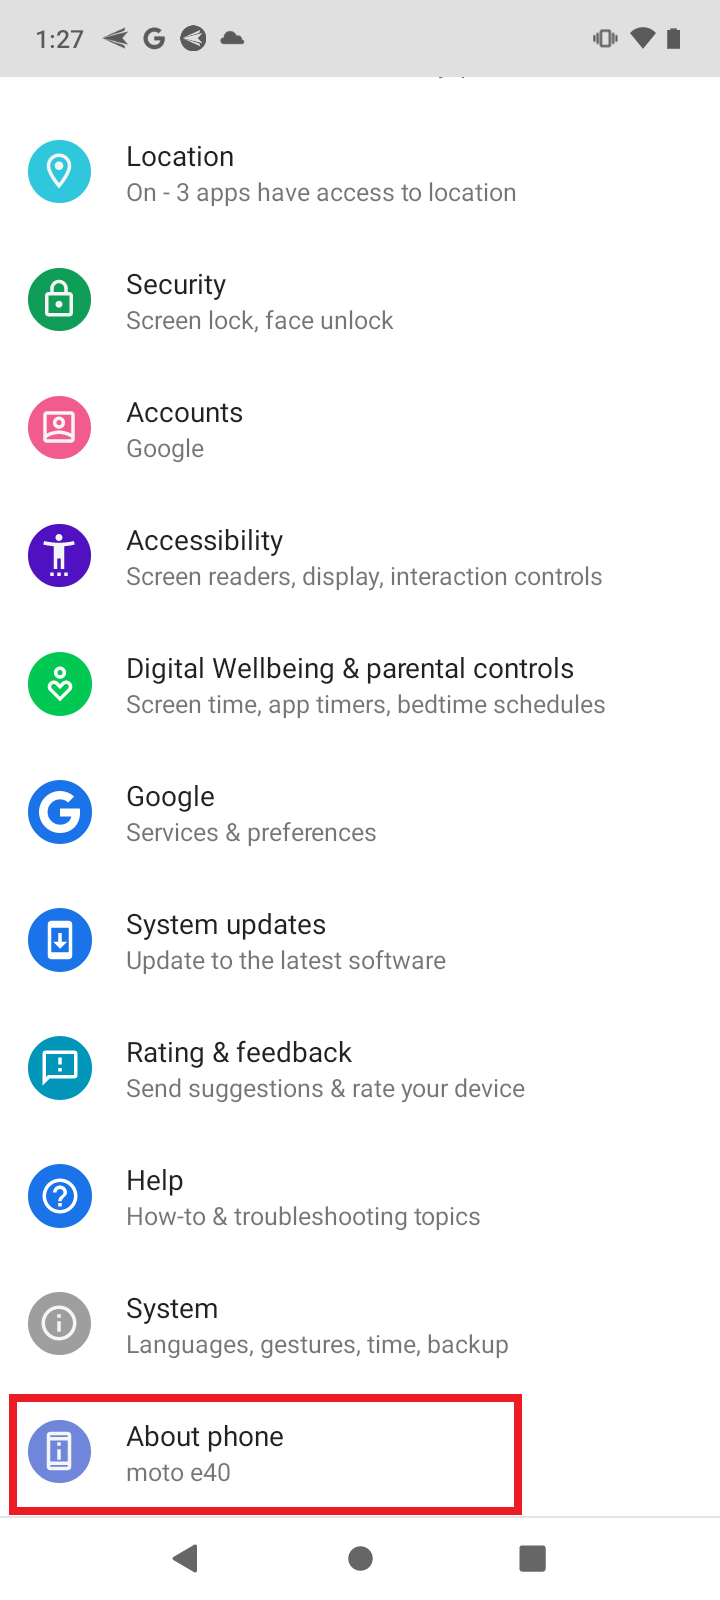
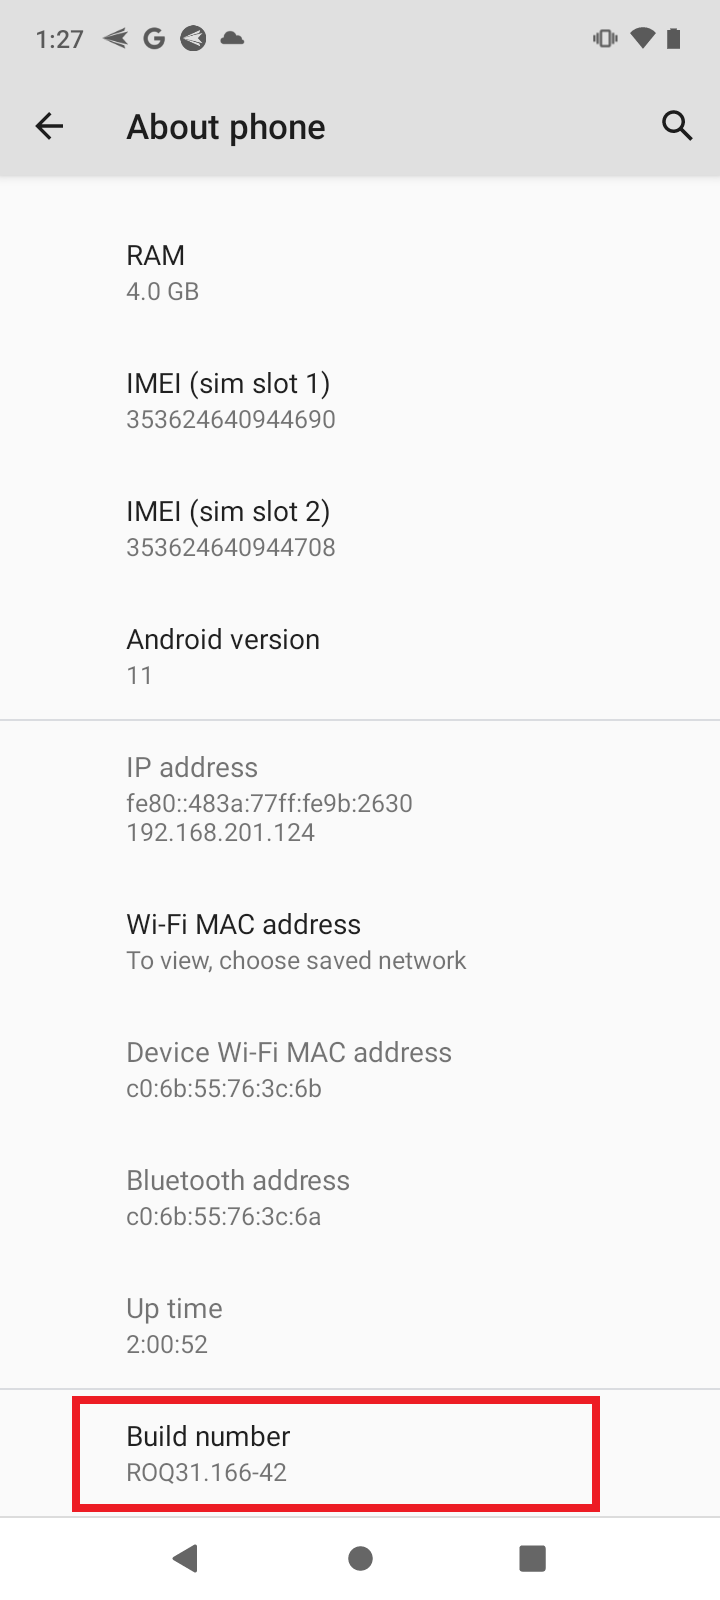
- Step 2Activate Developers Options from your device
- Go to Settings > About Phone, tap on Build number 7 times, and the Developer Options will appear in Settings.
- Note: The steps may vary due to different device models and brands.
- Step 3Enable USB Debugging
- Enable USB Debugging in Developers Options on your device
- Step 4Connect your device to your computer and enroll it via USB
- Go to Desktop Client on your computer > Enrollment via USB
- If you have not downloaded the AirDroid Business Desktop Client, please refer to Getting Started Step 3: Download the Essential Applications for your AirDroid Business.
- Step 5Select File Transfer file on the USB settings
- Follow the instructions to connect the device to the computer with a USB cable, and select “Transfer Files” as the USB connection mode. Otherwise, the desktop client is unable to detect your device.
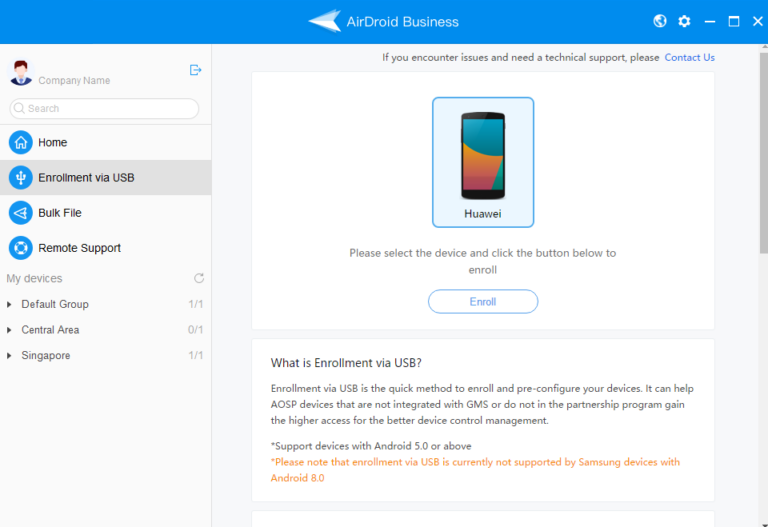
- Step 6Select the device for Enrollment via USB
- Then, you should be able to see your device on the desktop client and tap Enroll to proceed.
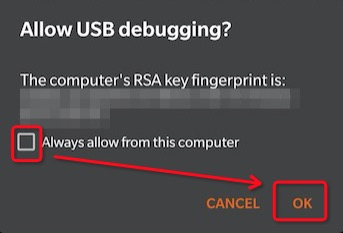
If this is the first time you have run this procedure, the following screen will pop up. Check the option "Always allow debugging from this computer." and tap OK.
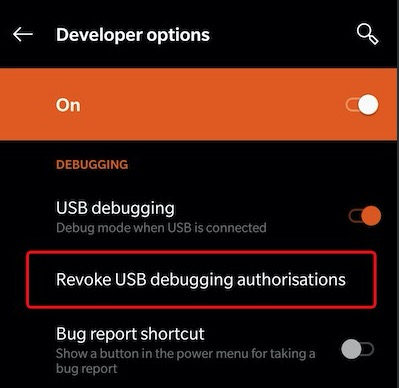
If the procedure keeps failing, reset USB debugging by clicking Revoke USB debugging authorizations.
Then, follow Step 5 to re-connect your device to the computer.
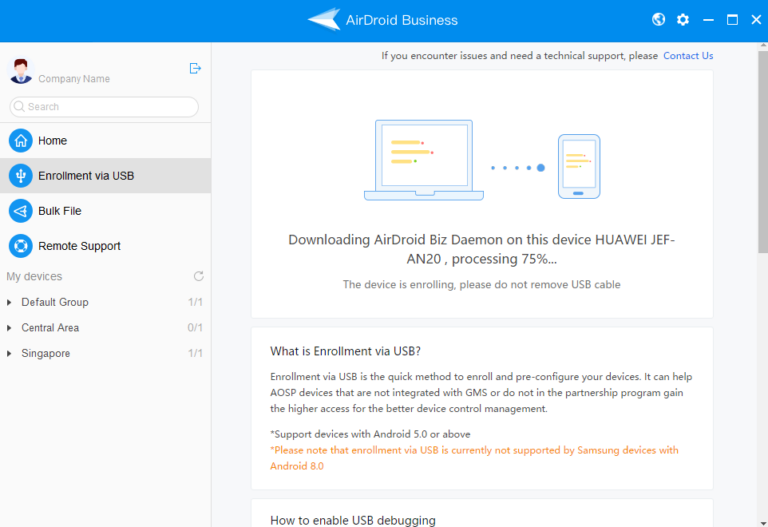
- Step 7Initiate the USB Enrollment process
- The Desktop Client will install the Biz Daemon and deploy the Device Owner permission for Biz Daemon on your device. Please DO NOT remove the USB cable.
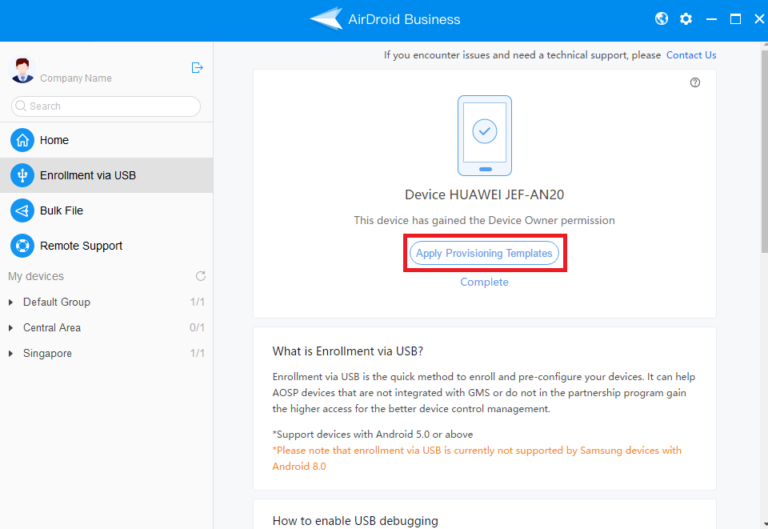
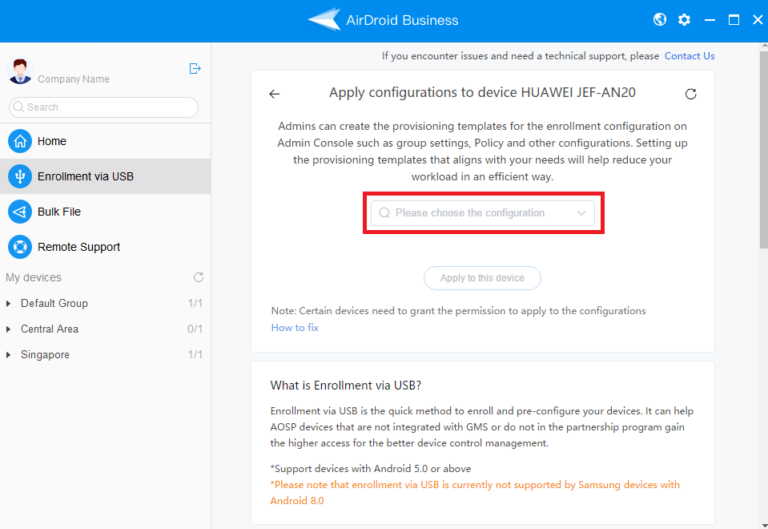
- Step 8Apply Provisioning Template
- After completing the steps above, the Biz Daemon on the device will obtain the Device Owner's permission. Then, click Apply Provisioning Templates, and choose the Provisioning Templates you like to write to set the registration configuration settings to your device.
- Note: Please make sure that you have completed the Provisioning Templates. If you have not completed the Provisioning Templates, please refer to this article.
- Step 9Complete the USB enrollment
- After that, you will see this page on Desktop Client, which means you finish the enrollment via Device Owner.

- Step 10Grant necessary permissions for Biz Daemon
- Go back to the device and click Continue and grant the rest of permissions for Biz Daemon on the device so that AirDroid Business will work as you desire.
- Please check this article for detailed information of each permission for Biz Daemon.

Congratulations! You have enrolled your device with Device Owner permissions. We suggest you to check this article for better management experience.
Still need help? Submit a request >>
Related Articles
- How do I Choose the Enrollment Method on AirDroid Business?
- Enrollment Preparation: How to use Provisioning Template?
- How to use Android Enterprise Enrollment?
- How to use Zero Touch to enroll your devices with AirDroid Business?
- How to use Samsung Knox Mobile Enrollment (KME) to enroll your devices with AirDroid Business?
You May Also Like
- What features are available for Remote Access on AirDroid Business?
- How to remote access a device via Admin Console on AirDroid Business?
- How to Manage Devices on AirDroid Business Desktop Client?
- How do I use the View Mode on AirDroid Business?
- How to use Black Screen Mode to maintain the remote device during Remote Control?