The Ultimate Guide for Quick Assist
Have you given some thought to how the internet works? Do you know it aids in connecting devices, even with supercomputers and servers, worldwide? Without these connections, many contacts between people may not exist. Similarly, service providers use several of these connections to stay in touch with their customers to provide them with the best service. Most customer support services are offered through social media, email, or other non-internet means like call.
However, traditional means of connecting with customers have been ineffective for service providers to help their customers. That is why service providers prefer to use remote assistance tools. Likewise, OS designers, such as Microsoft (who created Windows), have inbuilt alternatives for remote assistance tools. Their most recent customer support tool is Quick Assist. This article will discuss using Quick Assist, its viable applications, and Android alternatives.
What Is Quick Assist?
Quick Assist is a Windows administrative feature for users to connect their PC devices seamlessly. It's used to help people solve issues on their computers. The connections between devices are established through the internet. With this feature, you can share screens and take control of the other device through device assistance. Also, you can troubleshoot, diagnose, and update a system using Quick Assist. However, this feature is only available on Windows 10 and 11.
Before introducing Quick Assist, Windows users could connect their PCs using Remote Assistance. The feature still exists on new Windows versions. However, it functions differently from Quick Assist. One of their main differences is that the Remote Assistance feature is solely operated on Remote Desktop Protocol (RDP) while Quick Assist is cloud-based. Hence, Quick Assist connects through the internet, while Remote Assistance connects remotely.
Important Things before Getting Started with Quick Assist
Quick Assist is only available through a Windows PC. However, not just any Windows system has the feature. It works on the latest versions of Windows, which are Windows 10 and 11. The feature was introduced as an upgrade to the existing Remote Assistance. However, the previous feature was not removed. Also, you need to be connected via the internet to use the feature. The systems need to have a working Microsoft account. Then, the two PCs must be logged in to their account before they can be connected.
How to Use Windows Quick Assist App for Remote Assistance
This section will take you through how to set up Quick Assist from scratch.
Step 1. Quick Assist Download and Install on Windows 10/11
Before you can start using the Quick Assist feature on your computer, you need to ensure it is installed on your device. Here is how to confirm if it is available and download the app if it's not on your PC.
a. How to check the app
- Open the Windows Start Menu.
- Type Quick Assist into the search box.
If the app is unavailable, you can search Microsoft Store.

- Download the app and install it manually on your PC.
b. If the feature has been uninstalled
- Open the Windows Start Menu and click on the gear icon to open Settings.
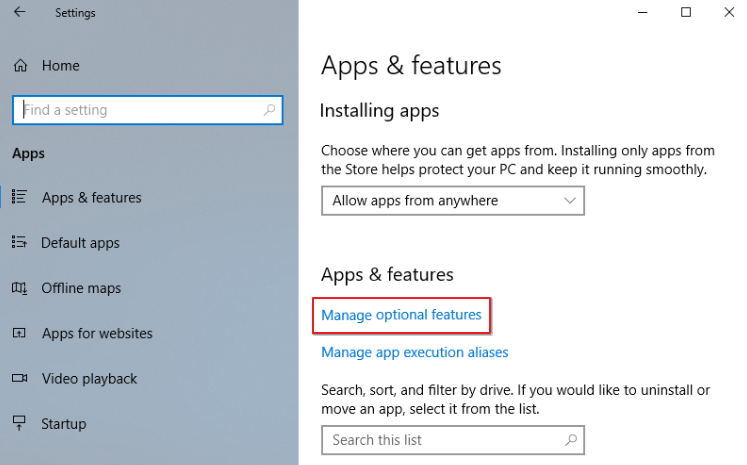
Select the Apps option from the settings list and proceed to pick Manage optional features.

- Click on Add a feature and search through the list for Quick Assist.
- Select the app icon and complete the process by clicking Install.
Step 2. Make the Connection between Windows Computers
Once you have confirmed that your device has Quick Assist, you can connect it to another system. Follow the steps below to connect to Windows computers.
- Step 1.Open the Windows Start Menu and type Quick Assist into the search box. Click on the MS Quick Assist app.
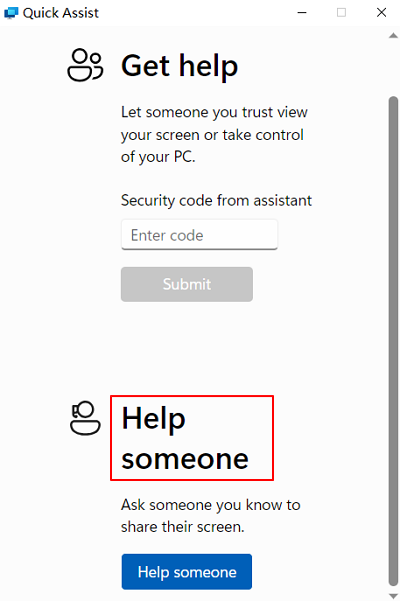
- Step 2.Suppose you will help others, click Help someone under Get Help.

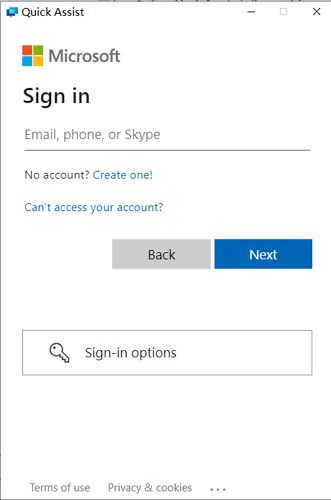
- Step 3.Sign in with your Email or phone number and password.

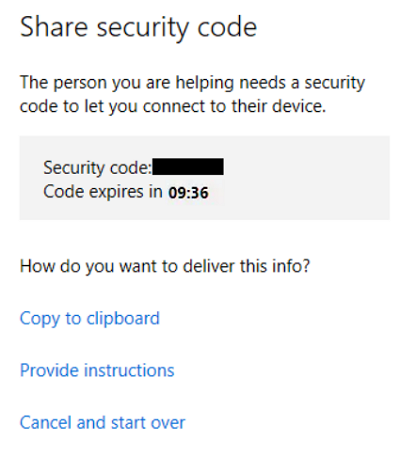
- Step 4.Click on Sign in, and then you will get a Security code.

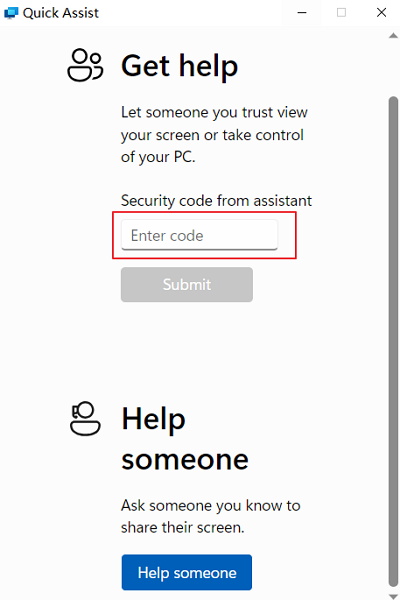
- Step 5.In the computer that needs help, run Quick Assist, and fill in the Security code under Get Help.

- Step 6.Complete the process by clicking the Share screen.
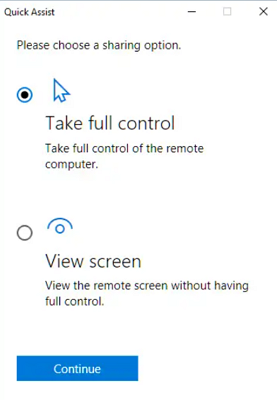
- Step 7.Select either Full Control or View Screen, then Continue.

- Step 8.On the helper's system, select the Allow button.
What You and the Supportee See
The screen of the client's system is displayed on your (server) screen. It is inside the Quick Assist app window, restricted by the yellow borderline. Moving your mouse pointer over the yellow frame gives you control over the client's system. Hence, whatever you click or type will appear on their system. This scenario means you can run programs and perform any function on the system.
The client will see what you are doing on their screen. The Screen Sharing prompt is an indication for them that you have access to their device. They will see the mouse pointer's movement, the apps' opening, and every other poking around. However, they can interfere with what you are doing. They can even pause or cancel your control over their PC.
Quick Assist Tools You Can Use
Some of the tools on the app have been identified and explained below, which will help you get familiar with Quick Assist.

Select Monitor: If the client device is connected to multiple monitors, you can select which monitor screen to see. The tool for doing that is the Select Monitor.
Annotate: This tool helps you to instruct the customer by providing them with a drawing tool. That way, you can help them quickly identify what you are instructing them to do.
Actual Size: It will be displayed in full resolution on your screen by default. Hence, this tool allows you to move vertically or horizontally to whichever area of the screen you want to view.
Toggle Instruction Channel: This is a chatting tool for instructing the customer when providing help.
Task Manager: It is used to open the task manager of the client's system. That way, you can troubleshoot or manage tasks on the system.
Quick Assist Not Working, Loading, or Connecting? Try These Ways
Users who are not very familiar with Quick Assist can get stuck while trying to use it. The most basic reason is that they do not have a proper network connection. However, there are other issues like Quick Assist not loading, Quick Assist being blocked by the firewall, Quick Assist being stuck waiting for a helper, Quick Assist down, etc. Solutions for resolving these issues are shown below.
1Run Quick Assist as Administrator
This solution grants the app needed permission when running.
- Open the Windows Start Menu.
- Type Quick Assist into the search box.
- Right-click on the Quick Assist app, then select Run as administrator.
2Uninstall and Reinstall Quick Assist
This solution is best when the app is not working on your system.
- Open the Windows Start Menu.
- Click on the gear icon to open Settings.
- Select the Apps option from the settings list.
- Proceed to pick Optional features.
- Navigate to Microsoft Quick Assist and click on it.
- Select the Uninstall option.
- Restart your system.
- Open the Windows Start Menu again.
- Click on the gear icon to open Settings.
- Select the Apps option from the settings list.
- Proceed to pick Optional features.
- Click on Add a feature.
- Search through the list for Quick Assist.
- Select the app icon and complete the process by clicking Install.
3Reset Your PC
This solution is best for repairing corrupted files in the system's registry.
- Open the Windows Start Menu.
- Type cmd into the search box.
- Right-click on the Command Prompt app, then select Run as administrator.
- Type sfc/scannow into the Command Prompt and press the Enter button on your computer.
- Wait till it reaches a 100% scan, then restart your system.
- Open the Windows Start Menu again.
- Type cmd into the search box.
- Right-click on the Command Prompt app, then select Run as administrator.
- Type DISM /Online /Cleanup-Image /RestoreHealth into the Command Prompt and press the Enter button on your computer.
4Create a New User Account
- Open the Windows Start Menu.
- Click on the gear icon to open Settings.
- Select the Accounts option from the settings list.
- On the left side pane of the screen, select Family & other users.
- Under Family & other users, select Add someone else to this PC.
- Click on I don't have this person's sign-in information link.
- Add a new account by selecting Get a new email address option.
- Fill in the registration details and select Next.
- Restart your system and use the new account details to log into the system.
- Then, launch the Quick Assist app.
5Try Chrome Remote Desktop
You can use Chrome Remote Desktop as an alternative to Quick Assist.
- Install the Chrome Remote Desktop extension on both devices.
- Sign in to the same Google Account on the two devices.
- Open the Chrome Remote Desktop web page.
- Click Remote Support on the left pane of the remote device screen.
- Select the Blue download button under Share this screen.
- Click on Generate Code on the server computer.
- Input the code of the server device on the client device.
- Click on Connect and select Share to complete the process.
6Check If Quick Assist Is Blocked
- Open the Windows Start Menu.
- Type Windows firewall into the search box.
- Select the Windows Defender Firewall with the Advanced Security option.
- At the left side of the screen, select Inbound Rules.
- At the right side of the screen, select New Rule.
- Set the new rule by selecting Port, then Next.
- Select TCP and select Specific local ports.
- Enter 433 inside the box before Specific local ports and click Next.
- Select Allow the connection, then Next.
- Select all the network types, then Next.
- Name the new rule and click on Finish.
7Run System Restore
- Open the Windows Start Menu.
- Type msconfig into the search box.
- Select the System Configuration option.
- Select the Services tab.
- Mark the box in front of Hide all Microsoft services.
- Click on Disable all.
- Select the Startup tab.
- Click on Open Task Manager.
- Select the Startup tab on the Task Manager.
- Click on Disable at the bottom of the screen.
- Close the Task Manager and select OK on the System Configuration screen.
- Restart your system, then launch the Quick Assist app.
Can I Use Quick Assist on Mac, iPhone, or Android?
No, Quick Assist is not available on any device that does not run on the Windows OS. Hence, you cannot use Quick Assist on Mac, iPhone, or Android. It only works for Windows 10 or 11 systems. The web version of Quick Assist available on the web browser of other devices only permits Microsoft representatives to provide remote support for other devices. However, it is not a feature available for all users. There are other screen-sharing apps on Mac, iPhone, or Android for remote support. For instance, you can use Screen Sharing for Mac-to-Mac support. And for Android, you can other remote support tools below.
Solve Android Problems over a Remote Connection
We have identified two apps to aid your quest if you want to provide remote assistance for an Android device.
For Personal Use (Support Android Phones and Tablets)
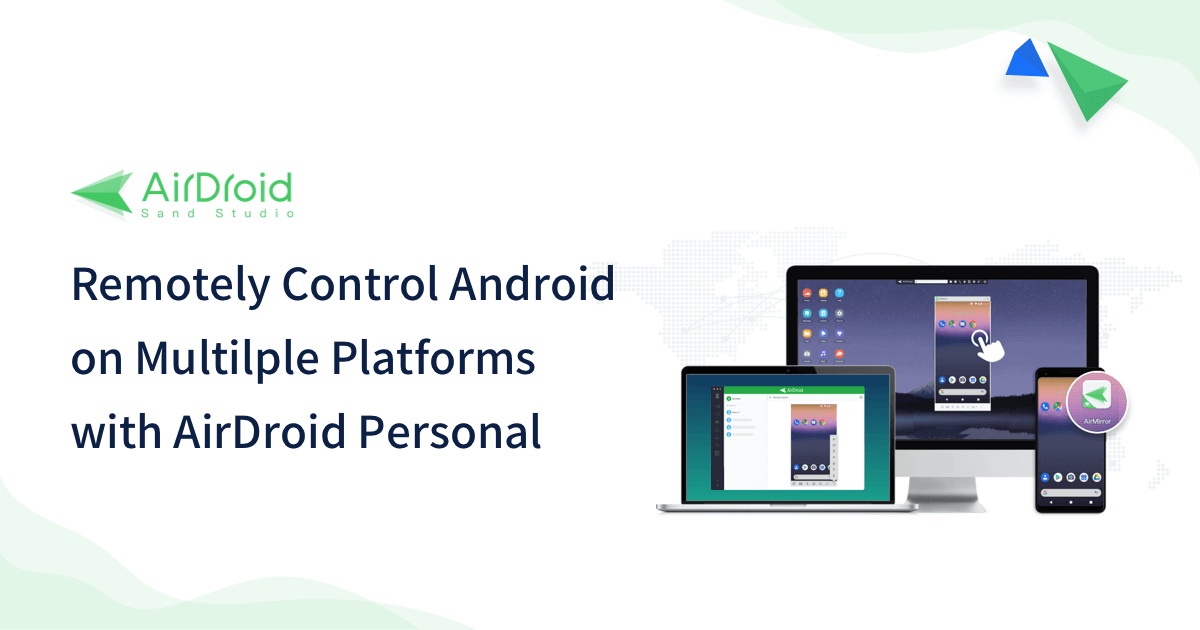
Our first app recommendation for solving Android problems over a remote connection is the AirDroid Personal. It has the best Android device management tools in its suite. You can use it at home without expert help. Some of the things you can use it for are mirror screens, managing notifications, sharing files, and controlling devices remotely. The app is available for both remote connection and via the web. It has no file restriction. Some of its key features are;
Remote Camera: You can use the target device's camera to see and guide them during system support.
No Device Rooting: You do not have to root your Android device before another can control it.
Remote Mouse and Keyboard Control: You can take full control of the mouse and keyboard of the target device to make changes to it.
Multiple Device Control: You can manage up to 4 devices on a PC using centralized mobile usage.
For Business Use (Support Any Android Devices)
Our second app recommendation for solving Android problems over a remote connection is the AirDroid Remote Support. It has screen sharing and Augmented Reality (AR) features. You can also use it to access your client's unattended devices. Aside from being intuitive and very easy to use, it comes with a beginner's guide. You can be guaranteed that your business and client data is protected because it uses a multilevel security system.
Some of its other key features are:
Unattended Access: AirDroid Remote Support allows you to connect with your users' devices without their consent. You can access the device even when it is not in use.
Remote Control: When providing users with a software service, you can fast-track the process by controlling their device to make the right changes.
Black Screen Mode: When the user's device is under repair, MSPs can hide the device screen to protect the user's privacy.
Security Policy: It features end-to-end and multilevel encryption security for all devices.
Lightweight Management: It provides service providers with fast access and stable control with its intuitive interface.
End Note
Windows-to-Windows connections help share screens and data. Much more than screen and data sharing, remote assistance can be done with this connection. Hence, Microsoft Quick Assist provides administrative assistance between two Windows computers.
This article has extensively discussed how to use the connection and resolve connection issues. Also, it shows how to resolve issues remotely on other devices without Quick Assist, especially Android phones. For Android devices, you can use AirDroid Personal or AirDroid Remote Support.
FAQs about Quick Assist
Here are some of the most asked questions online about Quick Assist.



Leave a Reply.