How to Enable Kiosk Mode on iPad (3 Methods)
There are 3 proven ways to enable Kiosk mode on iPad: Guided Access (built-in iOS feature), Apple Configurator (free Mac tool), and MDM solutions (enterprise management).
| Method | Guided Access | Apple Configurator | MDM Solutions |
|---|---|---|---|
| Best for | Personal use (1-2 devices). | A small batch of iPads. | Centralized control over a large number of iPads spanning multiple locations. |
We’ll break down each approach step-by-step so you can confidently choose and master the one that works for you. We won’t just be showing you how to enable Kiosk mode on iPad through these methods, but we'll also be explaining how these methods compare with each other regarding their specific setup requirements and their suitable use cases. We’ve made sure to put these techniques to the test to ensure you find the perfect method for your situation.
1Feature Comparison - All 3 Methods Side by Side
Understanding which method fits your needs saves you hours of setup time and prevents frustration down the road. The right choice depends on how many devices you're managing and whether you need remote control.
Criteria | Guided Access | Apple Configurator | MDM Solutions |
|---|---|---|---|
| Setup Difficulty | (1/5) - Instant | (3/5) - Technical | (4/5) - Professional |
| Cost | Free (Built-in) | Free (Requires Mac) | Paid (Subscription-based) with Limited Free Tier Options |
| Devices Supported | 1 device at a time | Small batches (3–10) | Unlimited (10 to 10,000+)/Up to 50 with certain Free Tier Options |
| Remote Management | No | No | Yes (Cloud-based) |
| Exit Complexity | Low: Triple-click + Passcode | High: Must reconnect to Mac | Medium: Remote command or Admin PIN |
| Battery Impact | Low (Standard usage) | Medium (High brightness/Always on) | Medium (Background sync) |
| Best Use Case | Parents & Solopreneurs: Quick hand-offs or one-day events. Smaller tasks like locking the iPad to a specific app for children or doing a quick customer survey | Showrooms & Classrooms: Static store displays or "App Stations". Anything from setting up iPads for a Learning Center in a classroom or creating static displays. | Businesses/ Hospitals & School Districts: Fleet management and "Shared" devices. From POS systems to Shared Device Management for schools or hospitals. |
2Method 1: How to Enable Guided Access (Kiosk Mode) on iPad
Guided Access is perfect when you need a quick kiosk setup right now. No extra software, no Mac required, just your iPad and about 2 minutes.
(Tested on IOS 26.2)
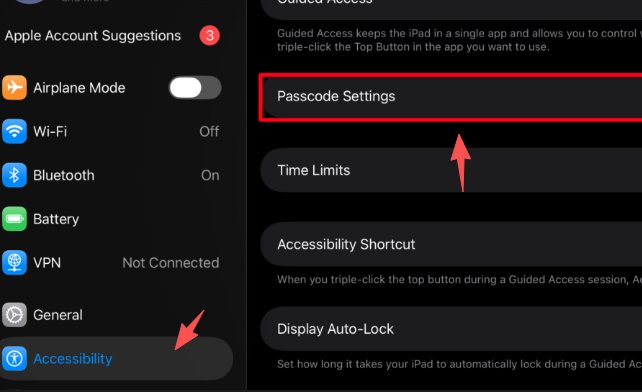
1. Open settings and select Accessibility on the left-hand side. And scroll down and select Guided access.
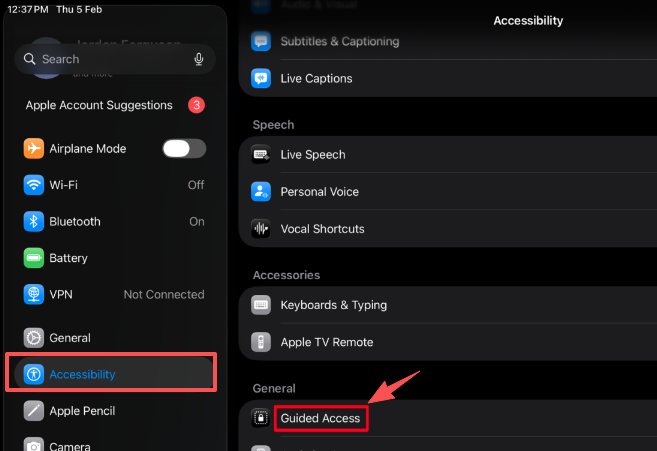
2. After enabling Guided Access, select the passcode setting and set guided access passcodes.
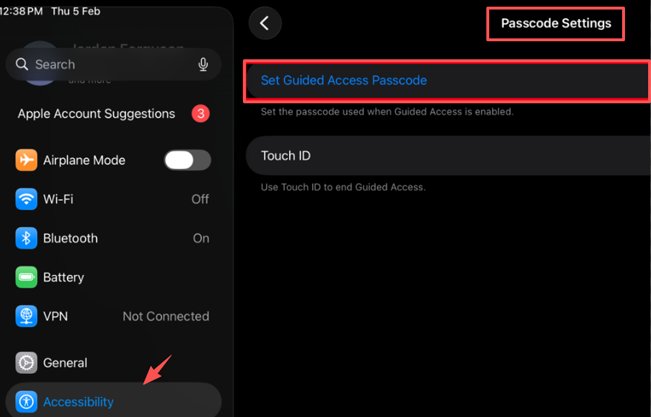
This passcode allows you to enter and exit iPad Kiosk mode.
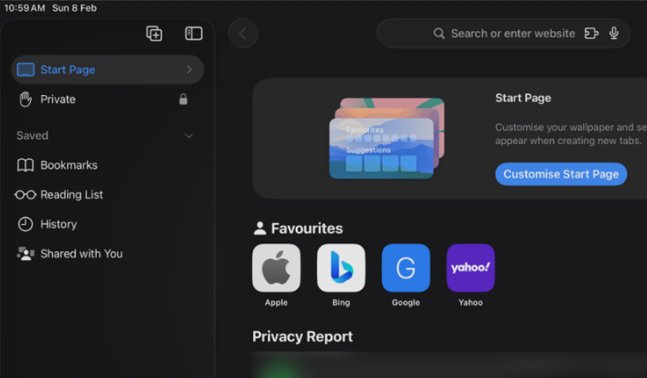
3. Open our desired app; we’re using Safari for example. Triple-click the Power button to begin Kiosk mode once inside the app.
At this stage, you can circle areas on the screen you’d like to disable. You can also configure session options by tapping it at the bottom .
4. Now tap 'Start' to begin Kiosk mode. While in Kiosk mode, the Volume and Power buttons are all disabled. To exit out of Kiosk mode, triple-click the Power button and enter the password.
What if I forget my Guided Access password?
The Force Restart
As long as your iPad is still responding, a force restart will typically end the session and return you to the home screen.
For iPads without a Home Button:
- 1. Quickly press and release the Volume Up button.
- 2. Quickly press and release the Volume Down button.
- 3. Press and hold the Top (Power) button until the Apple logo appears.
For iPads with a Home Button:
Press and hold both the Home and the Top (Power) buttons simultaneously until you see the Apple logo.
3Method 2: How to Enable Kiosk Mode with Apple Configurator
Apple Configurator gives you a more permanent kiosk lock than Guided Access. It survives reboots and battery drains. But there's a catch—you need a Mac, and the setup process will factory reset your iPad.
The Prerequisites
Before you can lock an app, the iPad must be in Supervised Mode. This is a security state that proves your organization owns the device.
Warning: Enabling Supervised Mode via Apple Configurator will factory reset the iPad. Back up any data you need before starting!
- 1. Go to Settings > (Your Name) > Find My and turn it off. Apple Configurator cannot supervise a device that is activation-locked.
- 2. Plug your iPad into your Mac using a USB cable and launch Apple Configurator.
- 3. Right-click the iPad in the device window and select Prepare.
- 4. Choose Manual Configuration.
- 5. Check ‘Supervise devices’ (checking "Allow devices to pair with other computers" is recommended so you don't lock yourself out of the USB port later).
- 6. Follow the prompts to create a "New Organization" (enter your business name).
- 7. When asked about the "Setup Assistant", you can choose "Show all steps" or "Don't show any".
- 8. Click Prepare. The iPad will now erase and restart in Supervised Mode.
Enabling Single App Mode
Now that the iPad is in Supervised Mode, you can trigger the Kiosk lock.
- 1. In Apple Configurator, right-click your (now in Supervised Mode) iPad.
- 2. Go to Actions > Advanced > Start Single App Mode
- 3. A window will pop up showing all apps currently installed on the iPad. Select the one you want to lock.
- 4. Click the Options button in the bottom left. Here is where you get more control:
- Disable the Sleep/Wake button (so the screen never turns off).
- Disable Volume buttons.
- Disable Touch (if you just want a digital sign).
- 5. Click Select App. The iPad will instantly jump into that app and stay there.
How to exit Single App Mode
Since the iPad is hard-locked, you can’t just triple-click a button to leave.
- 1. Connect the iPad to the same Mac used to lock it.
- 2. Open Apple Configurator.
- 3. Right-click the device and go to Actions > Advanced > Stop Single App Mode.
4Method 3: How to Enable Kiosk Mode with MDM
Enabling Single App Mode via MDM is the most robust and automated solution. Unlike the manual methods, this is done entirely from your computer and can be pushed to hundreds of iPads simultaneously over the air.
The Prerequisites
To set up Single App Mode on an iPad via MDM, the following prerequisites must be met:
- Supervised Mode: The iPad must be in Supervised Mode. This is the most critical requirement. You can achieve supervision by:
- Enrolling the device through Automated Device Enrollment (ADE) via Apple Business Manager.
- Manually supervising it using Apple Configurator on a Mac (requires a factory reset).
- Operating System: The device must be running at least iOS 7 or later.
- App Installation: The specific app you intend to lock must be pre-installed on the device before the Single App Mode profile is applied.
- Active MDM Enrollment: The device must be fully enrolled in your MDM solution (e.g., Jamf, Intune, Kandji) to receive the configuration profile over-the-air.
- Network Connectivity: An active internet connection is required for the device to receive the "Lock to App" command and for the app to verify its license.
Configuration
While every MDM (Jamf, Mosyle, Meraki, etc.) has a slightly different interface, the workflow is almost identical across all of them:
- 1. Log in to your MDM dashboard. Navigate to Profiles or Policies and create a new iOS/iPadOS Configuration Profile.
- 2. Select the "Kiosk" or "Single App Mode" Payload. Look for a section labelled 'Kiosk,' 'Single App Mode (SAM),' or 'App Lock.'
- 3. Choose Your App. You will be prompted to select an app. You can usually search for it by name or enter its Bundle ID (e.g., com.apple.mobilesafari).
- 4. Customize the restrictions. Most MDMs let you toggle:
- Touch: Disable the entire screen (good for digital signs).
- Volume Buttons: Block users from changing the sound.
- Auto-Lock: Keep the screen on indefinitely (recommended for kiosks).
- Motion Sensor: Prevent the screen from rotating.
- 5. Select the iPads (or groups of iPads) you want this to apply to. Click Save and Publish. The iPads will instantly "snap" into the app.
How to Exit MDM Kiosk Mode
Exiting Single App Mode (Kiosk Mode) on an iPad managed via MDM typically requires action from the MDM administrator console, as hardware buttons are usually disabled by the management profile.
Remote Admin Command (Standard): The fastest way to exit is to send a command from your MDM dashboard.
Emergency Exit (No Internet): If the iPad has lost its network connection, it cannot receive the "exit" command. You must use a physical connection to a Mac.
- 1. Plug the iPad into a Mac running Apple Configurator.
- 2. Right-click the device in the Configurator interface and select Remove > Profiles.
- 3. Select the management profile causing the lockdown and click Remove.
Local Passcode (If Pre-Configured): Some MDMs allow for a "local exit" if it was enabled during setup.
Autonomous Single App Mode (ASAM): If the app manages its own lockdown, use the admin passcode within the app itself to end the session.
5Conclusion
Guided Access works great for quick, temporary lockdowns but becomes unusable after the battery drains and requires manual re-entry. Apple Configurator provides a stable kiosk lock that survives reboots, making it ideal for permanent installations like store displays. MDM solutions offer the most robust option with auto-recovery after power loss and remote management capabilities.
Here's your decision framework: Use Guided Access for events or temporary setups (zero cost, instant setup). Choose Apple Configurator for 3-10 iPads in a single location where you can physically access them (one-time Mac investment, permanent lock). Go with MDM for 10+ devices, multiple locations, or when you need remote control (monthly subscription, enterprise-grade features).
Ready to lock down your iPads? Start with the method that matches your scale, and you'll have a secure kiosk running in under an hour.
Secure and monitor your entire fleet with AirDroid Business MDM, the ultimate kiosk and remote management solution for Android and Windows devices.


Leave a Reply.