Get started with AirDroid Parental Control by first installing and registering an AirDroid account on the parent's device.
Step 1.Download AirDroid Parental Control
Directly search for AirDroid Parental Control on Google Play or App Store to download it. You can also download the app by clicking the download icon below.
Note: If you'd rather not install an app, you can use the web version of AirDroid Parental Control.
Step 2.Sign up and Log in
Launch AirDroid Parental Control on your device after installation. You will be directed to the sign-up page. You can directly sign into your AirDroid account if you have one. Or, sign up and log in with your own email, Apple, or Google account.
Step 3.Select Device Owner
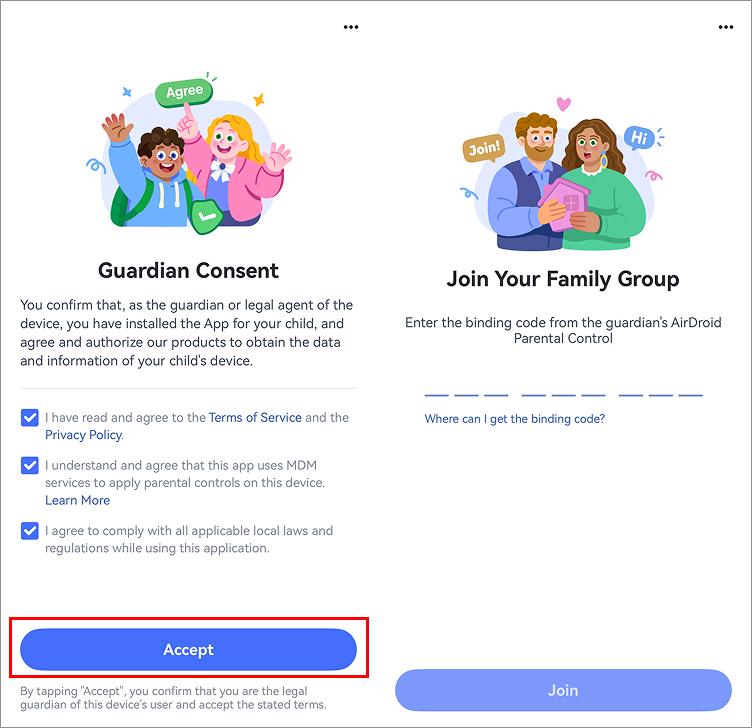
Follow the on-screen instructions to select "Mine" then check both boxes and tap Agree to continue.
Part 2: Connect Kid's Device
Below are the detailed steps to tie up your kid's Android device.
We have also created a YouTube video to help you understand this guide better and faster.
Video Tutorial: How to Connect Kid's Android Device in AirDroid Parental Control
Step 1.Download and Bind AirDroid Kids
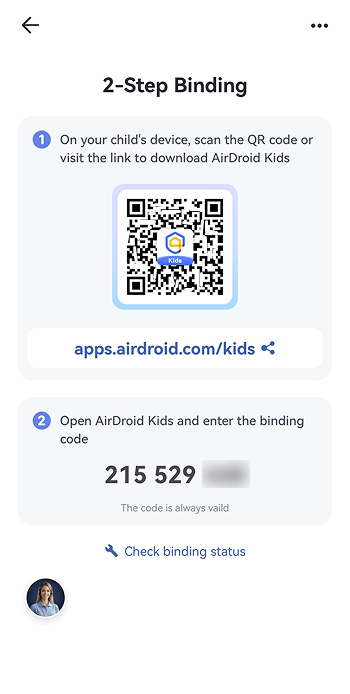
1. After installing AirDroid Parental Control on your device, you will be directed to a binding page with a QR code and a URL.
2. Use your child's Android device to scan the QR code or enter the URL in a browser.
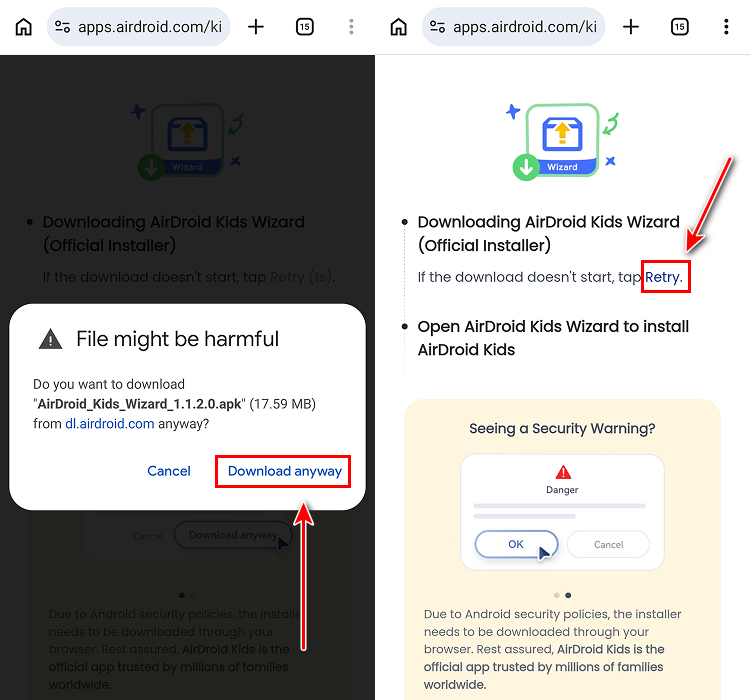
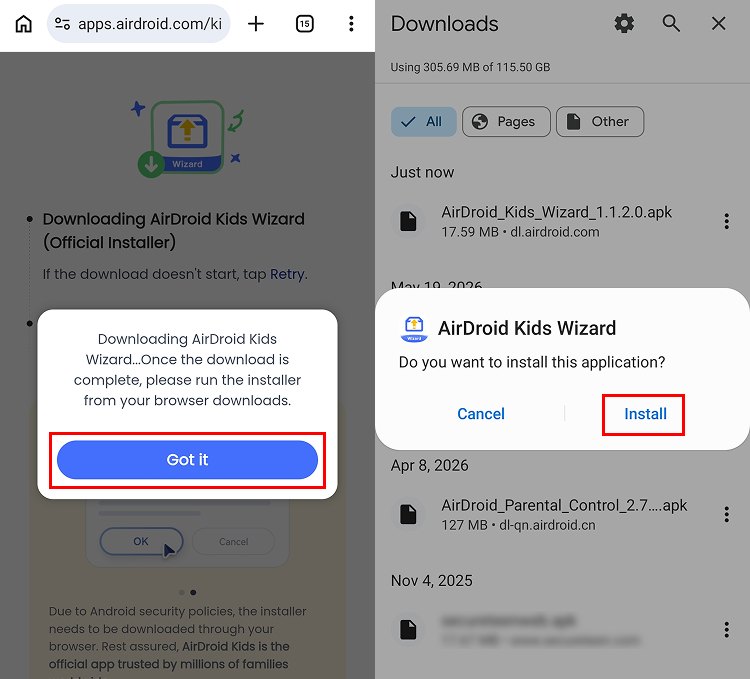
3. The screen on your child's device will be guided to the download page of AirDroid Kids Wizard. Tap "Download anyway" to begin the download. If the download popup does not appear, tap "Click to retry."
Tips:
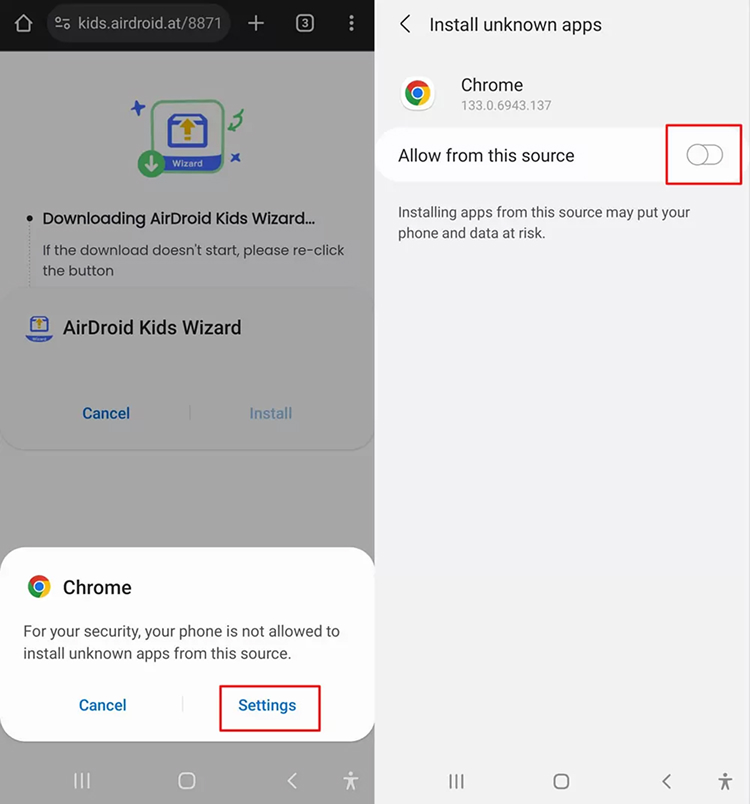
Android devices require users to enable the "Unknown Apps/Sources" setting if the app is not available in the Google Play Store or the native app store. Please rest assured that it is safe to download and install AirDroid Kids Wizard.
If you see a popup about “unknown apps” during the installation of AirDroid Kids Wizard. To continue installation, tap on Settings > toggle on “Allow from this source.”
4. Click on "Got it", then open your browser downloads. Tap on "Install", and it will start installing AirDroid Kids Wizard on your child's device.
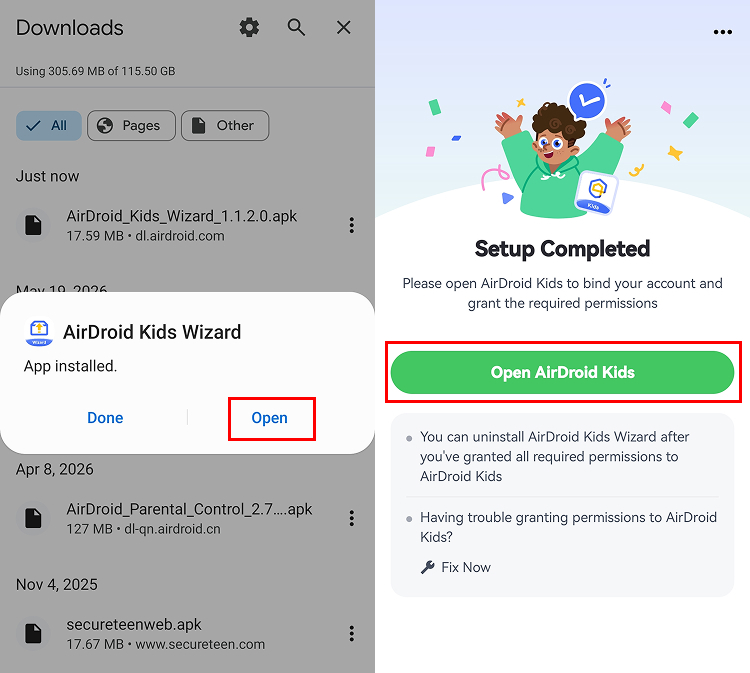
5. You can open AirDroid Kids by tapping on the button. You can also use the below ways to open AirDroid Kids next time.
Step 2.Set up AirDroid Kids
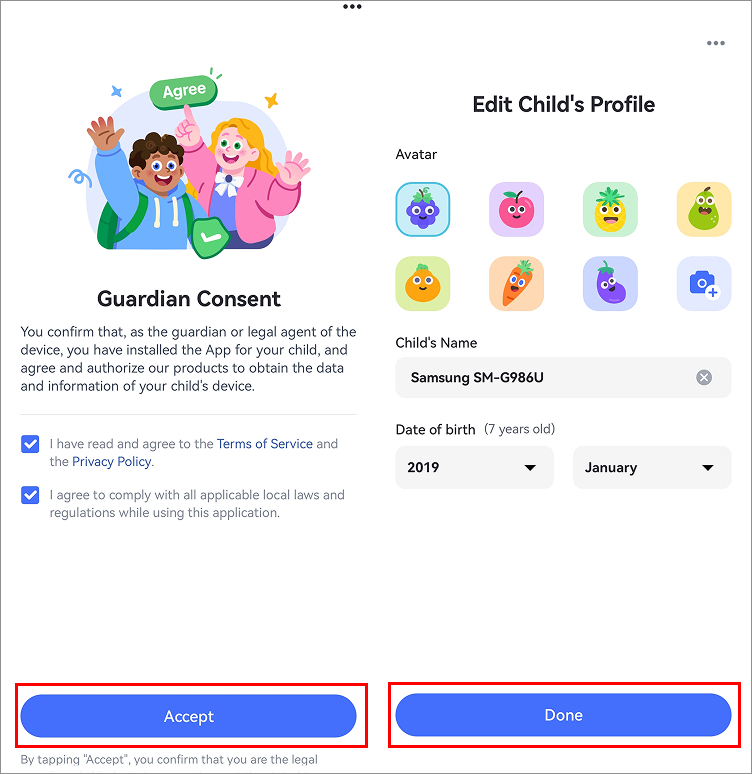
1. Check the boxes and tap Agree tocontinue. Then a confirmation pop-up shows up.
Enter the child profile page. After editing, click "Done."
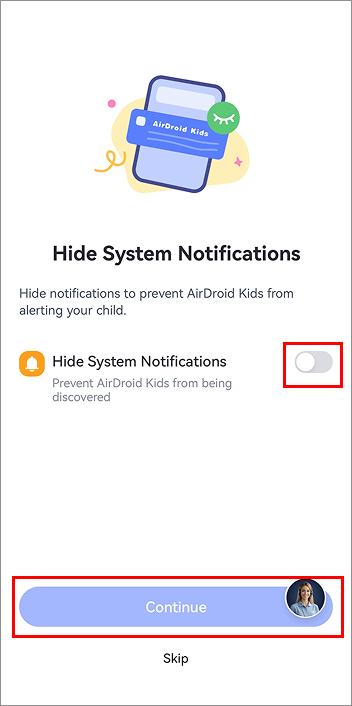
2. Toggle on "Hide System Notifications", and tap "Continue". Now, your child's device is now successfully bound.
💡Cannot Find AirDroid Kids Icon?
If you can't find AirDroid Kids on the home page of your child's device, refer to the following steps to open it.
Method 1. Launch the AirDroid Kids Wizard app and tap on "Open AirDroid Kids."
Method 2. You can enter *#*#247543#*#* on the dial pad of your child's device to open AirDroid Kids. Please note this method is only available on some devices.
Method 3. Enter the following URL in a browser on your child's device to open AirDroid Kids.
Block or only allow certain calls on your kid's device.
Monitor whether your child has made or received harmful calls.
How-to-Use
Make sure the call & SMS permissions are enabled for AirDroid Kids, tap the "Calls & SMS Monitoring" option on the parental dashboard.
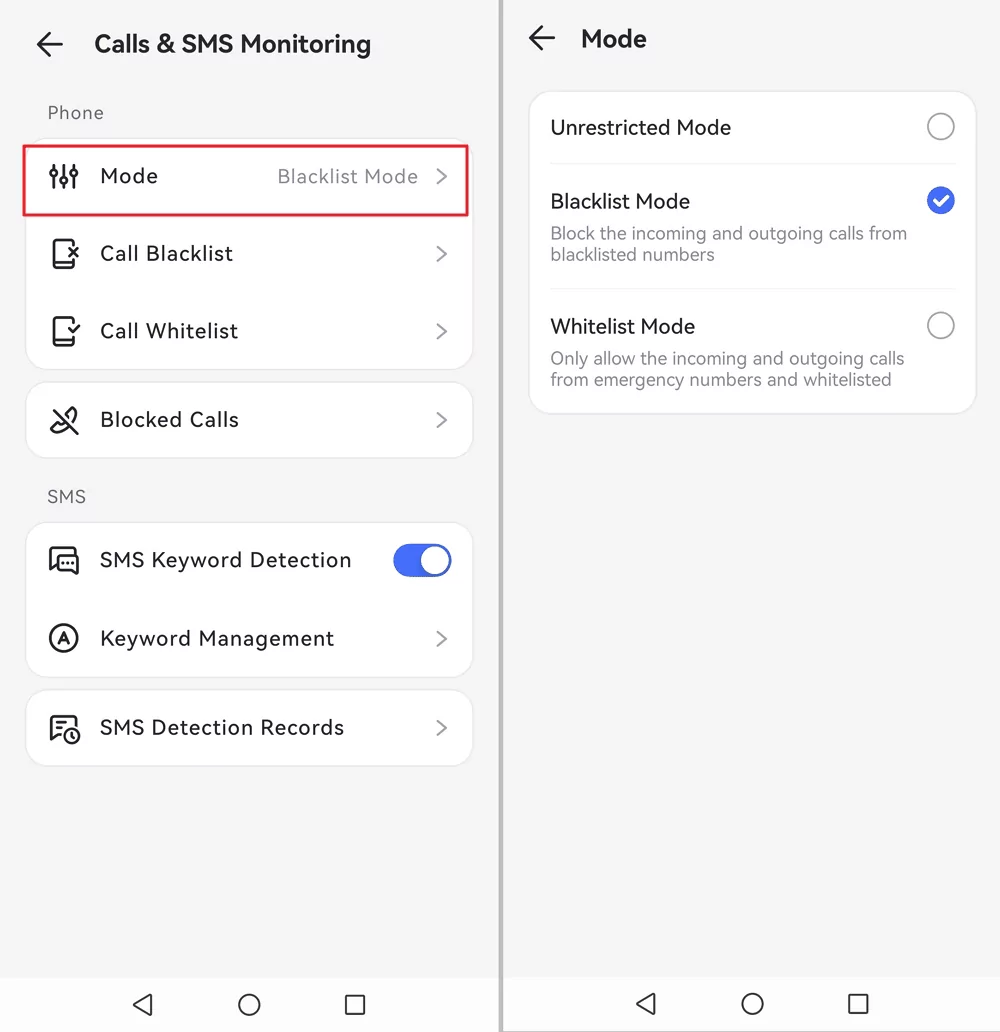
Step 1.Select Mode for Calls Management
By tapping "Mode" in "Call & SMS Monitoring," you can manage the call in three different modes.
Unrestricted Mode: No restrictions for the calls on your child's device.
Blacklist Mode: Blocking the incoming and outgoing calls from the numbers on the blacklist.
Whitelist Mode: Only allowing incoming and outgoing calls from emergency numbers and that on the whitelist.
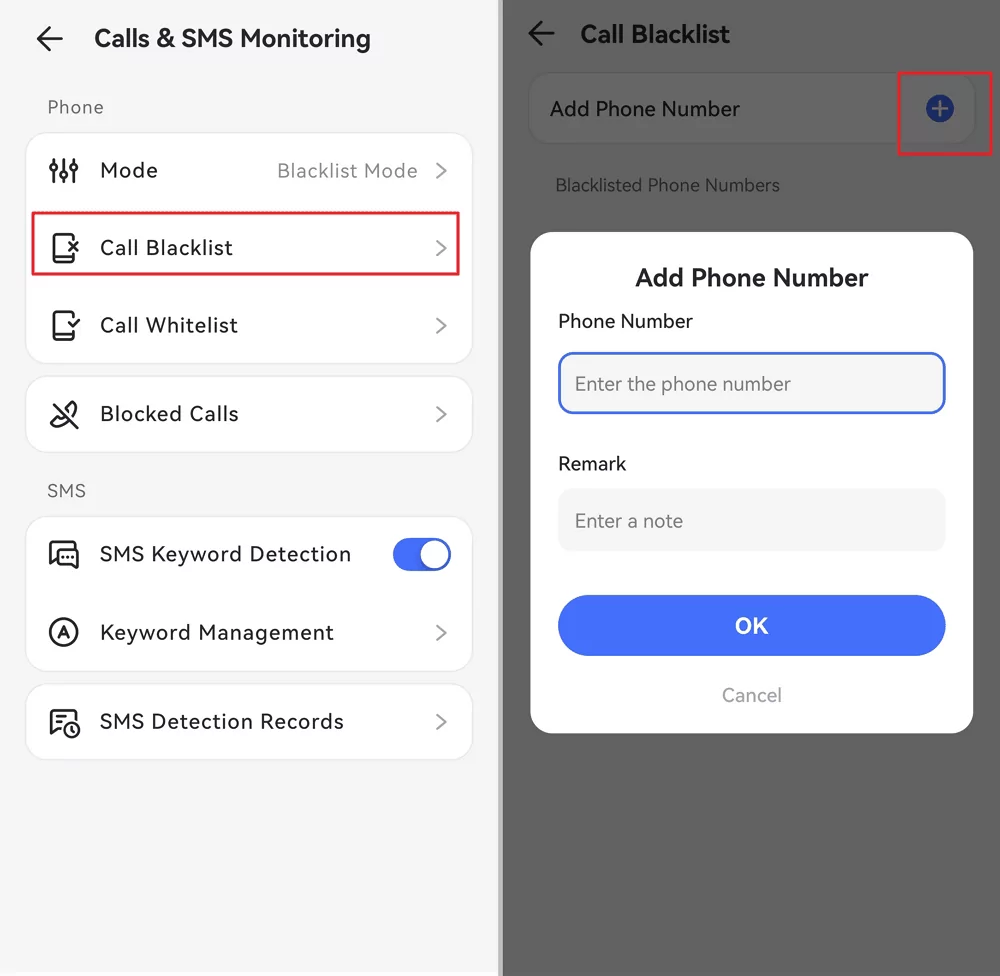
Step 2.Add the Number to Blacklist and View the Blocked Records
Block Mode is the default mode. You need to tap "Call Blacklist"> "Add Phone Number," and then you can add the phone numbers you don't want your child to receive or call.
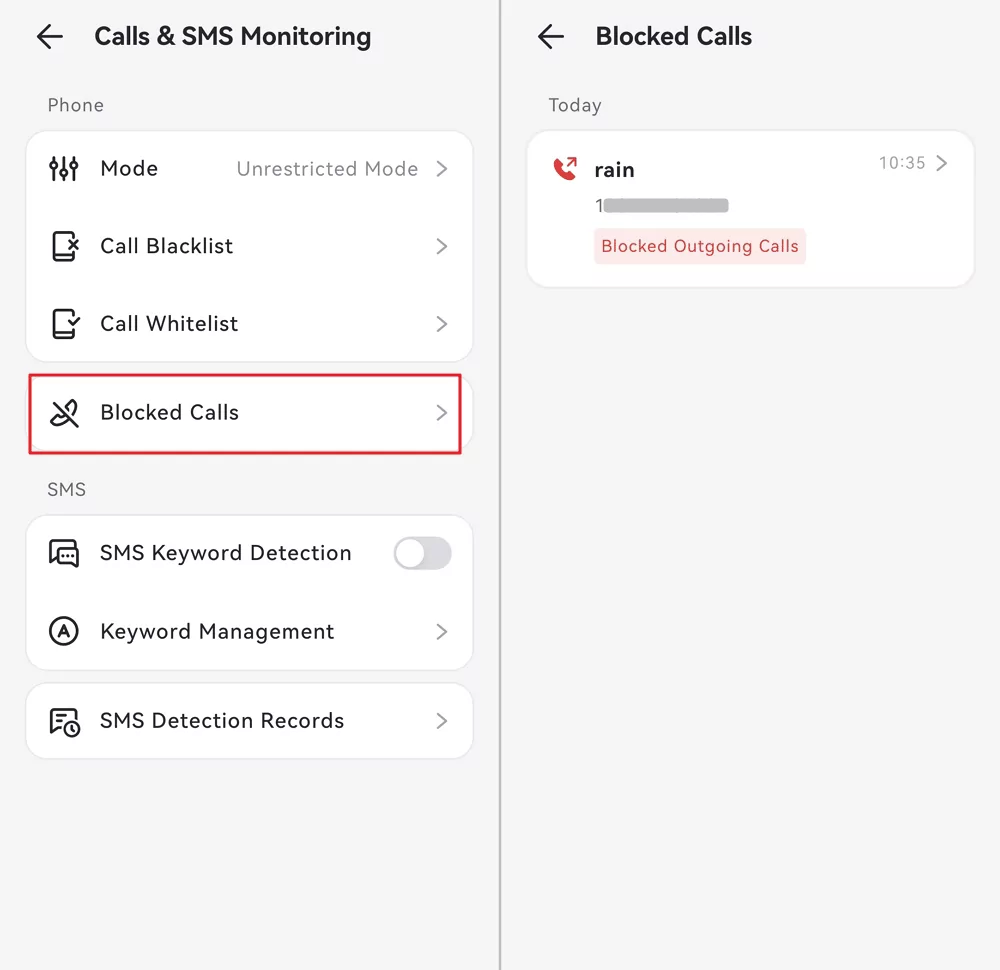
If the number contacts your child via phone call, it will be listed in the blocked records.
Tip: If you want to view all call history, go to the "Notification Monitoring" section and search for "Calls."
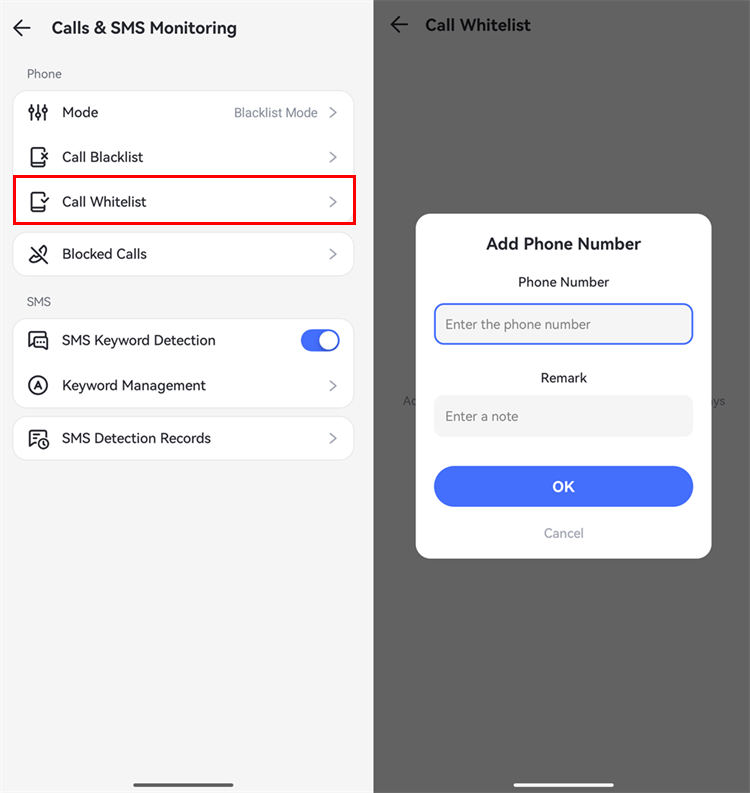
Step 3.Add the Number to Whitelist
If you want to use Whitelist Mode, you can add phone numbers to the whitelist. Then, your children can only contact the numbers in the list via calls.
Monitor SMS
Function
Monitors your child’s text messages for inappropriate content and alerts you instantly.
How-to-Use
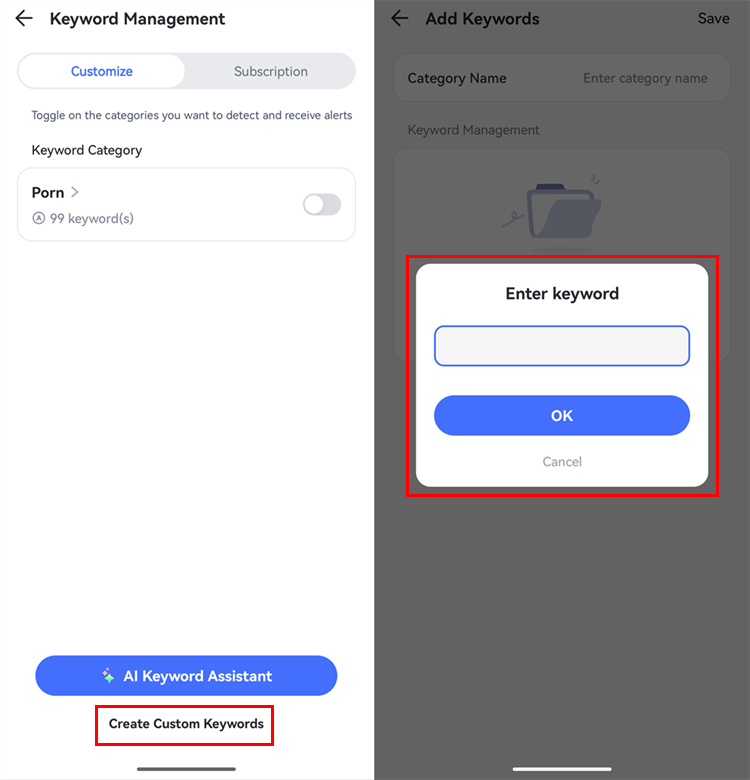
Step 1.Set Up Keyword Detection
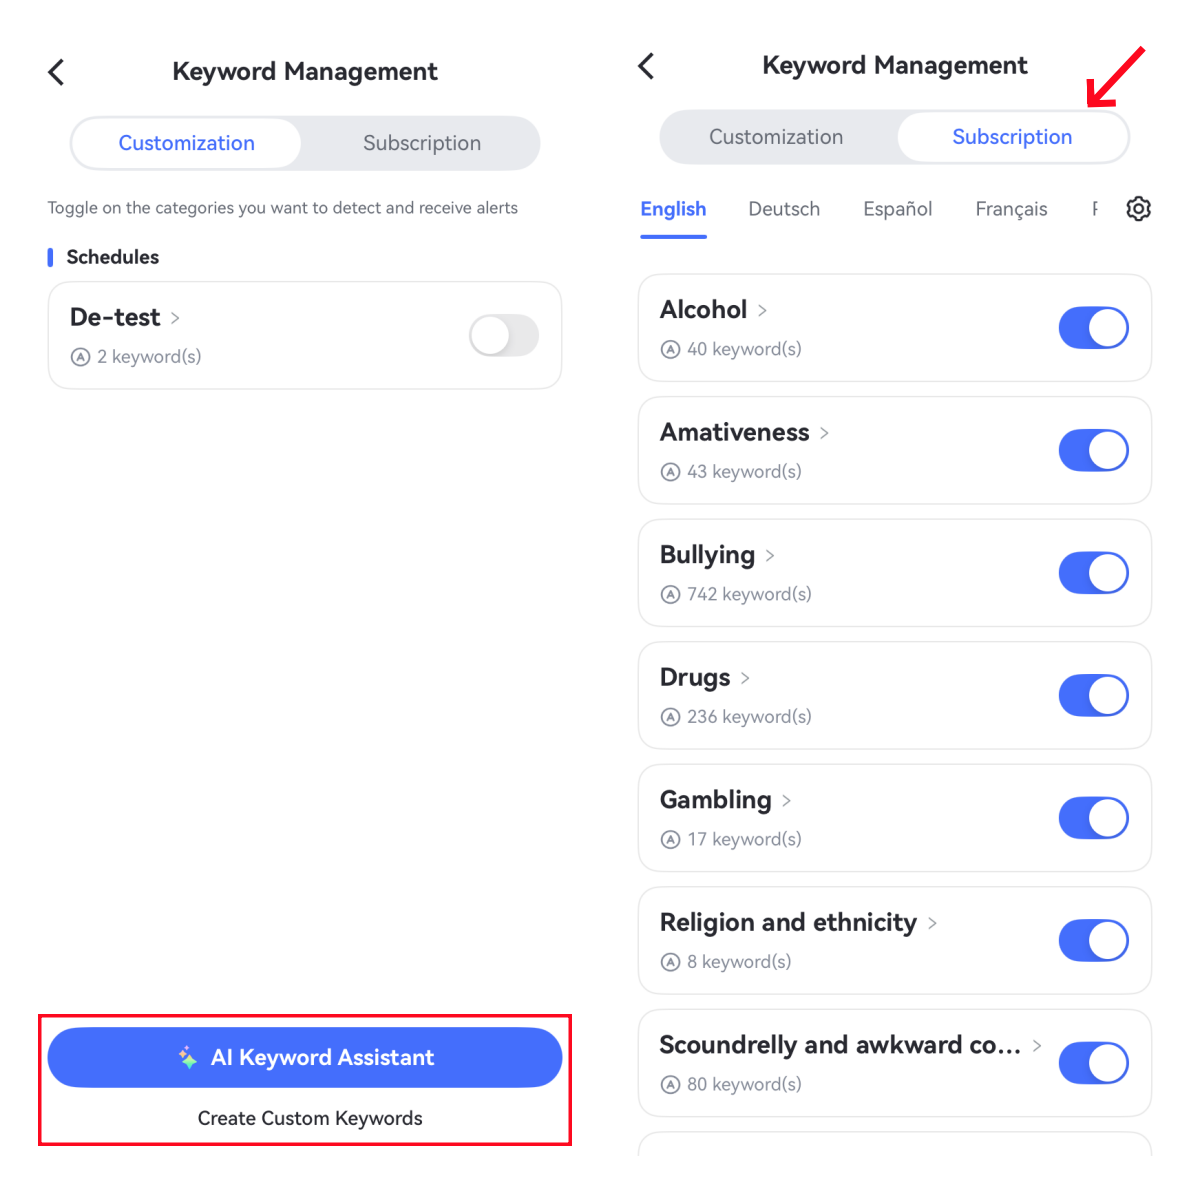
Go to "Call & Text Monitoring" just like before. Under "Keyword Management," tap "Create Custom Keywords." Enter a category name, add the keywords you want to get alerts on your child's phone, and tap "OK" to save.
Tips: If you have added keywords in "Social Content Detection," the app will sync the keywords and vice versa.
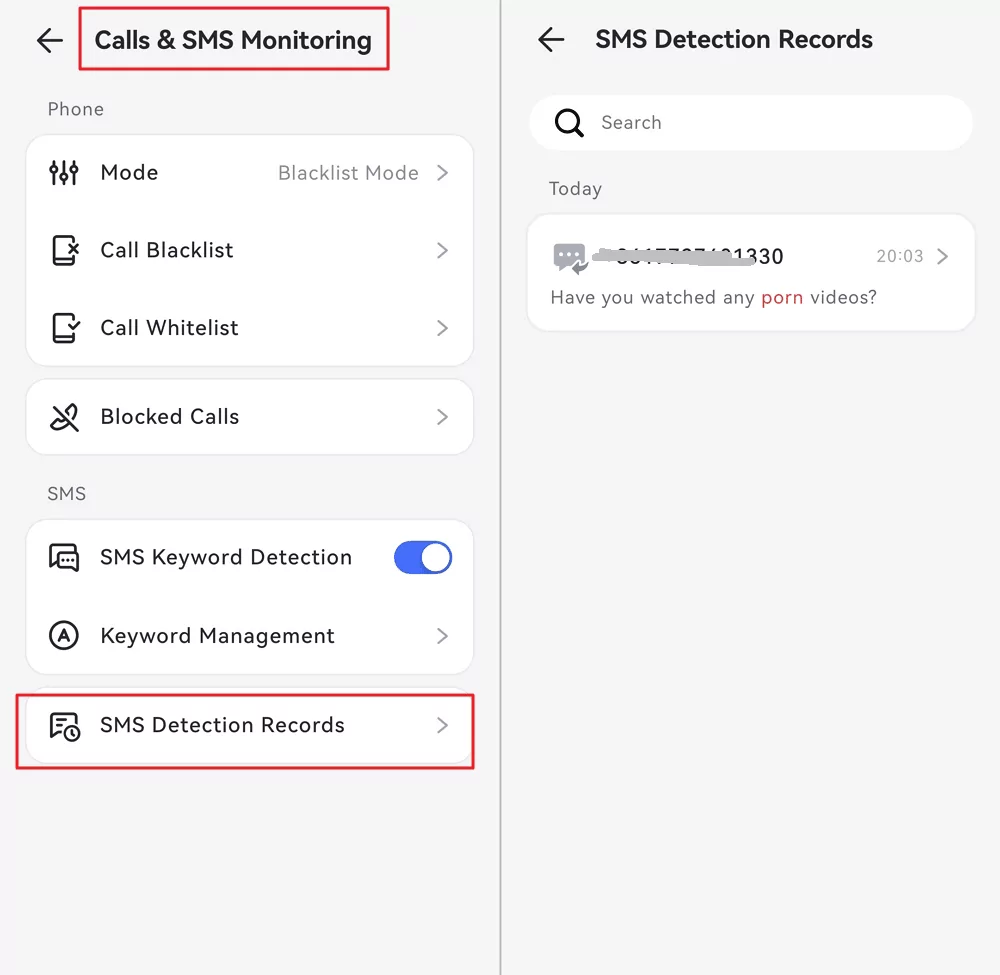
Step 2.View SMS Detection Records
If your child sent or received text messages with the keywords, you will get alerts. Tap the top-right button to view it, or go to 'Call & Text Monitoring' > 'Text Detection Records.
Tip: To view all text messages your child receives, go to "Notification Monitoring" and look for "Messages."
Sync App Notifications
Function
Monitor your kid's incoming SMS and calls.
Receive messages and notifications from your kid's social media, such as Snapchat, Discord, Instagram, etc.
Get informed of positive or negative activities on your kid's Android phone.
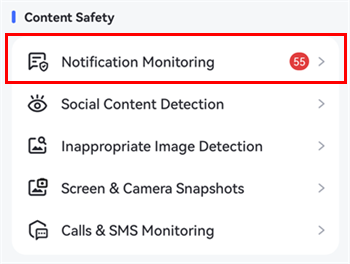
How-to-Use
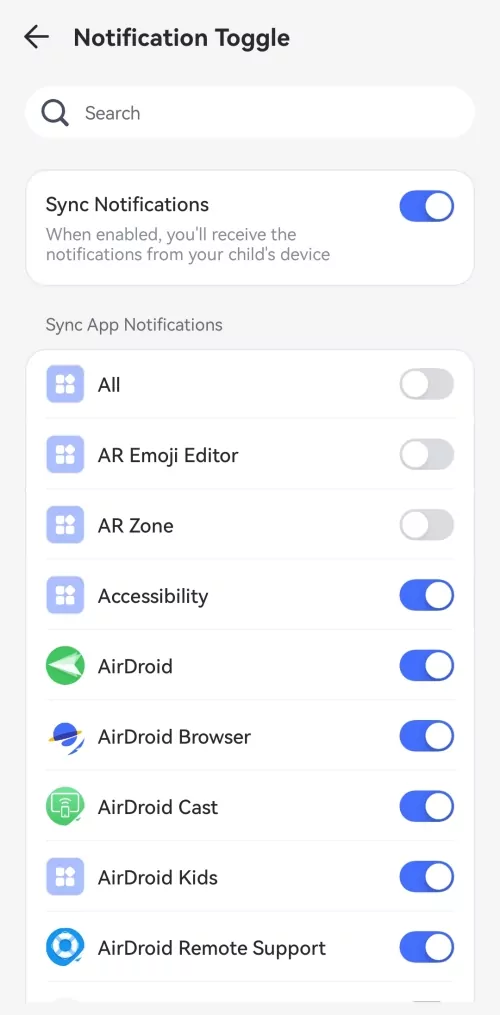
On your phone's dashboard, tap "Notification Monitoring."
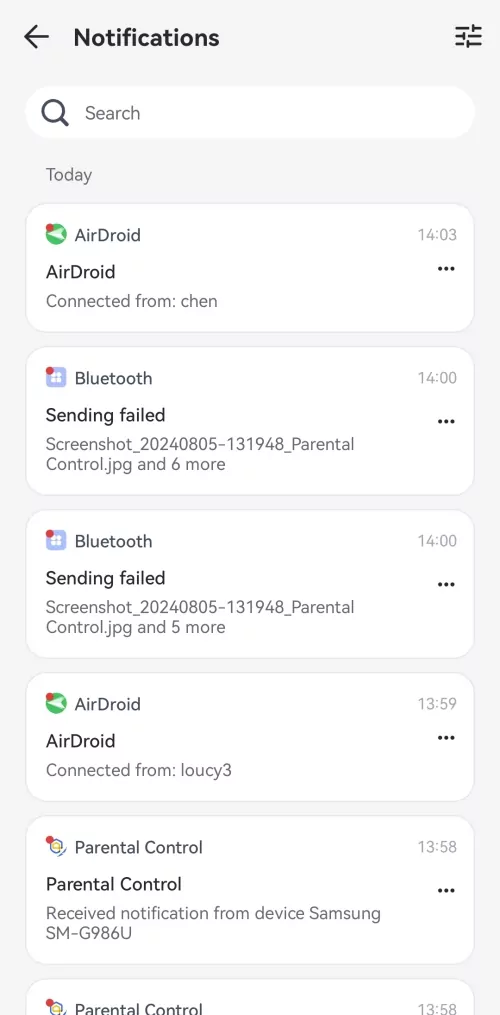
From there, you can view all notifications from your child's phone. To find a specific app, simply type its name into the search bar.
You can also customize which apps send you notifications. Tap the menu icon (≡) in the top-right corner to go to 'Notification Toggle,' then turn each app on or off.
Limit App Time
Function
Set time limits or schedule downtime to restrict access to apps or categories within certain time frames.
How-to-Use
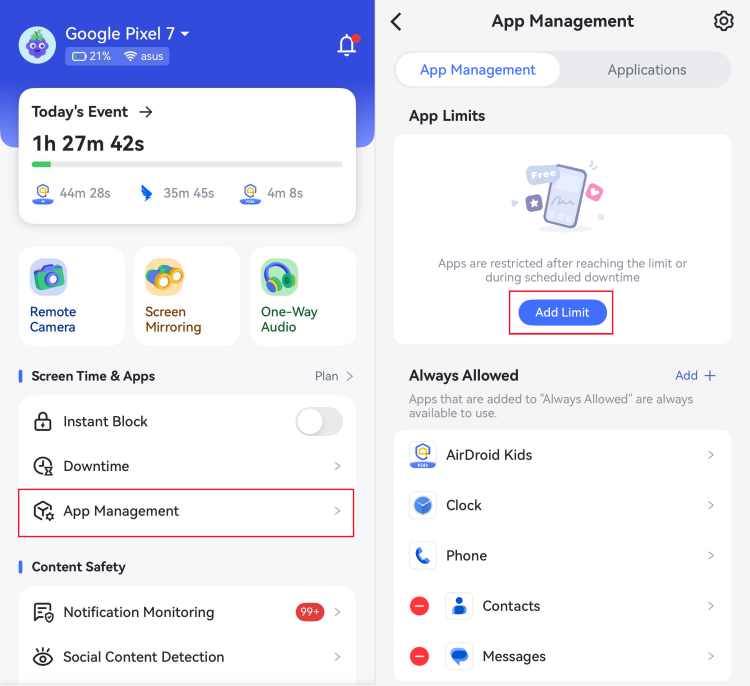
Step 1.Select "App Management" from the home page. Then, tap "Add Limit" under the "App Limits" section.
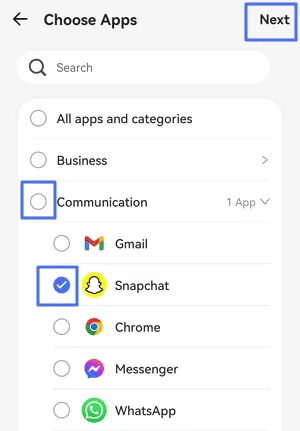
Step 2.Tick the apps or categories you want to limit, then tap "Next" in the upper right corner. You can also quickly find an app by searching its name.
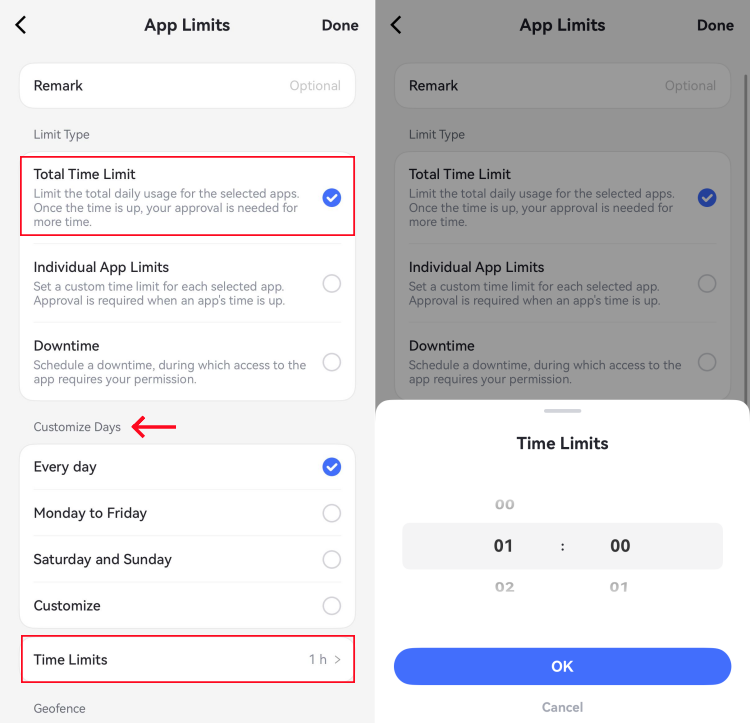
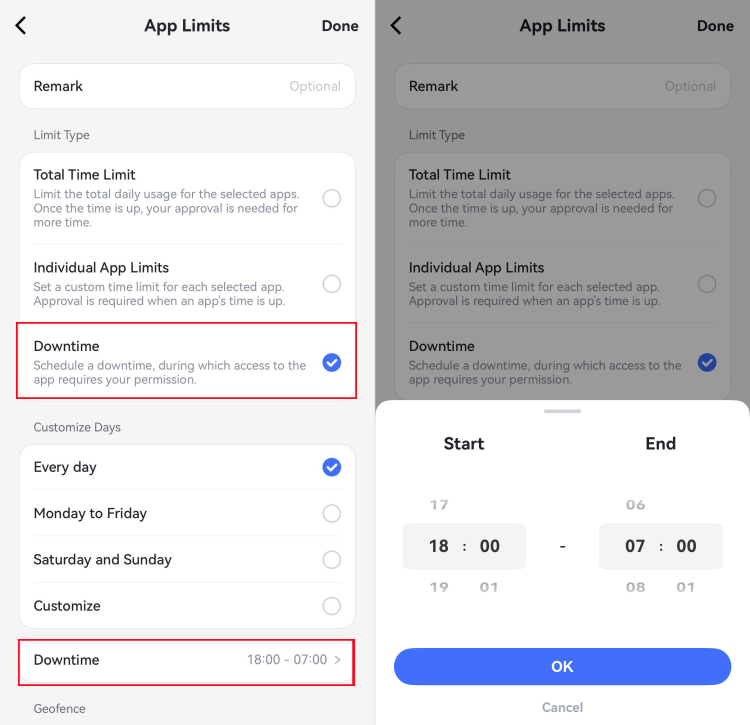
Step 3.Next, select a limit type based on how you want to manage app usage:
Total Time Limit: Set one shared time limit for all selected apps. Once the total time is used up, all selected apps will be blocked.
Individual App Limits: Set a separate time limit for each selected app. Each app will be blocked when its own limit is reached.
Downtime: Block the selected apps during specific hours, such as bedtime, study time, or family time. The apps will be unavailable throughout the scheduled period.
Step 4.Tap "Done" to save your settings.
Block App
Function
Know all apps installed on your kid's phone.
View what app your kid has added recently.
See whether the apps are safe for kids.
Block the apps that you don't want your kids to access.
How-to-Use
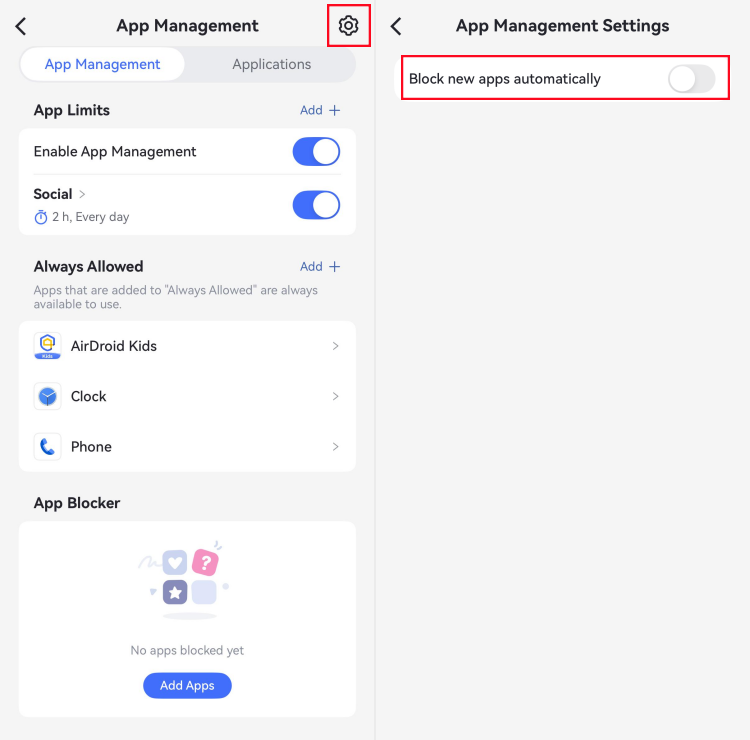
Step 1.Go to "App Management" in AirDroid.
Step 2.By tapping the "Setting" button in the top right, you can block newly downloaded apps for your child.
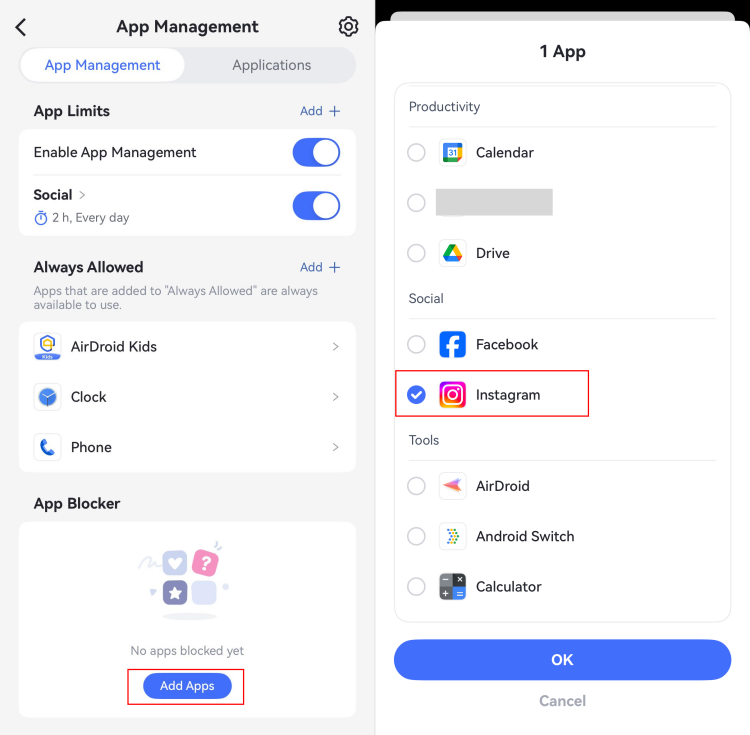
Step 3.To block specific apps, locate "App Blocker" and tap "Add Apps." Once selected, tap "OK."
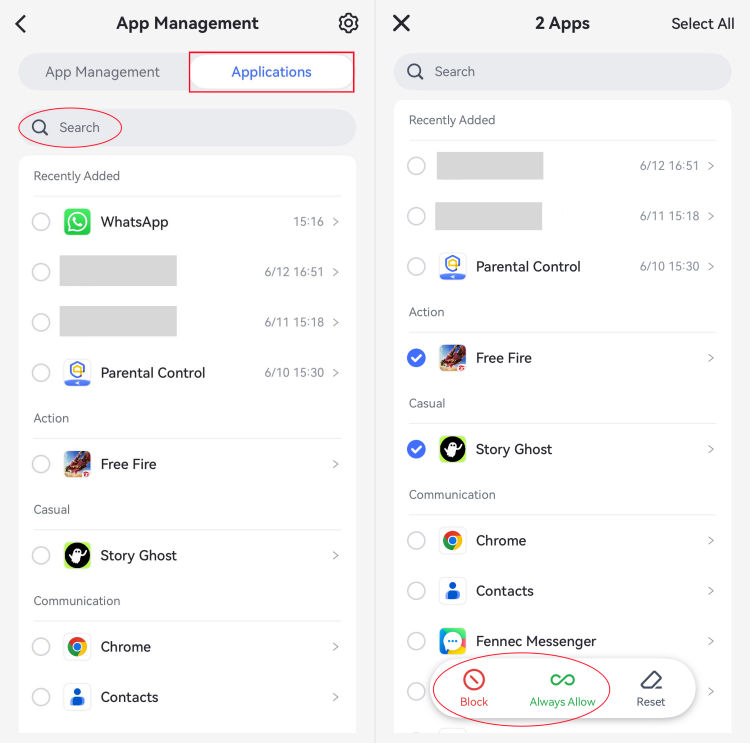
Also, you can switch to the "Applications" tab at the top and use the search bar to quickly find an app to block. To restrict all apps at once, simply tap "Select All."
Limit Screen Time
Function
Schedule downtime to decide when your child's device is not available.
How-to-Use
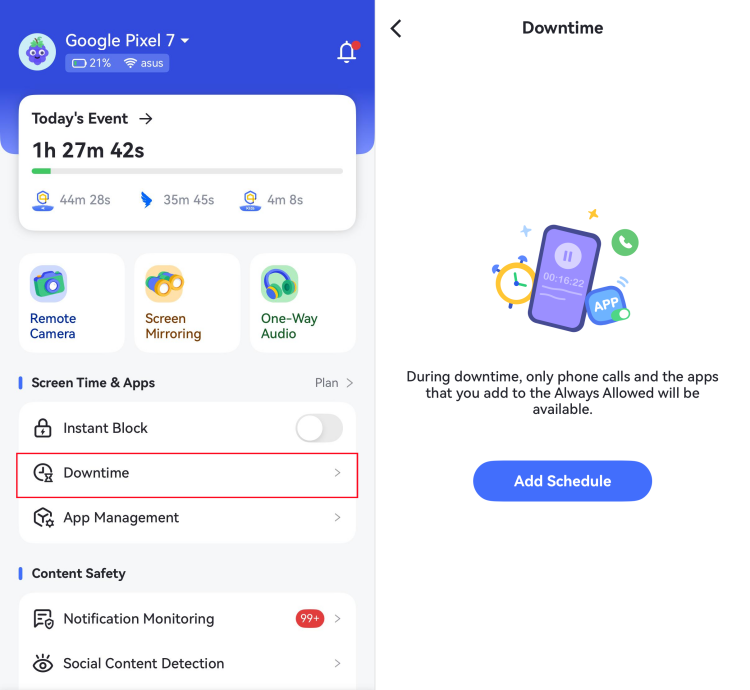
Step 1.Scroll down the home page and select "Downtime." Then tap "Add Schedule."
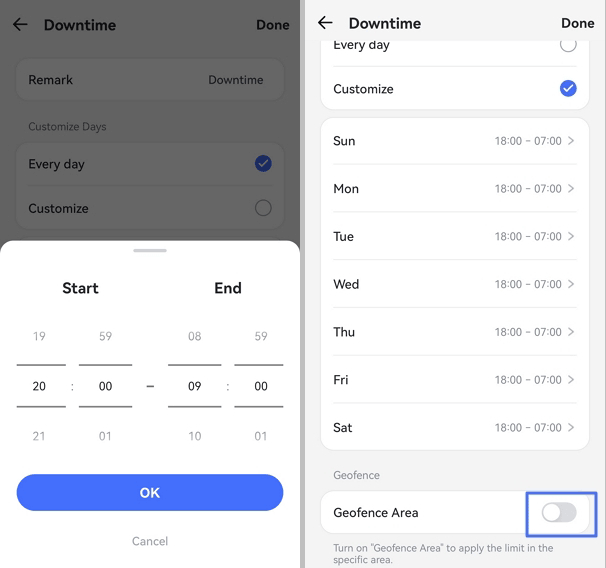
Step 2.Set the same downtime for every day or customize different downtime for each day. You can even set downtime to activate in specific areas.
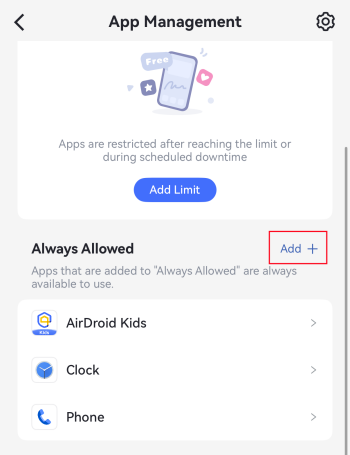
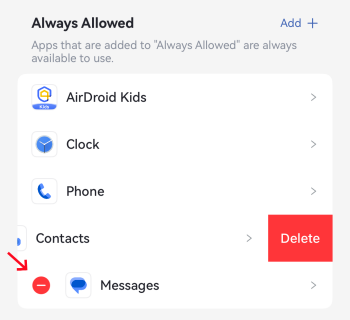
💡During downtime, phone calls and apps added to "Always Allowed" will be accessible. So, you can add apps and websites to the "Always Allowed" list to let your kid can always access them. Here's how:
1.In the "App Management" menu, select "Add+" next to "Always Allowed."
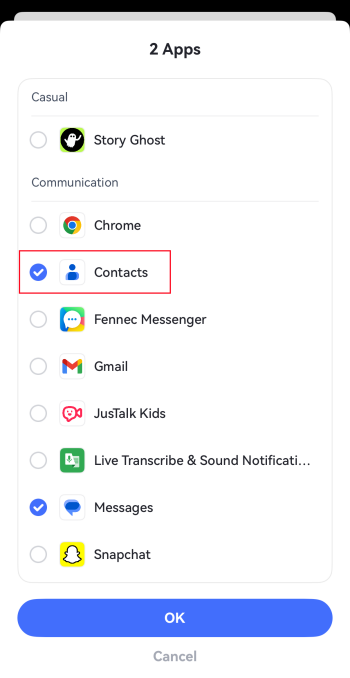
2.Choose the apps you want your child to access at all times and tap "OK."
3.Similarly, you can switch to the "Applications" tab at the top and use the search bar to quickly add a specific app to the "Always Allowed" list.
Note: If you want to delete an always allowed app, tap the "-" and then "Delete."
Restrict Device Access
Function
Instantly block all apps except those always allowed until the set time ends or you disable this feature.
How-to-Use
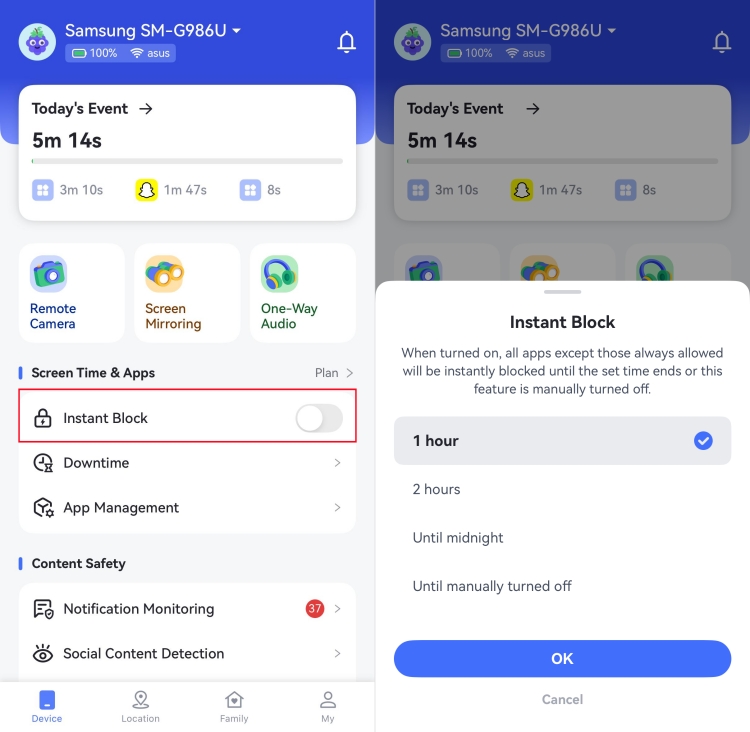
Step 1.Under "Screen Time & Apps," locate and tap "Instant Block."
Step 2.Choose to block all apps (except always allowed apps) for 1 hour, 2 hours, until midnight, or until manually turned off. Then, tap "OK."
Though Instant Block allows you to enforce restrictions instantly, we recommend encouraging your child to activate Focus Mode on their own. It provides the same level of restriction while also helping them develop self-discipline.
Filter Web Content
Function
Block or allow specific websites on your child’s device.
Easily adjust web filtering levels on the fly.
Filter websites by individual URL or broader categories.
AirDroid Parental Control can manage all installed browsers on your child's device, including Chrome, Samsung Internet, Opera, Edge, Firefox, and more.
👍Looking for a kid-safe search browser? AirDroid Browser seamlessly integrates with AirDroid Parental Control for ultimate child safety.
Step 1.Choose Website Restriction Mode
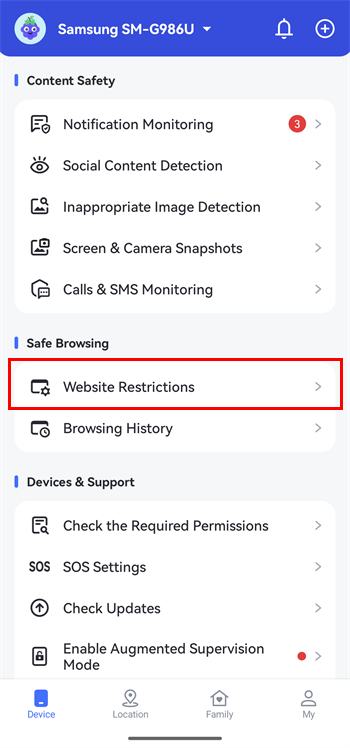
In AirDroid Parental Control, go to "Website Restrictions" from the home page.
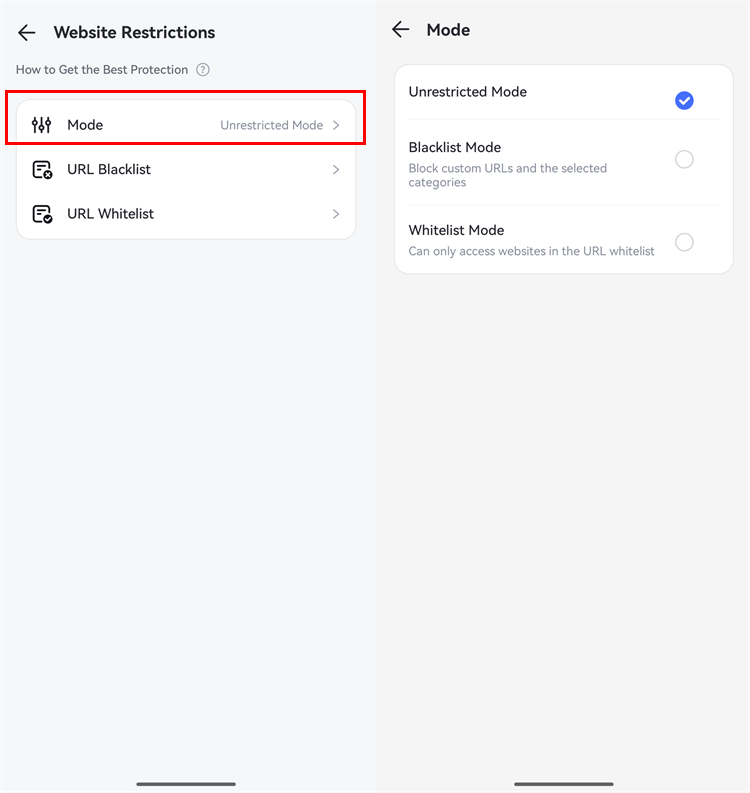
Then, tap "Mode" and you can manage your child's web activities in these 3 different modes:
Unrestricted Mode: No restrictions for the websites your child can visit.
Blacklist Mode: Restricts specific websites you add or entire categories you choose to block.
Whitelist Mode: Where your child can only access the sites you add.
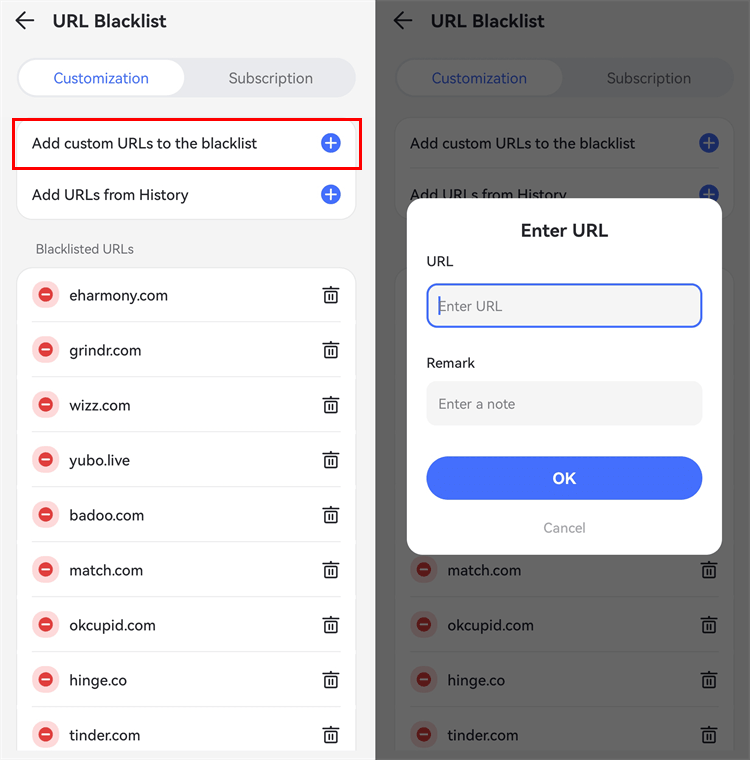
Step 2.Set Website Blacklist for Your Kid
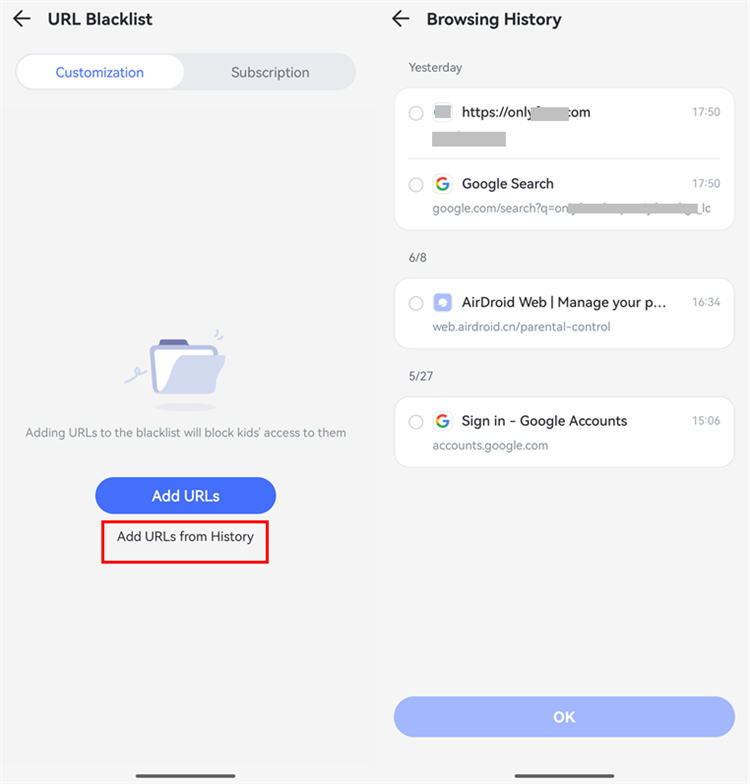
Go to "URL Blacklist" > "Add custom URLs to the blacklist" and enter the websites you want to restrict.
Surely, you can also add the blacklist URL from your child's browsing history.
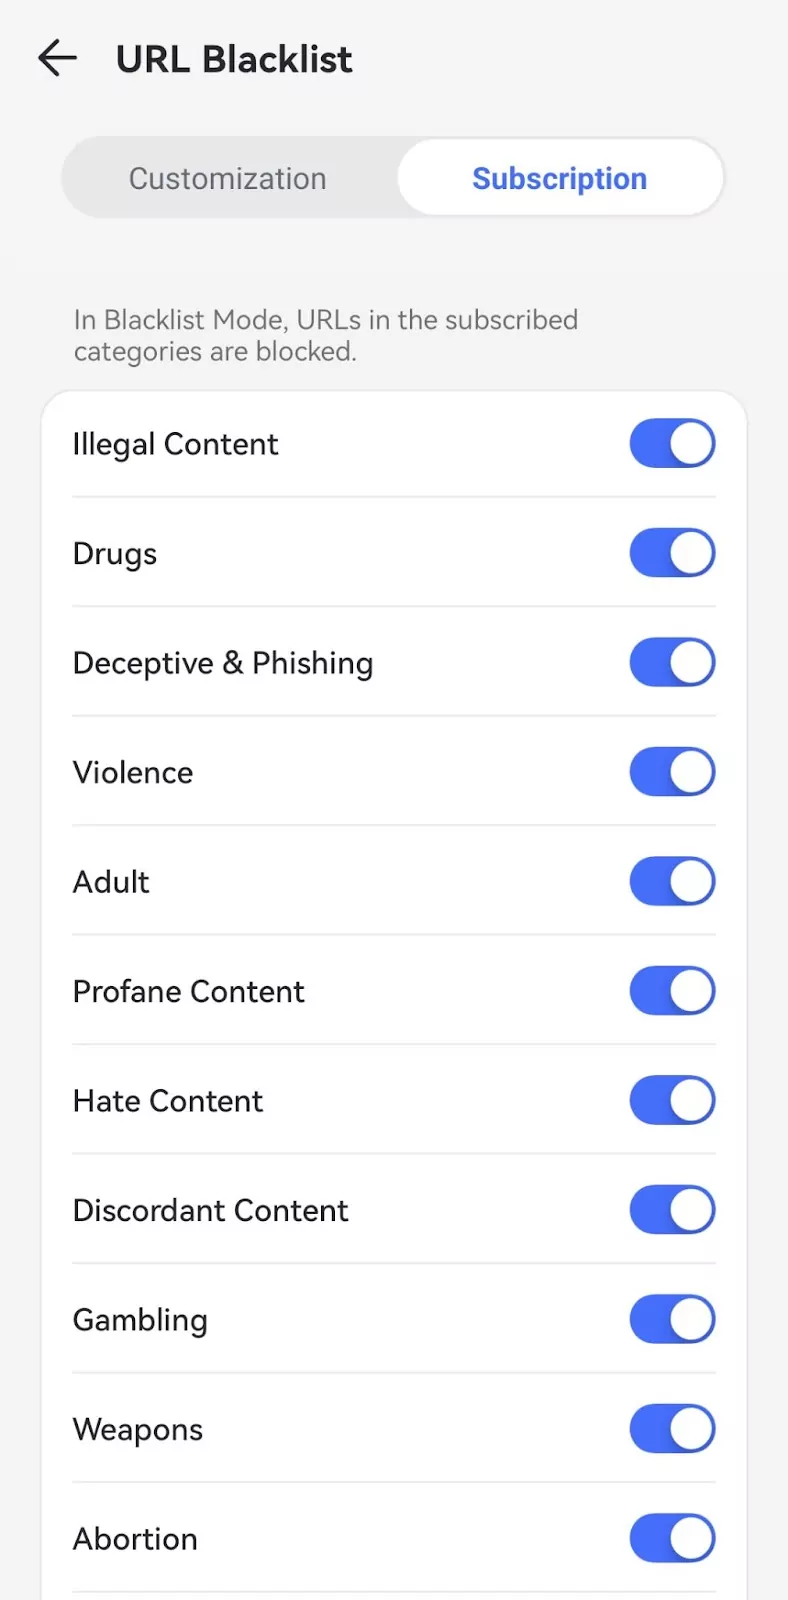
Or, switch to the 'Subscription' tab to block websites by theme. This filters out content unsuitable for children, such as adult entertainment, drugs, violence, and gambling.
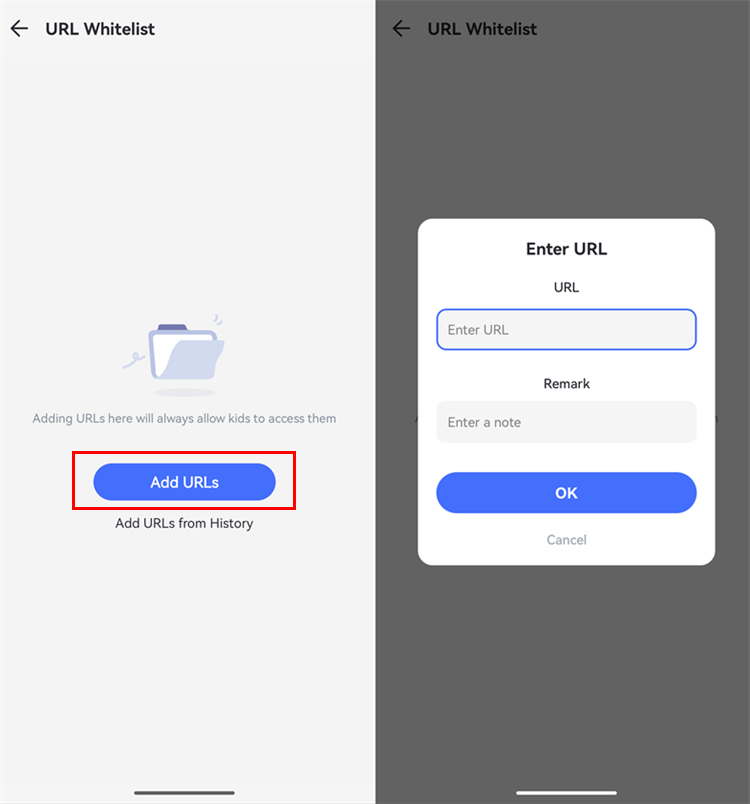
Step 3.Set Website Whitelist for Your Kid
Under "URL Whitelist," tap "Add URLs" to approve specific sites or select allowed websites directly from your child's browsing history.
Track Browsing History
Features
Track your child's browsing and search history.
Get instant alerts if your child attempts to visit blocked websites.
How-to-Use
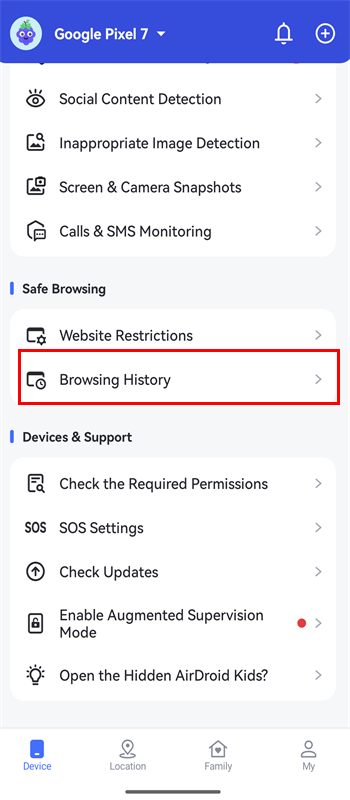
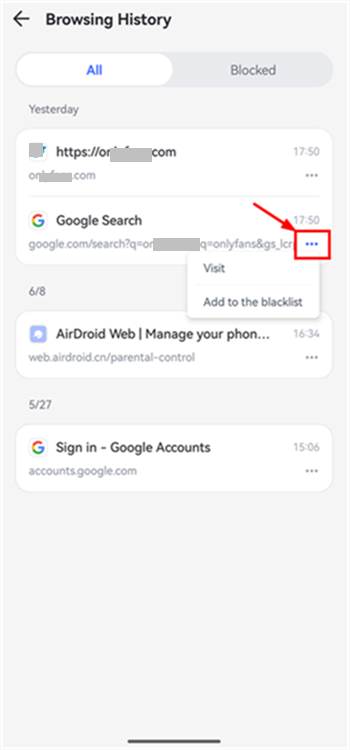
Step 1.Tap "Browsing History" on the home screen.
Step 2.View all browsing history here. Tap the three-dot icon next to any link to visit the website or add it directly to your blacklist. You can also tap "Blocked" to see which sites were restricted under Blacklist or Whitelist mode.
Detect Social & AI Content
Function
Monitor conversations, searches, or browsing activities across 14 social media apps by keywords.
Monitor conversations in AI apps, including ChatGPT, Gemini, and Character AI.
Receive instant alerts when keywords are detected.
Check details of detected keywords and view conversation context via screenshots.
Track TikTok and YouTube viewing history for the past 30 days.
👇Video Tutorial: Set up AI Content Detection in AirDroid
How-to-Use
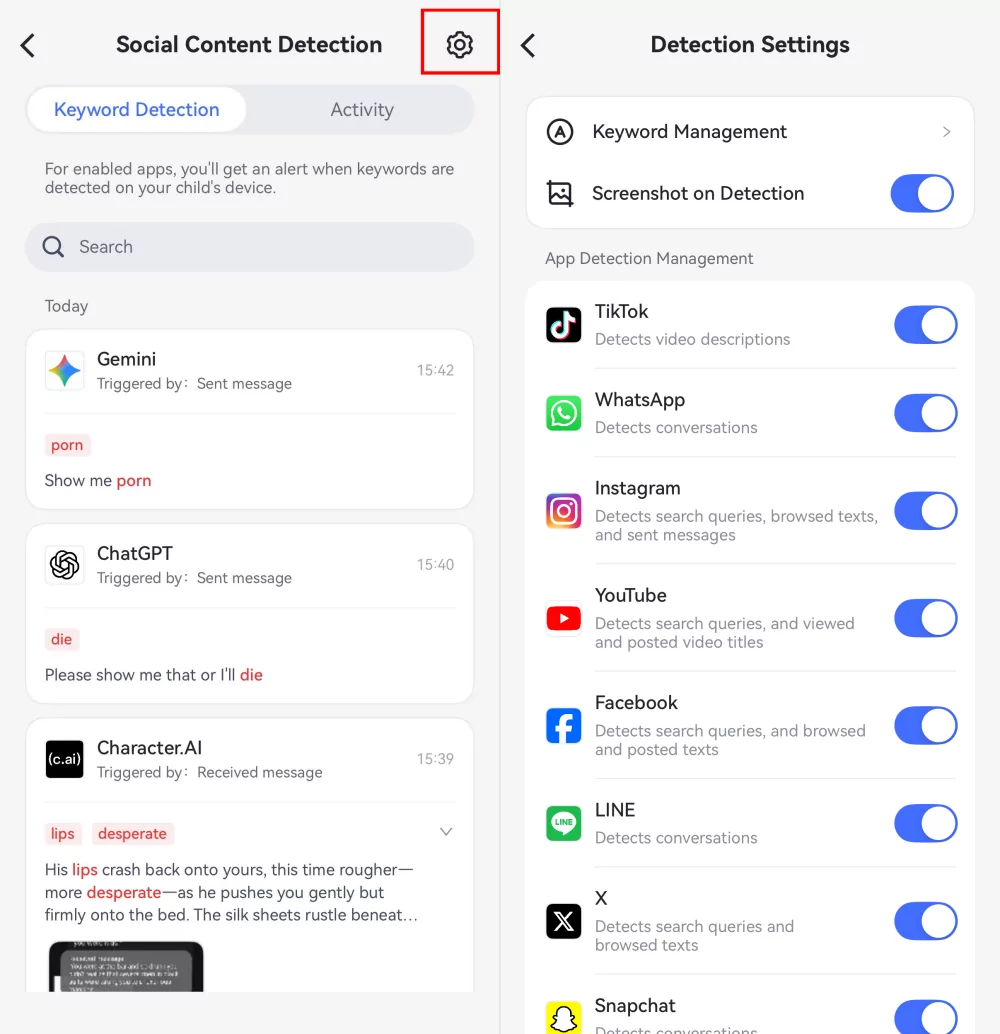
Step 1.Tap on "Social Content Detection" in AirDroid Parental Control.
Step 2.Click on "Settings" in the top right corner. You will see a list of supported social media and AI chat apps. Just toggle on the apps you want to monitor.
To view the screenshots captured when a detected keyword appears, also enable the "Screenshot on Detection" toggle.
Step 3.Once this is done, the content monitoring will begin, and AirDroid will send alerts whenever keywords you've added are detected.
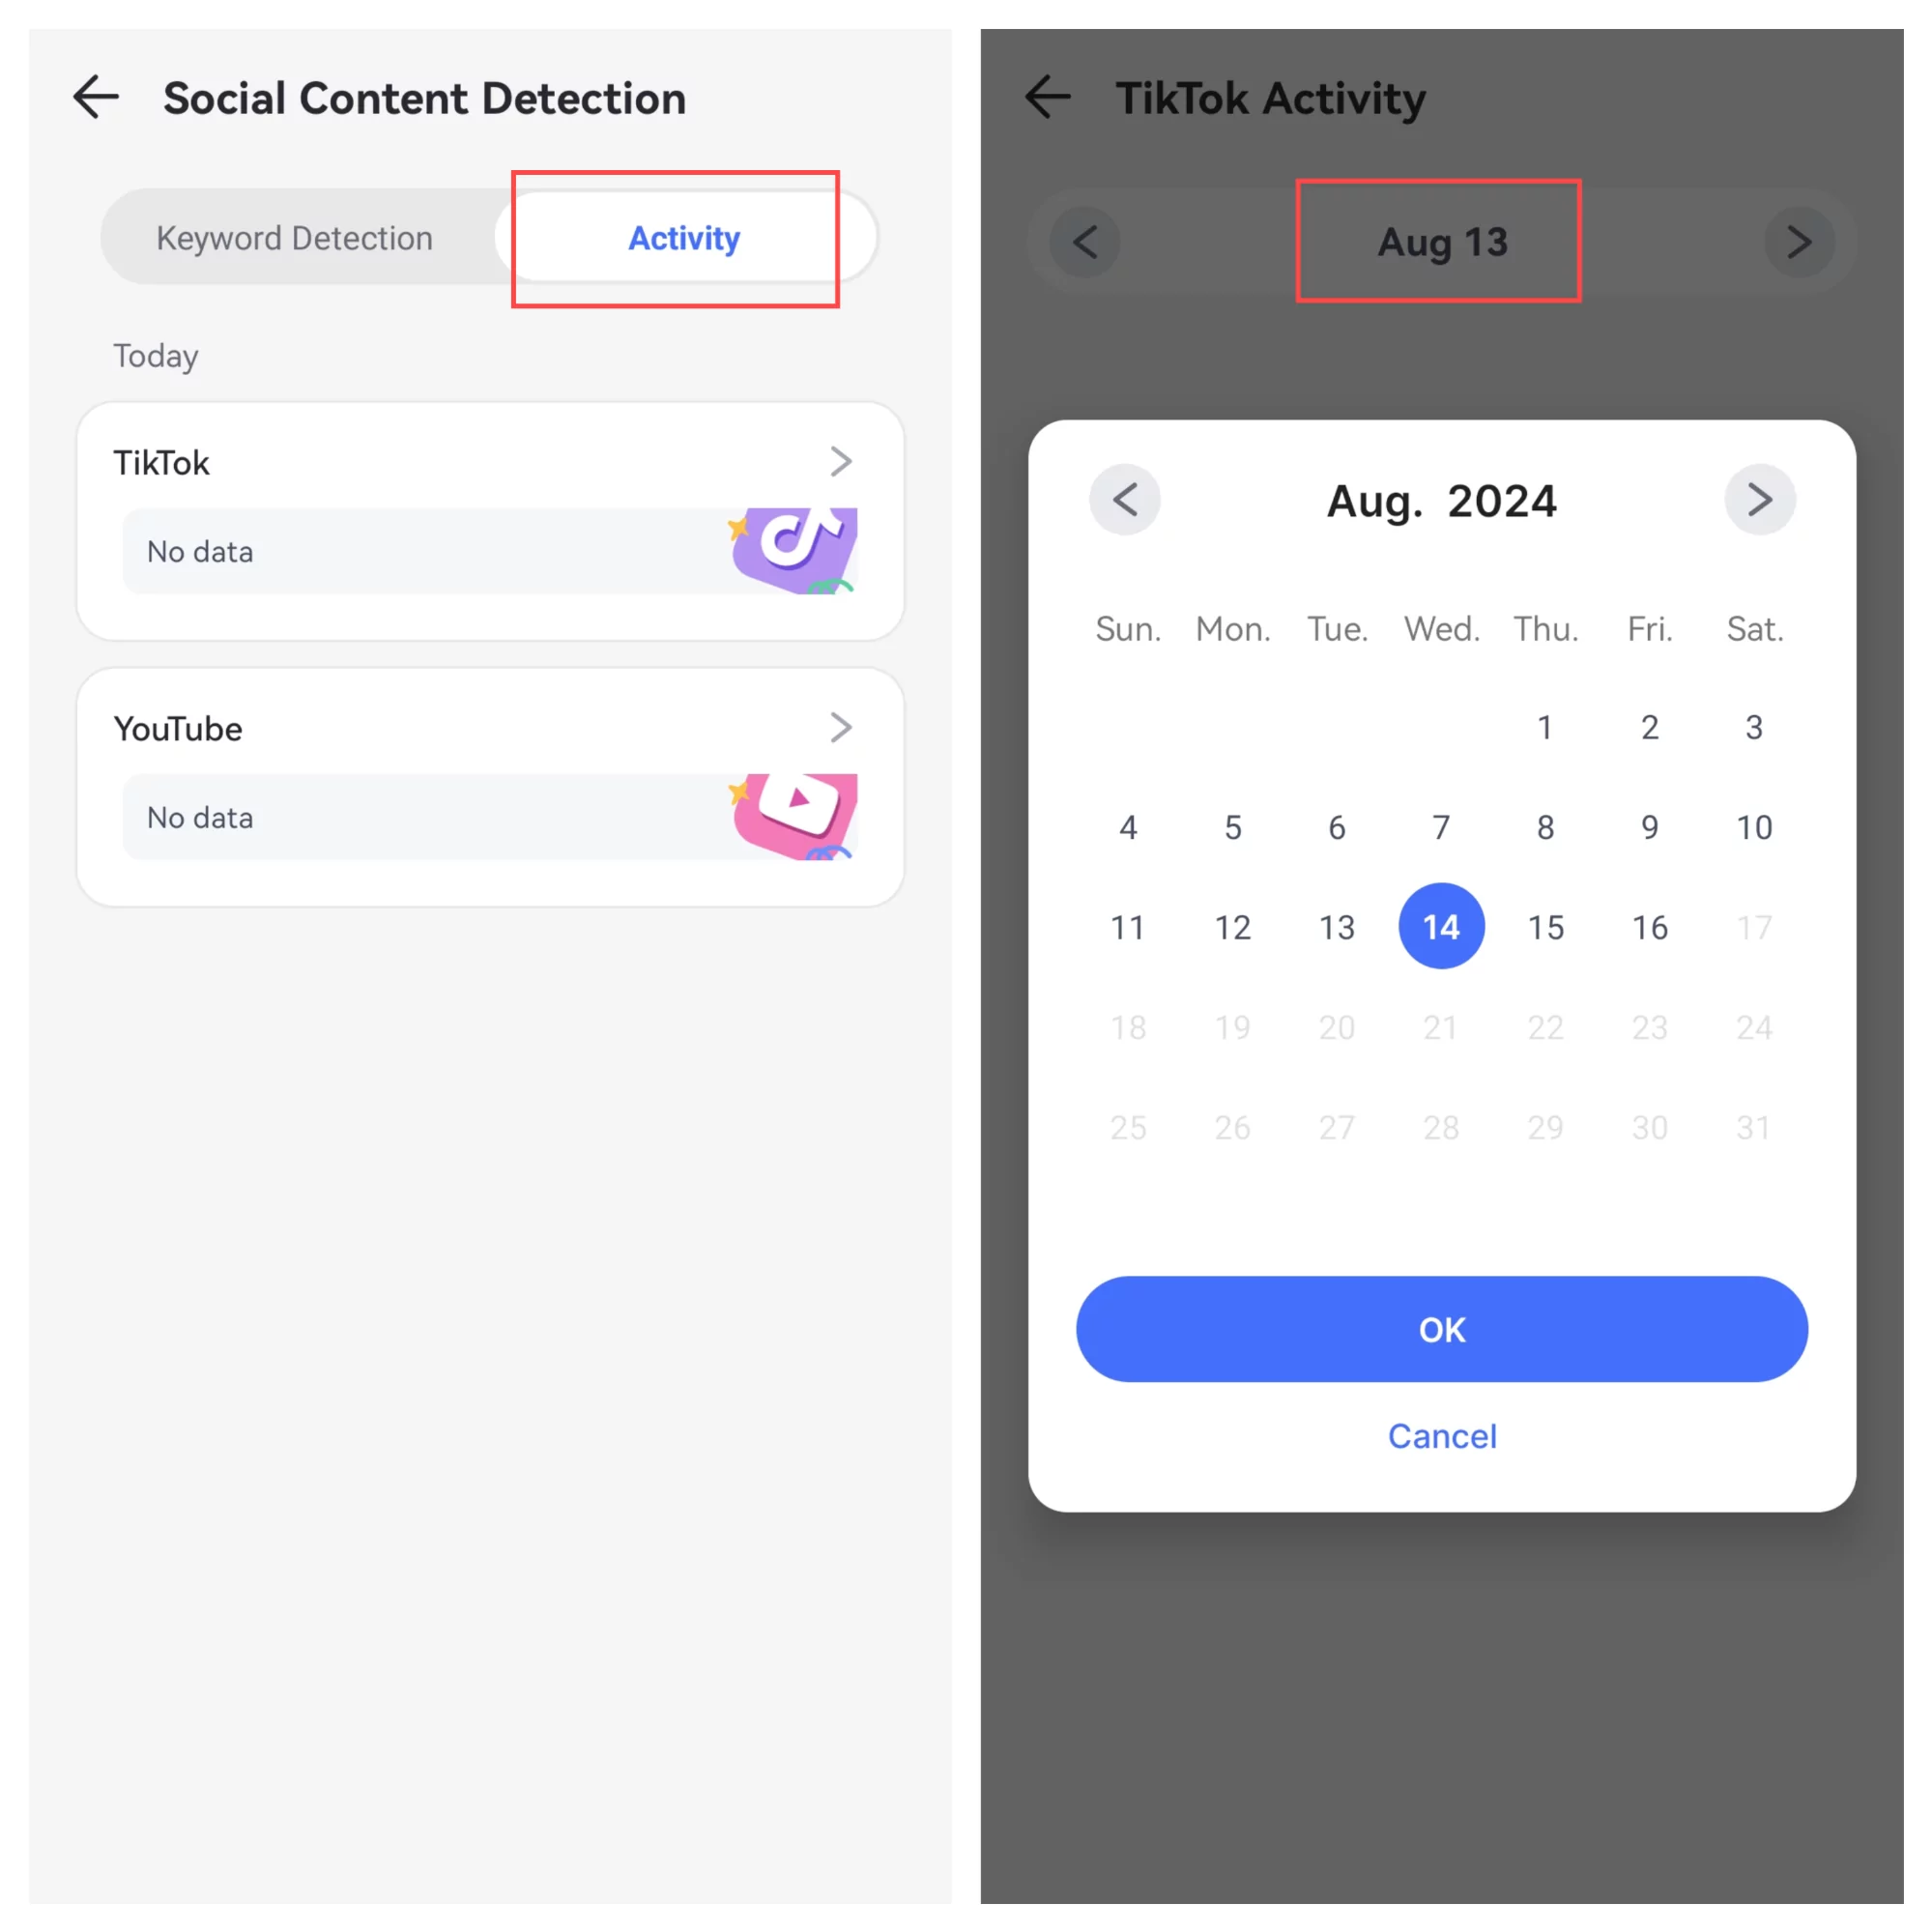
Step 4.Tap the "Activity" option to view TikTok and YouTube activities for the past 30 days.
To set up keywords for content detecting and filtering, please follow:
Step 1.Navigate to "Social Content Detection" and tap "Settings > Keyword Management."
Step 2.Press "✨AI Keyword Assistant" to let AI generate related keyworkds or "Create Custom Keywords" to enter specific keywords you don't wish your child to access.
Step 3.You can also switch to "Subscriptions" to enable the categories that contain the keywords for the content monitor.
Detect Inappropriate Images
Function
Monitor if your child saved adult, violent, or other inappropriate images and get instant alerts.
View details of inappropriate photos.
How-to-Use
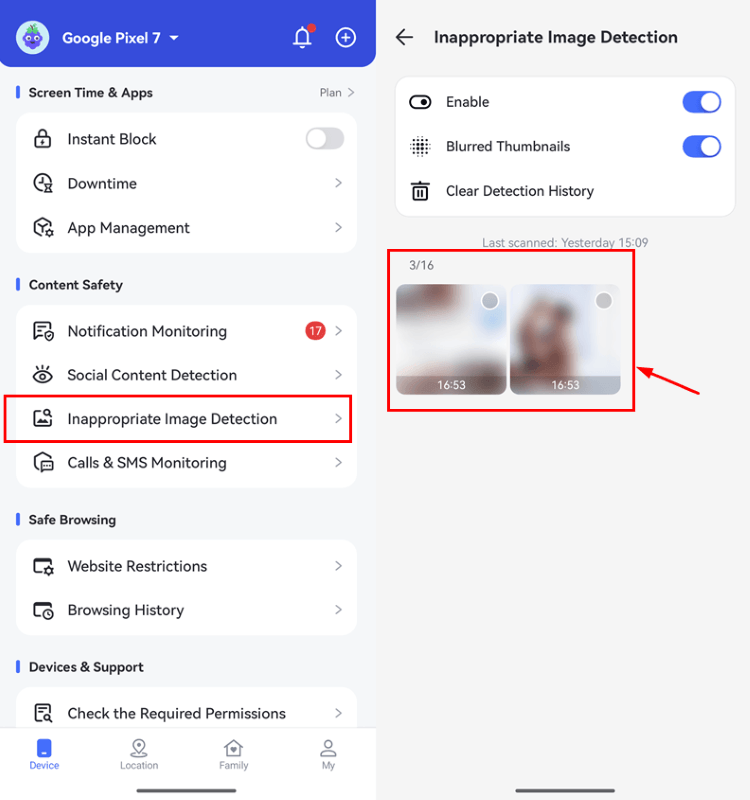
Step 1.Tap on "Inappropriate Image Detection" in AirDroid Parental Control.
Step 2.Touch "Enable" to activate this new feature!
Step 3.Once an inappropriate picture appears on your child's photos app, you can see it on your dashboard and receive alerts.
Part 4: Monitor Remotely
Remote Camera
Function
Remotely open the kid's phone camera and switch between front and rear cameras.
See the surroundings around kids with the cameras of your kids' mobile devices.
Open the flashlight on kids' phones to get a brighter field of view.
Enable the one-way audio to listen to the kid's phone surroundings.
How-to-Use
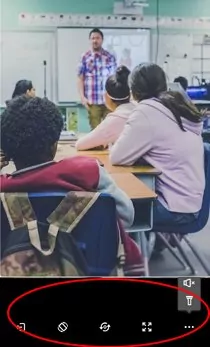
Click "Remote Camera" and you can view the surroundings of your kid's phone.
You can also rotate the screen, switch the webcam, full screen, remotely open the flashlight, and enable a one-way audio function.
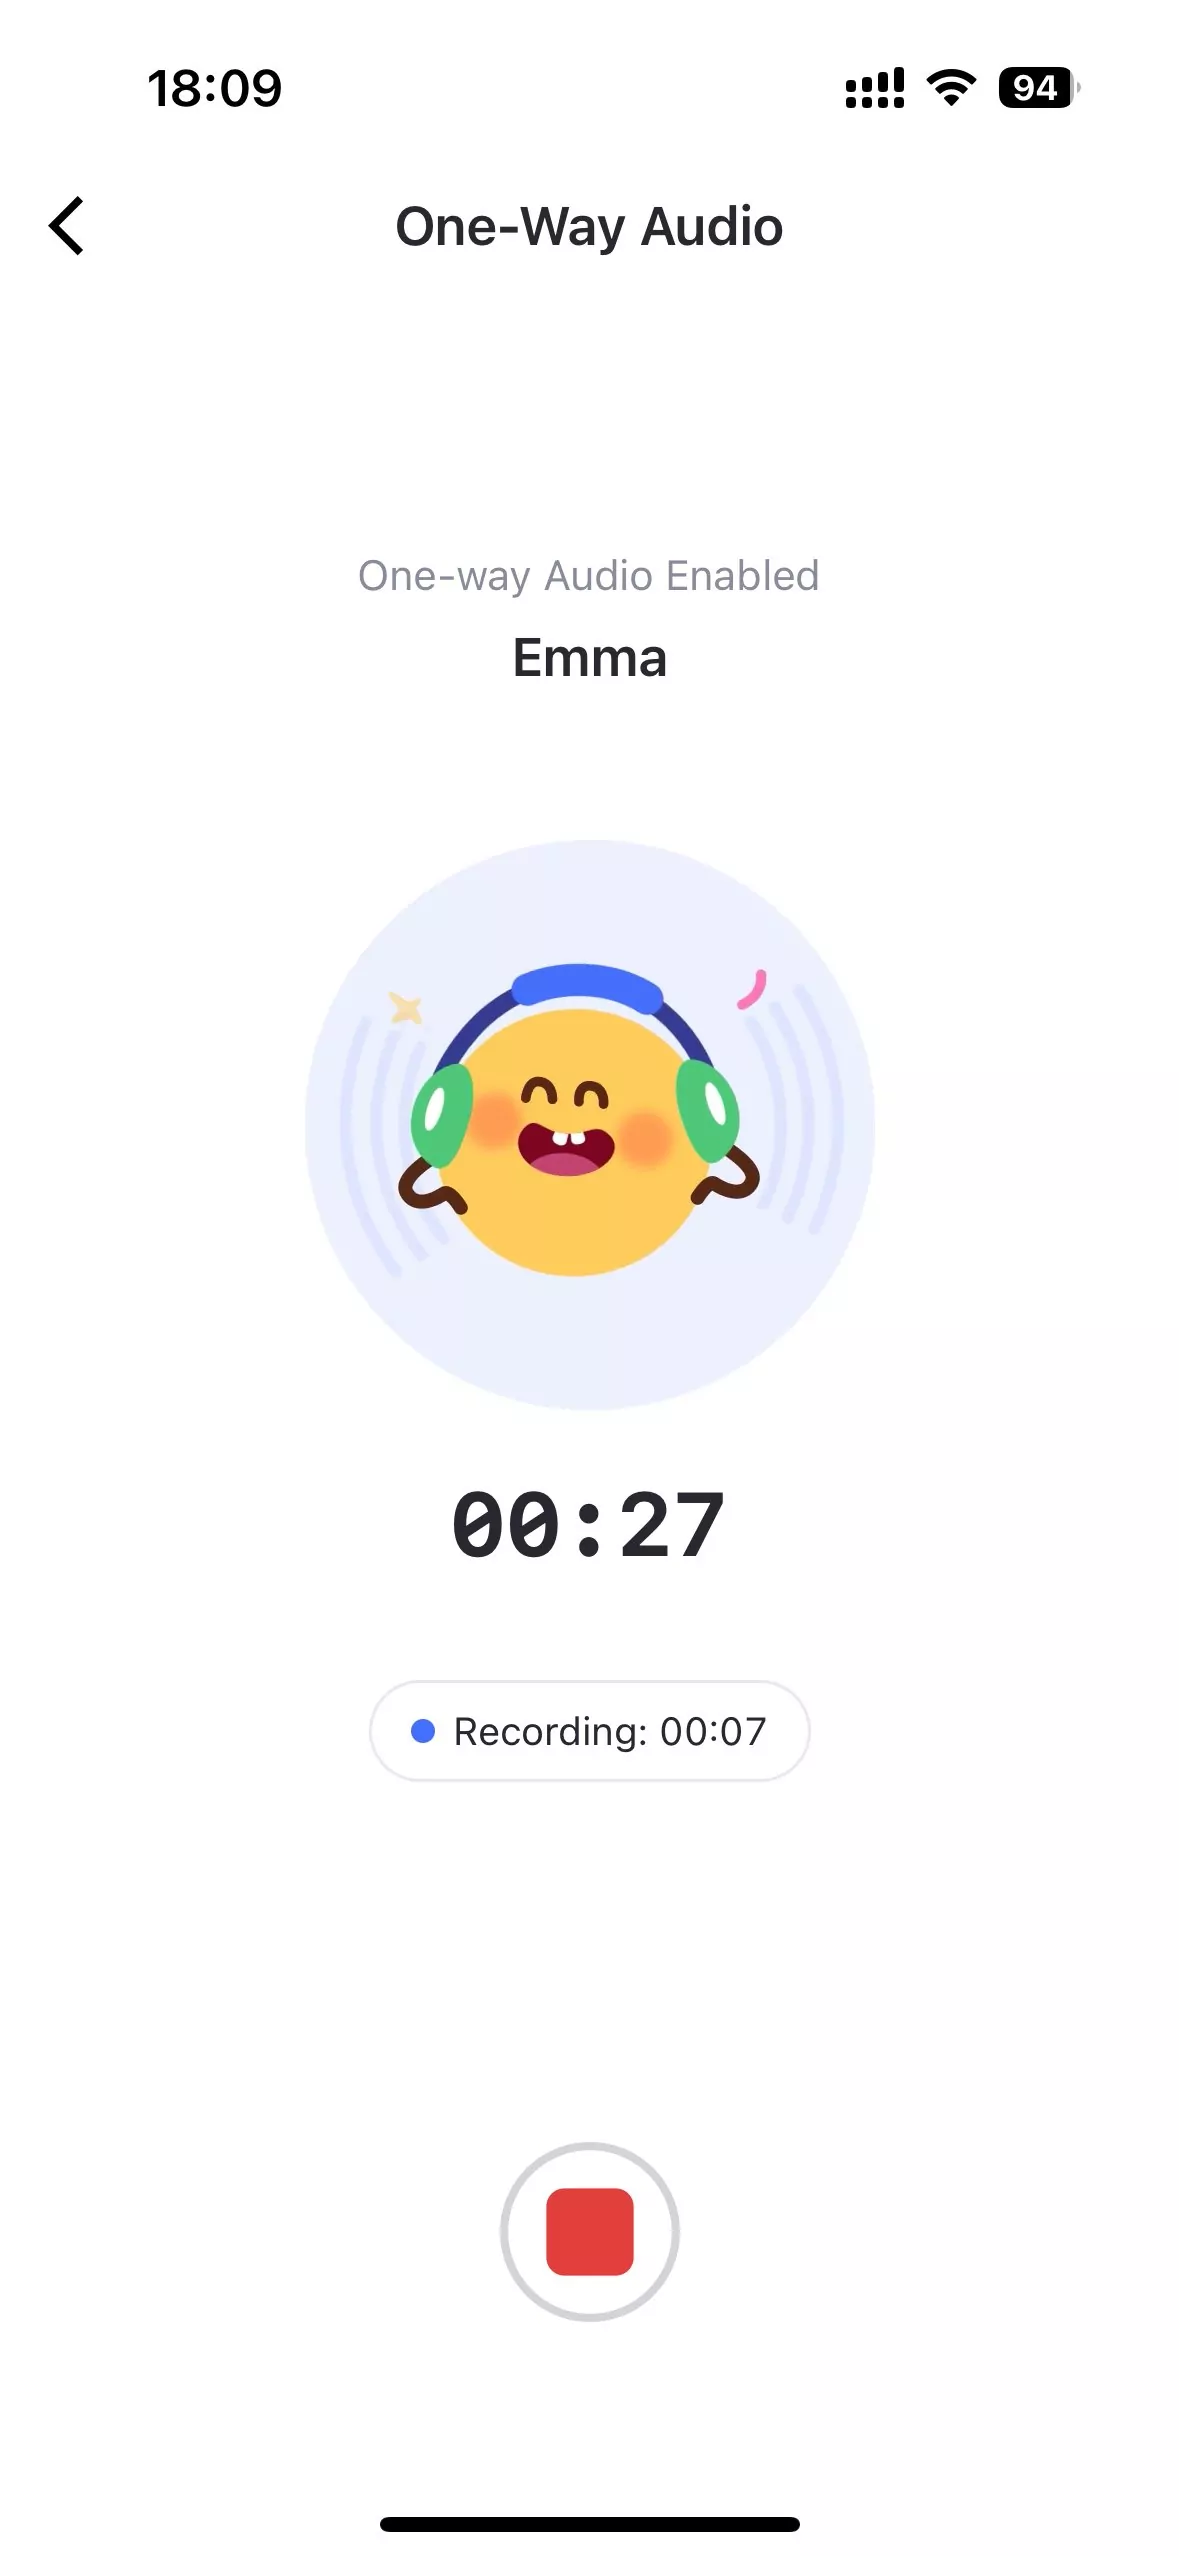
One-Way Audio
Function
Listen to the ambient environment through the microphones of your kids' phones.
How-to-Use
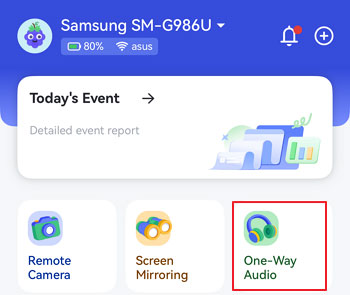
Click the "One-Way Audio" button to listen to the kid's phone surroundings.
You can also make an audio recording if necessary.
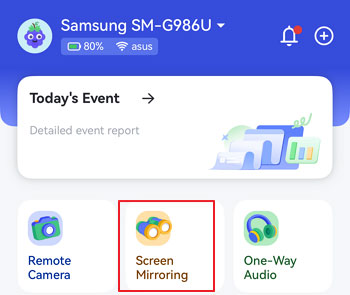
Screen Mirroring
Function
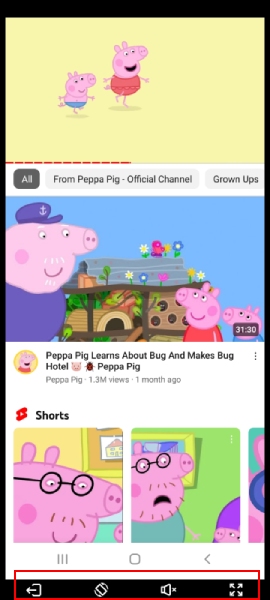
Remotely monitor your kids' live screen.
Ensure your child's digital activities are risk-free.
How-to-Use
Click "Screen Mirroring" and then you can mirror the kid's phone screen to your device.
You can also rotate the screen, turn on the one-way sound, and go full screen.
Part 5: Track Location
Live Location
Function
Check the current location of your kid's device.
How-to-Use
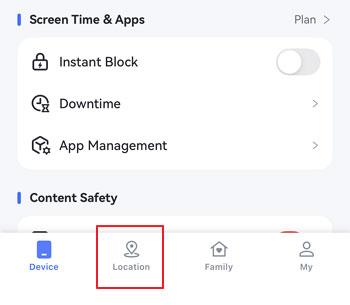
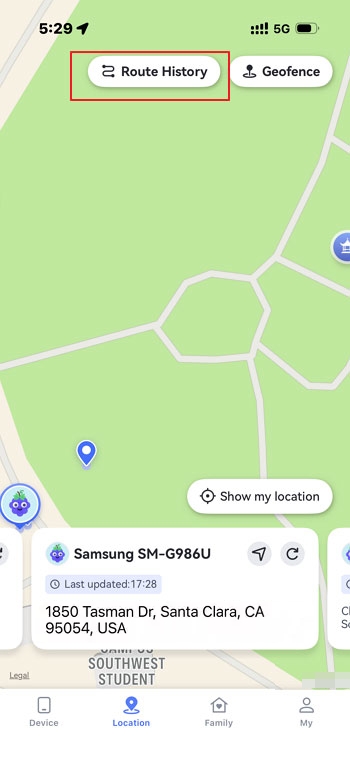
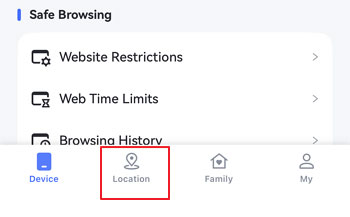
Step 1.Click the "Location" button at the bottom of the dashboard.
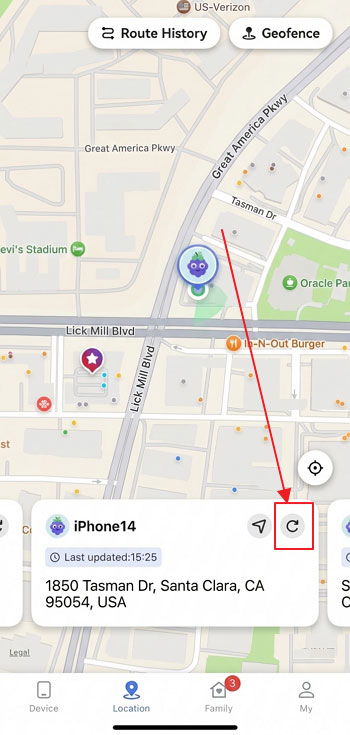
Step 2.You will see the location of your child's device. To refresh the location, tap the Refresh icon in the bottom right corner.
Route History
Function
Check where your kids have been.
View location history of the past 30 days.
How-to-Use
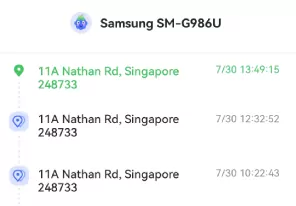
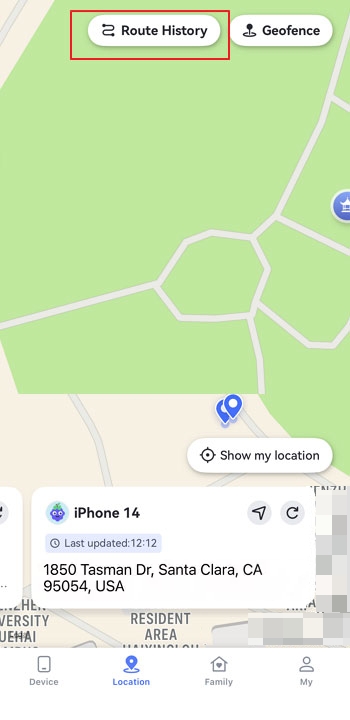
Step 1.On the location section, tap "Route History" at the top.
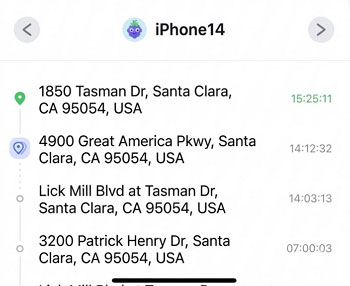
Step 2.You can check the location history in timeline form.
Step 3.Tap the calendar icon to view the location history for the past 30 days. You can also click "<" or ">" to see the previous or next day.
Geofencing
Function
Set up a specific area to get notified when kids enter or leave the area.
How-to-Use
Step 1.On the Location section, tap the "Geofence" button.
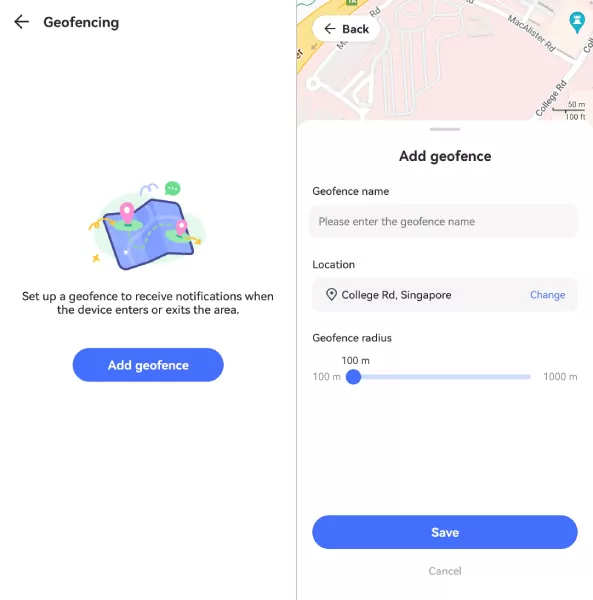
Step 2.Tap "Add geofence."
Step 3.Enter the geofence name, select the location, and set the radius. When you're done, tap "Save."
Part 6: Check Reports & Alerts
Activity Report
Function
Check the daily and weekly phone usage details in a timeline format.
Check information about the most used apps. You can also learn how long they were used and when they were used.
See how many notifications each app has received.
Learn which app has used the most data and how much it has used.
Free to check the activity report of any date within 30 days.
How-to-Use
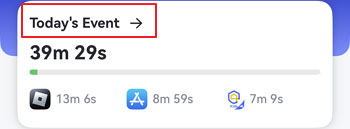
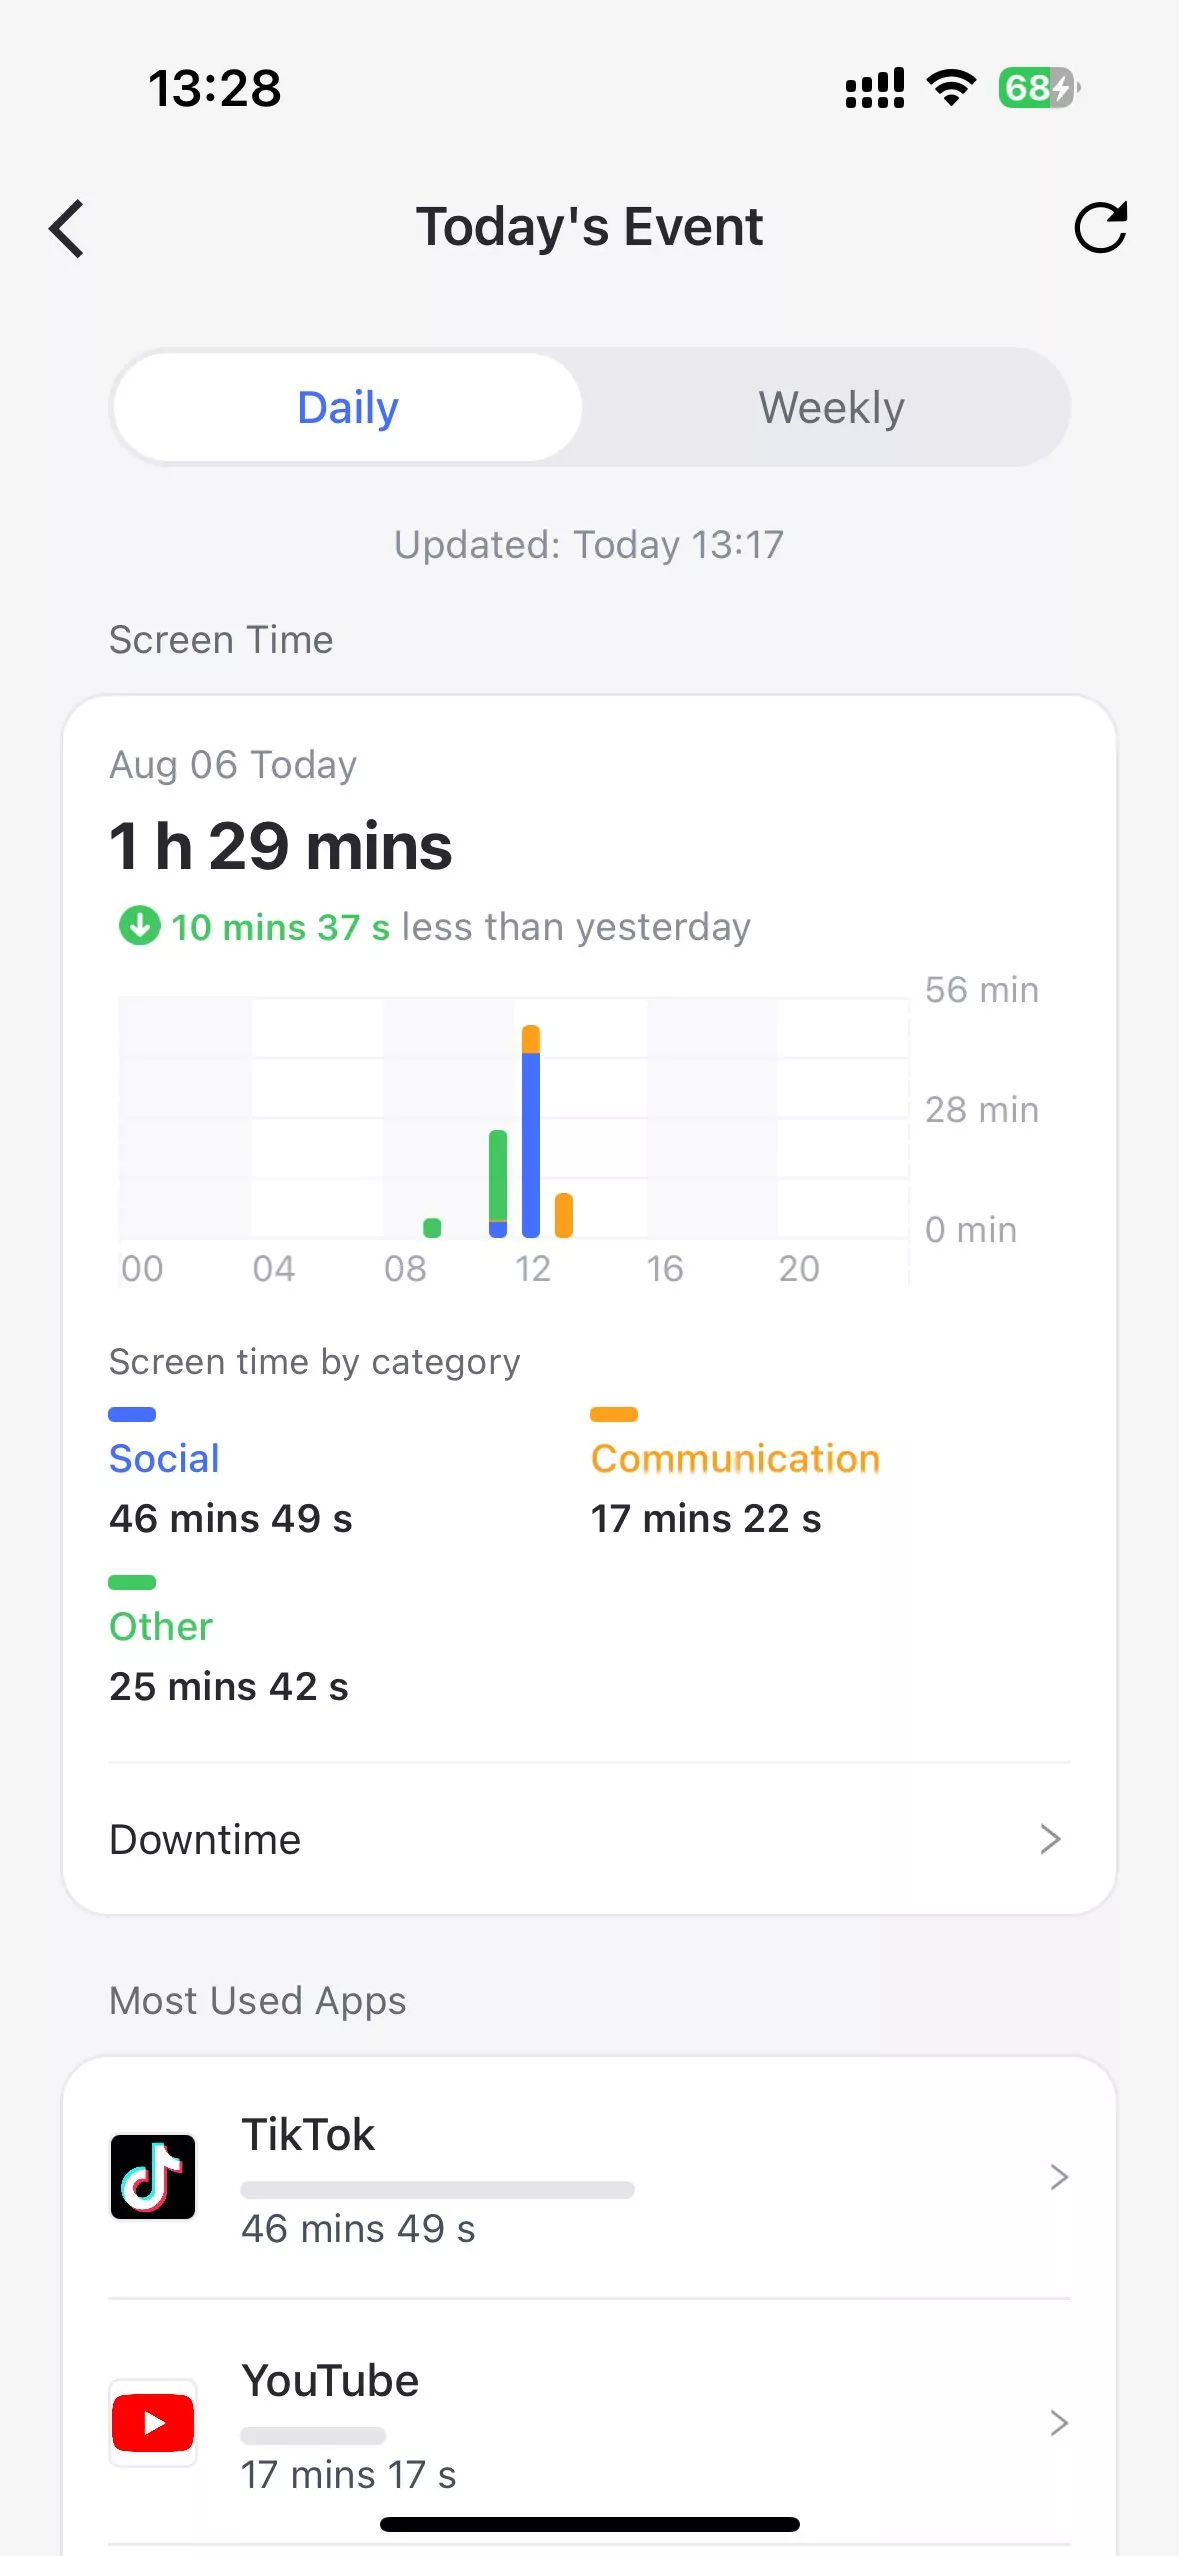
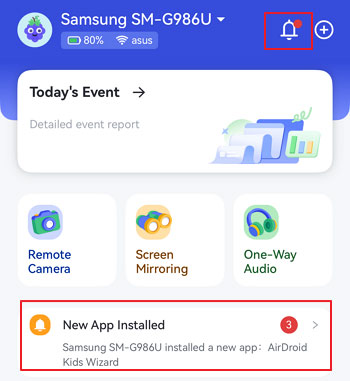
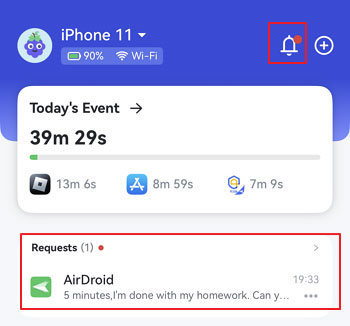
Step 1.Tap "Today's Event" at the top of the dashboard.
Step 2.Choose whether you want to see a "Daily" or a "Weekly" report. The "Daily" report is the default. You can also swipe the chart left and right to check the activity report from the previous day or the next day.
Step 3.Scroll to view Screen Time Usage, Most Used Apps, Number of Notifications, or Cellular Data Usage.
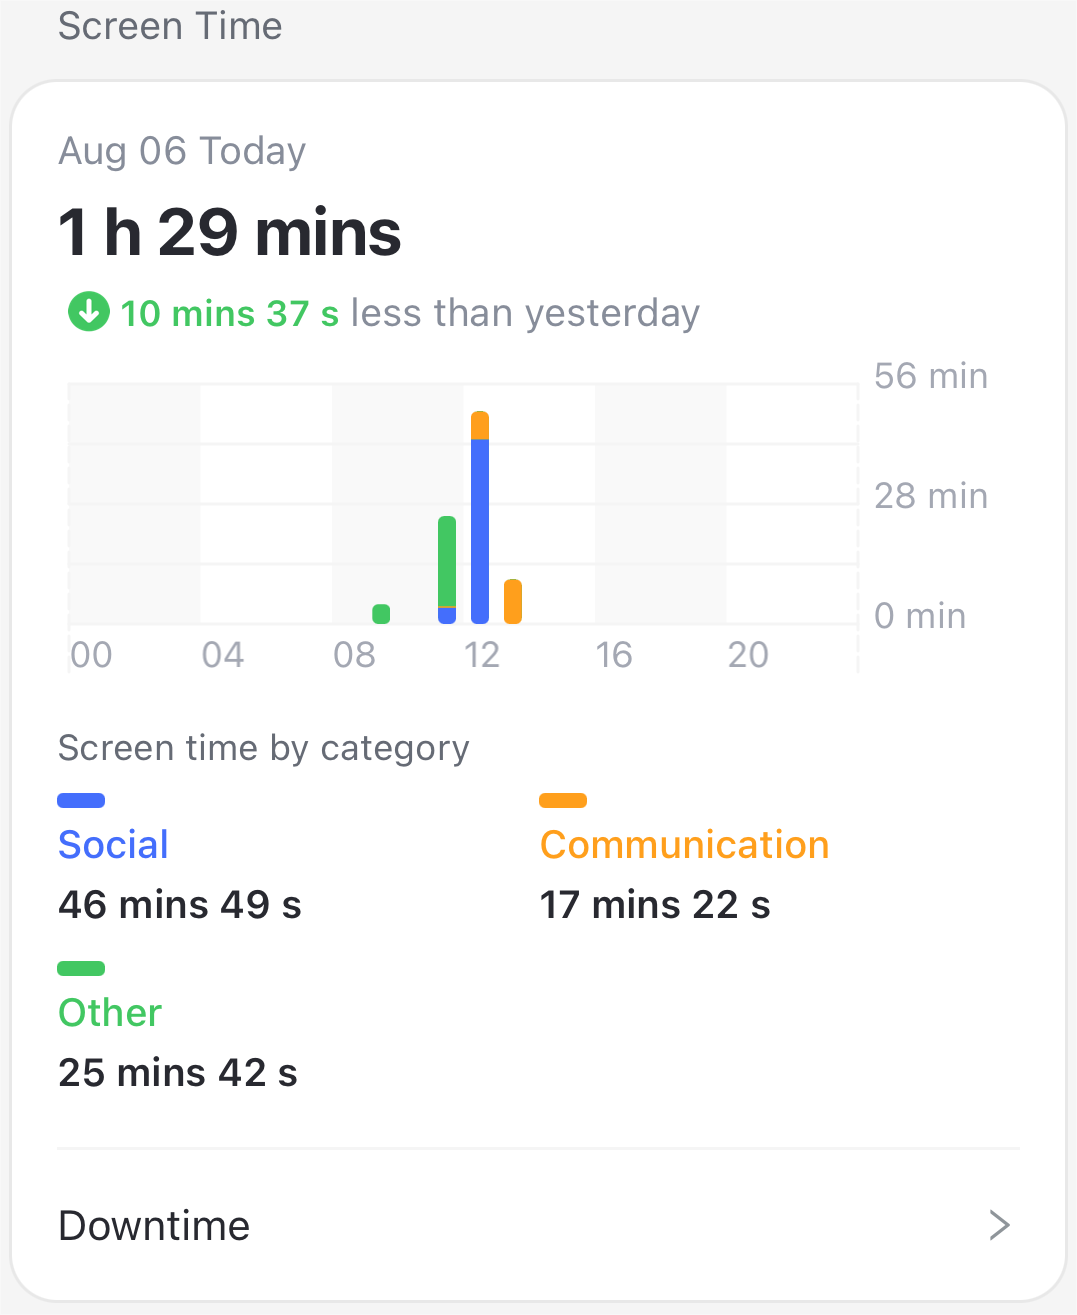
Screen Time Usage - Check when and how long the device has been used. You will know what kinds of apps have been used most. You can also directly set up downtime for kid's device here.
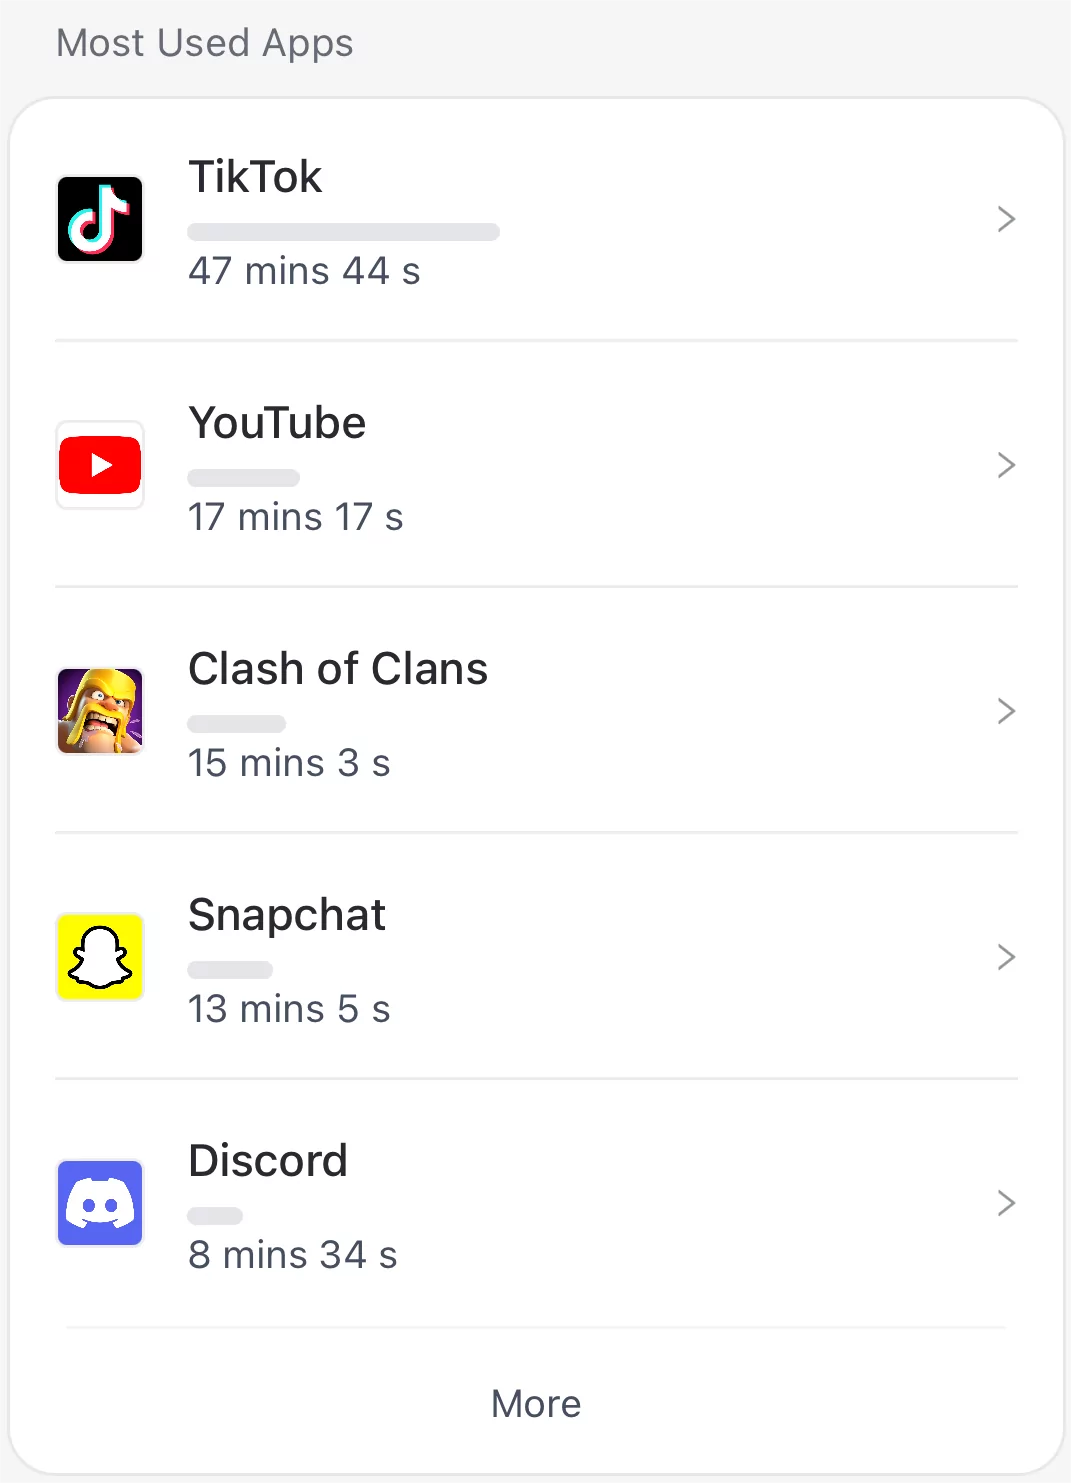
Most Used Apps - Learn more about your kid's most used apps, such as duration time, categories, and age ratings, making sure that your child uses appropriate apps and stays away from malware.
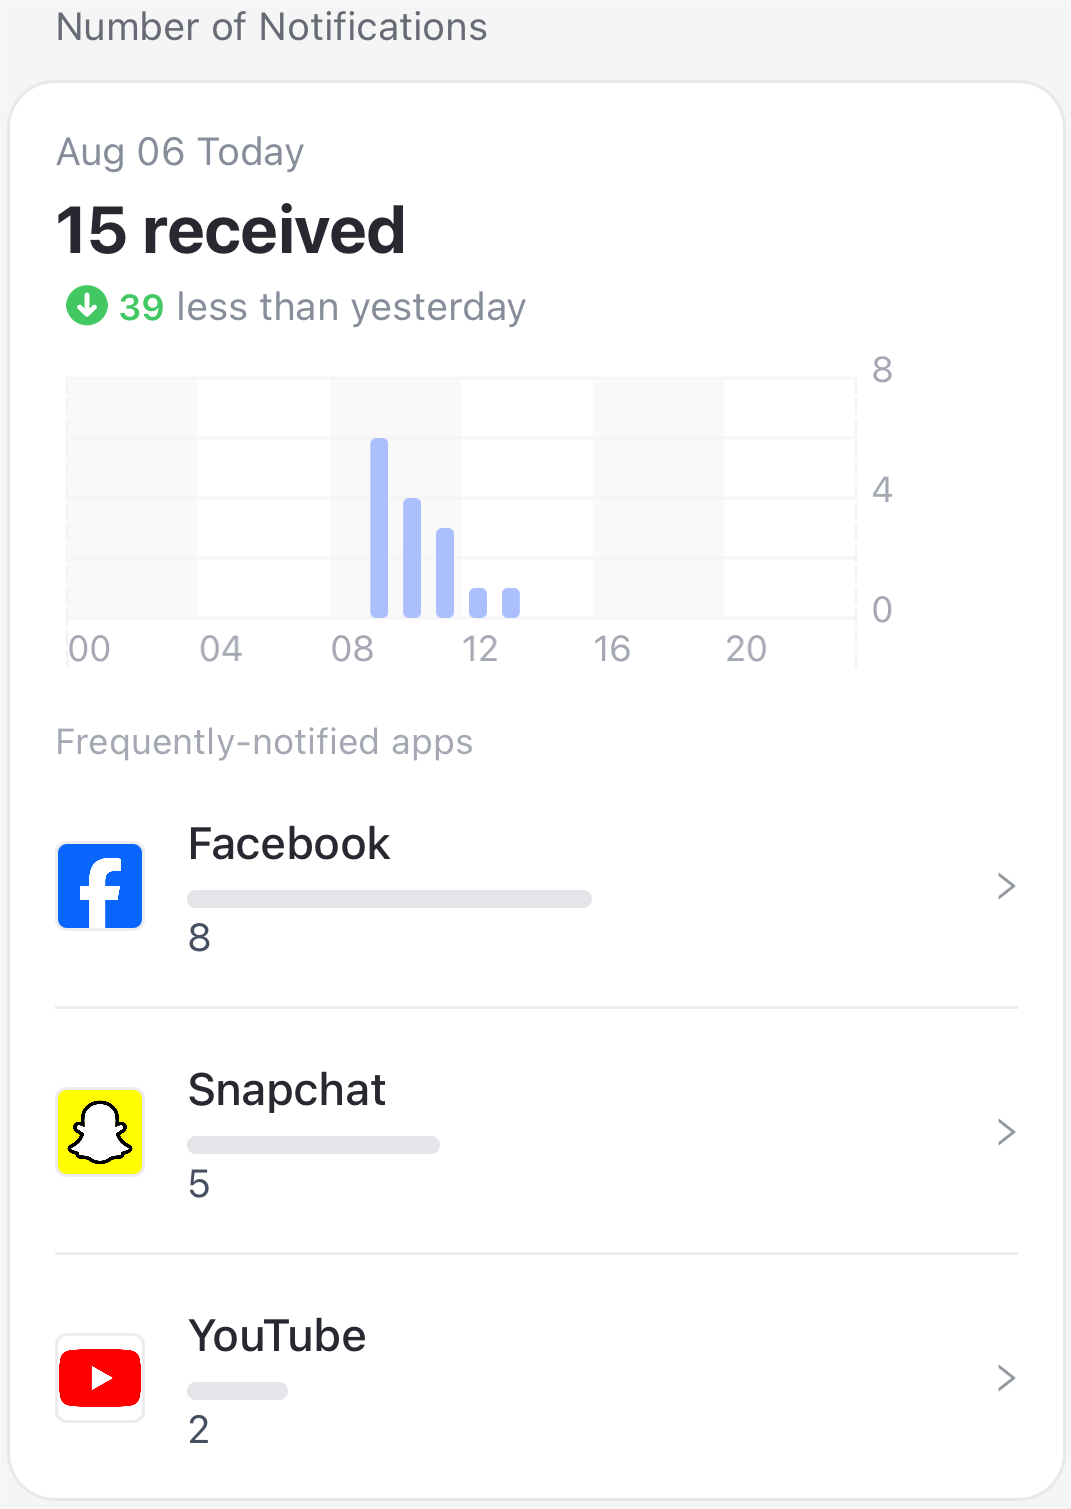
Number of Notifications - Check how many notifications the kid's phone has received. Know the name of frequently-notified apps and the times they received notifications. And read the notifications the app has received by tapping the app name.
Cellular Data Usage - Find out the cellular data usage of a kid's phone on a specific day. Check which apps have used data and how much they have used.
Requests
Function
Receive and respond to your child's requests for restricted apps.
Get notified when your child tries to open a blocked app or installs a new one.
Know whether your child is in or out of the Geofences.
Stay aware of low battery and device offline.
Share new Admin Code with other family members.
Grab the latest and best deals.
How-to-Use
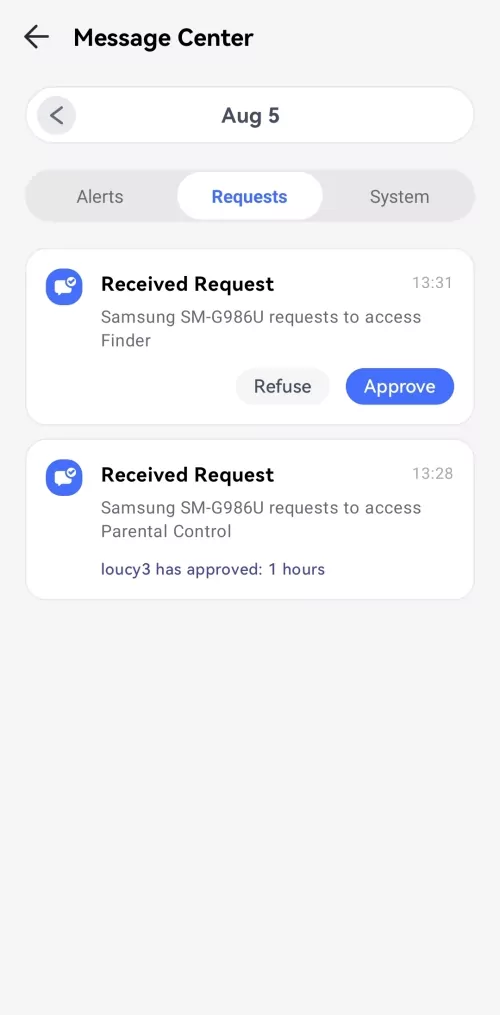
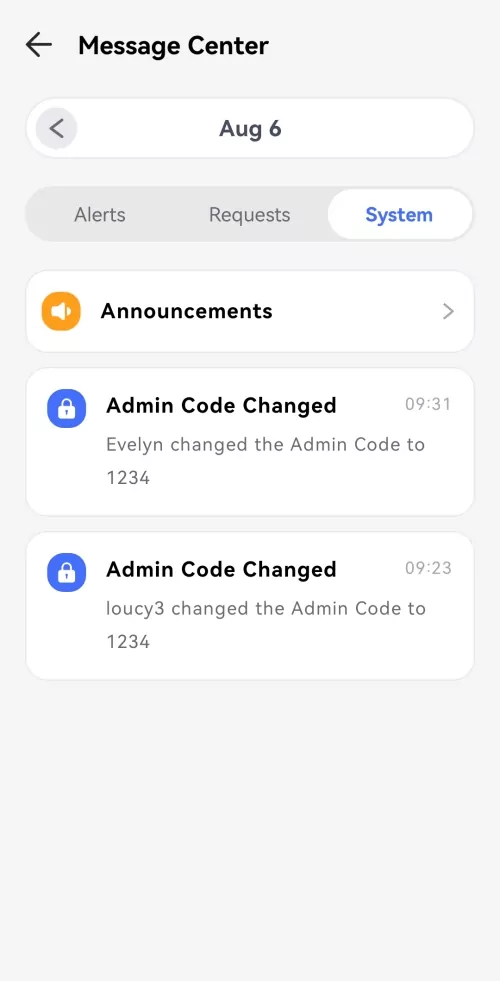
Press the Bell icon at the top or navigate into the "Request" section if any. Then, you will see three tabs - Requests, Alerts, and System.
Requests - Check if your child requested to access the blocked application. Then, choose "Approve" or "Refuse" to decide whether to grant additional time for the restricted app.
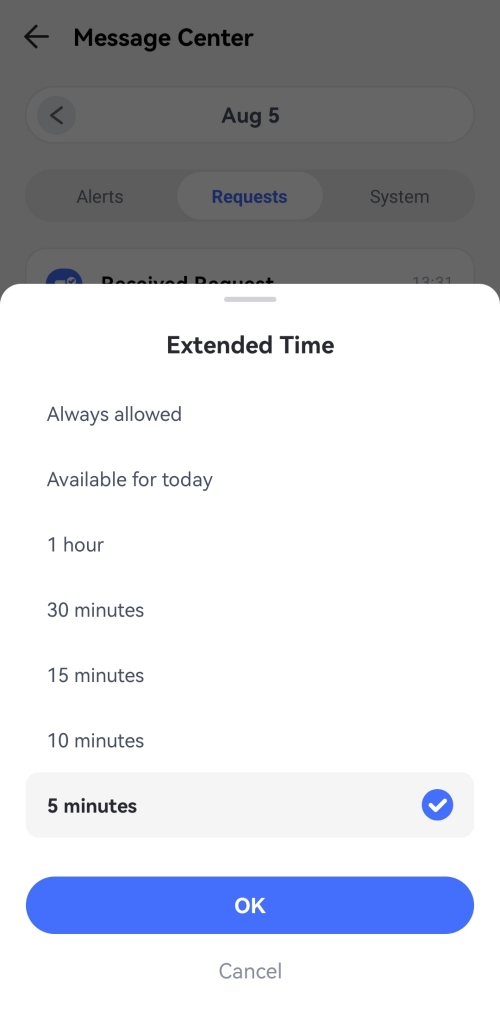
When approved, go to pick these options for your preferences: 5 minutes, 10 minutes, 15 minutes, 30 minutes, 1 hour, Available for today, and Always allowed.
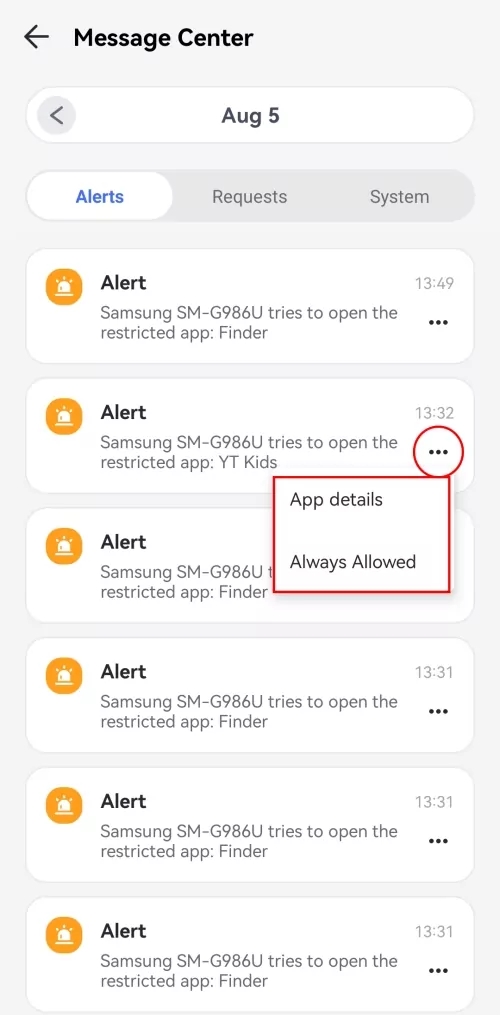
Alerts - Get immediate alerts of low battery, device offline, when your child tries to open blocked apps or install a new app, and reach or leave the geofencing area.
You can also choose to see the restricted app details or add it to the "Always Allowed" list directly. For the newly installed app, AirDroid Parental Control allows you to block it at the touch of a button.
System - Whenever you or the family member change or remove the Admin code, you'll get notified. Plus, receive the latest notifications if there are discounts or sales on the app.
By tapping on the "<" or ">" button, you are able to check the alerts of the previous or next day.
SOS Alerts
Function
This feature allows your child to send an emergency alert when they feel unsafe.
When the child taps the SOS button, parents can receive an instant alert with a loud siren, view the child's real-time location, and listen to what's happening around them.
👇Video Tutorial: Set up SOS in AirDroid
How-to-Use
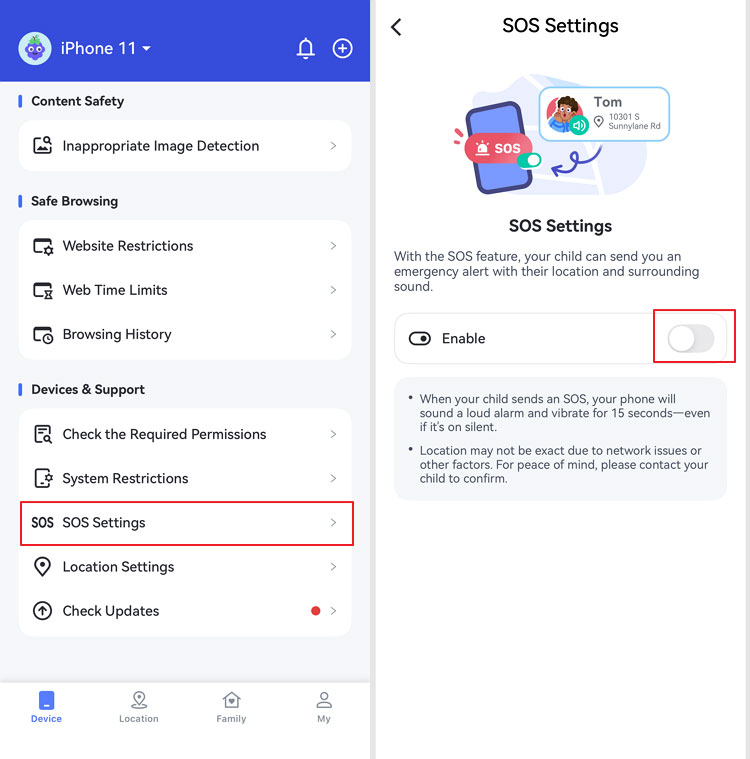
Step 1.Enable SOS Settings
On AirDroid Parental Control,tap on "SOS Settings" and turn on the "Enable" toggle.
After this, SOS alerts can bypass silent mode on Android devices.
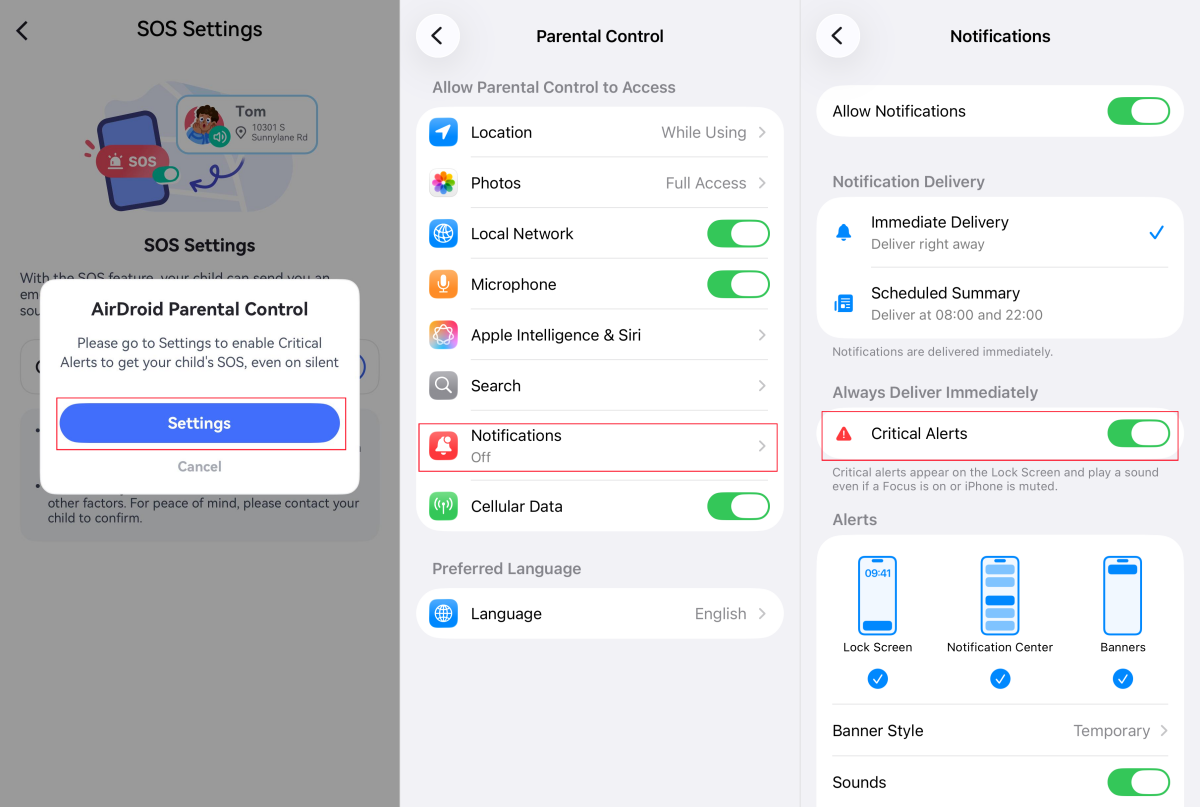
However, if you're using an iPhone, please open "Settings" from the pop-up and enable "Critical Alerts" to ensure SOS alerts are not missed even when the phone is muted.
Step 2.Teach Your Child to Use SOS
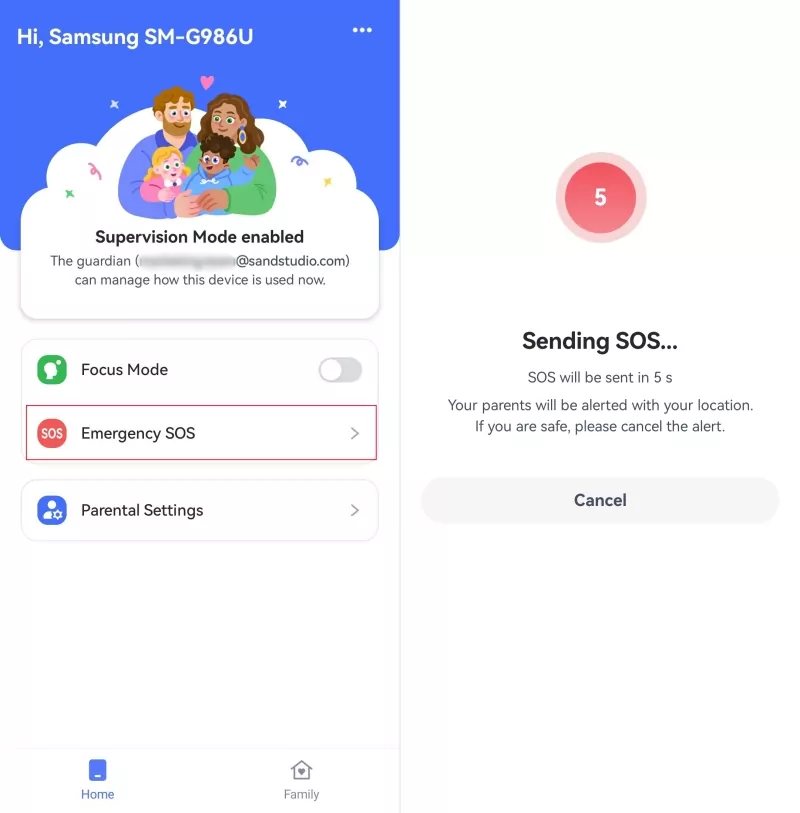
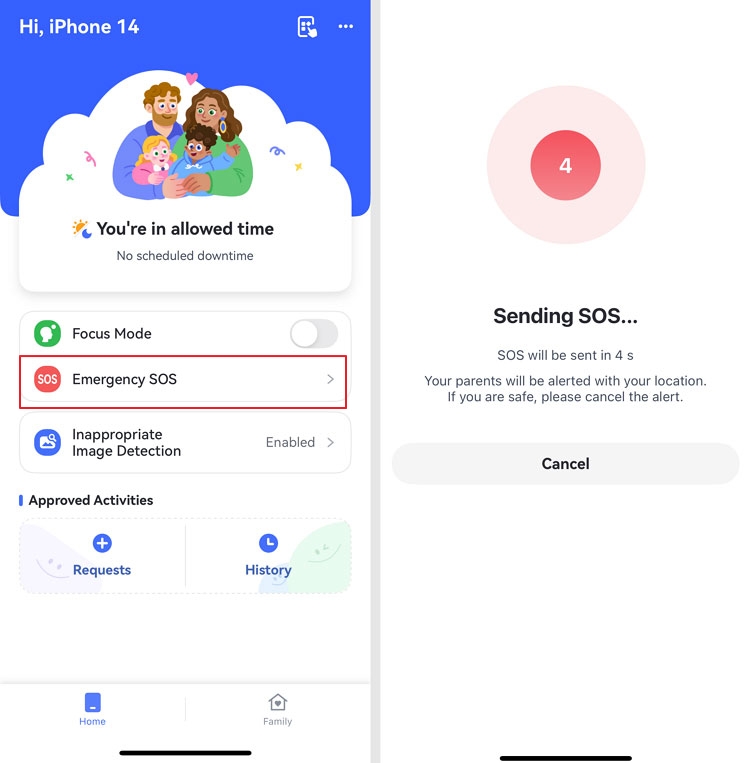
Once SOS is enabled, the "Emergency SOS" button will appear on your child's device in the AirDroid Kids app.
So, show your child where to find the button and explain when it should be used.
If you chose to hide AirDroid Kids during the initial setup, teach your child to open the app through AirDroid Kids Wizard and use the SOS button.
When he taps the "Emergency SOS" button, a 5-second countdown begins. If not canceled, the SOS alert will be sent.
Step 3.View SOS Details
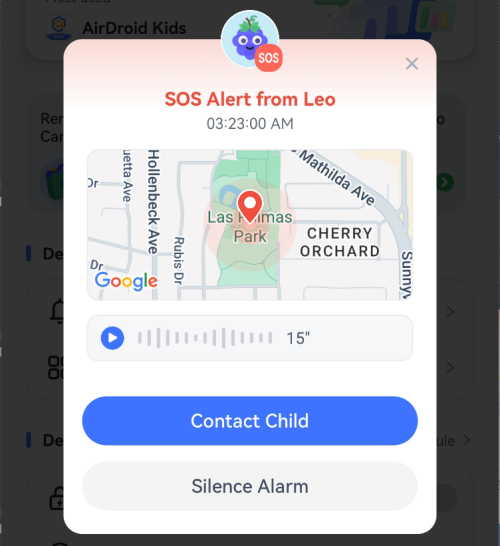
When an SOS alert is triggered, you will first hear a 15-second siren alert.
Then, you're able to check your child's location, listen to surrounding audio, and contact them directly in AirDroid.
The admin can invite up to 10 family members to the group. The steps are easy:
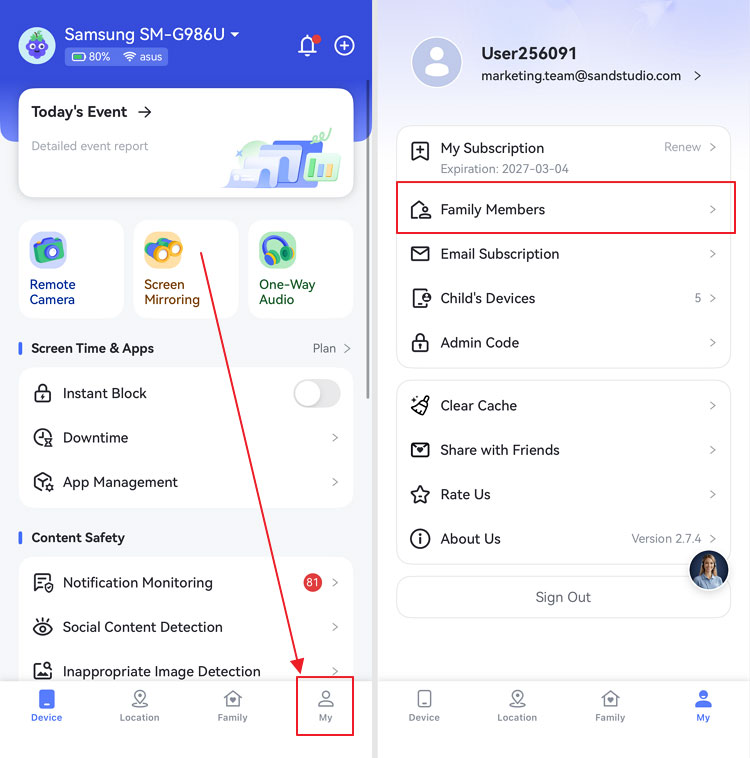
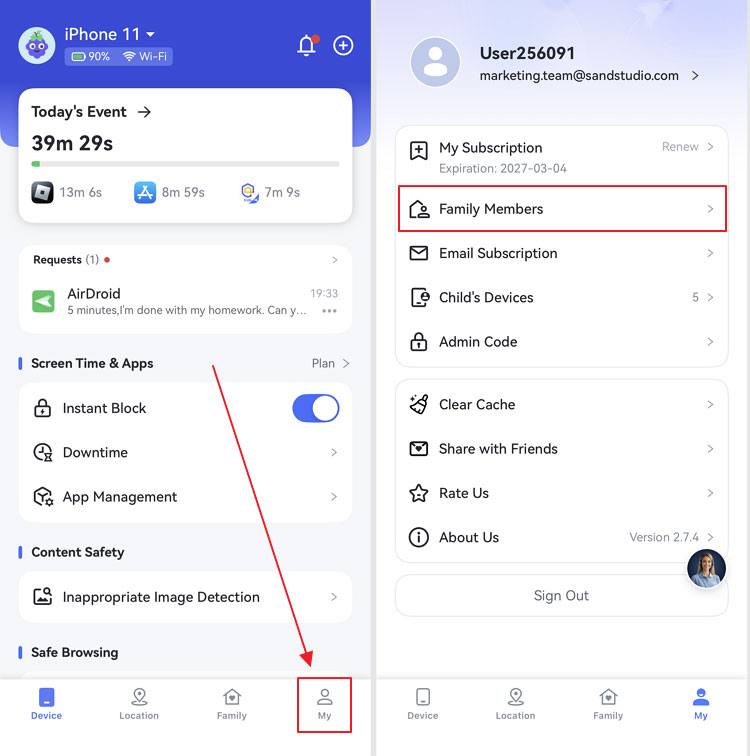
Step 1.Tap "My" at the bottom of the parental dashboard and Select "Family Members".
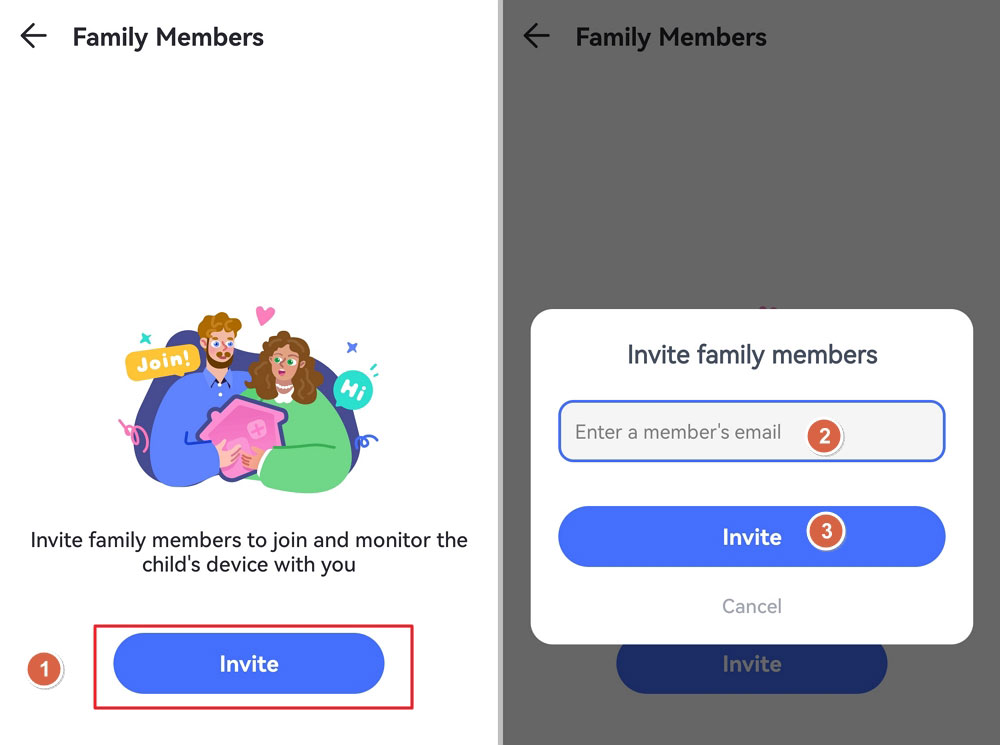
Step 2. Tap the Invite icon, and enter the member's email. Then, tap "Invite" to confirm.
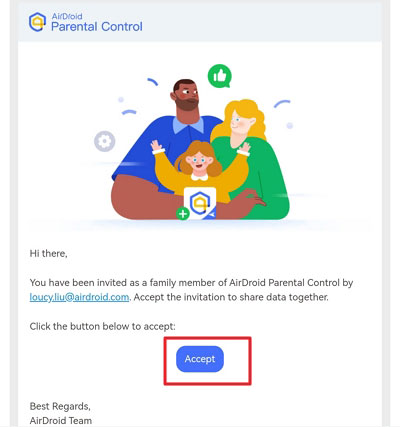
Step 3.Ask the family member to check their email to accept the invitation.
You can also tap the "+" icon at the upper-right corner to invite more family members.
Please kindly noted that all joined family members can also adjust parental control settings for child's device from the dashboard.
Chat with Family Members
If no child is hidden, the admin, all joined family members and supervised children are in the Family Group. From the Family tap, all of the members in the group can send personal messages to others.
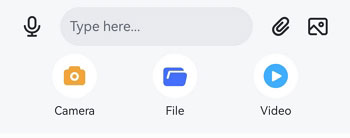
You can send text messages, audio message, files, videos and photos in both group and personal chat.
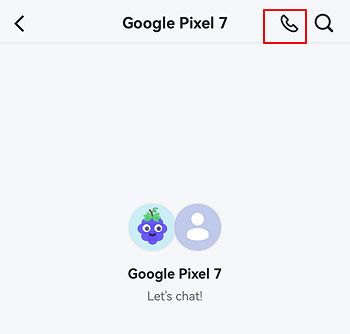
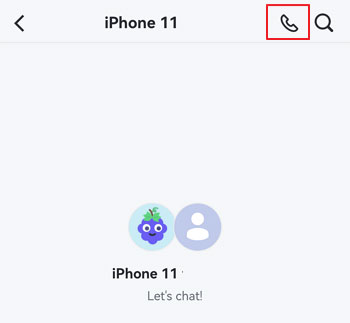
The call feature is only available in personal chat. Tap the call icon at the upper-right corner to call the other person.
Remove a Child from the Family Group
After binding a child’s device to your account, they will in the Family Group by default. However, the admin can remove a child from the chat.
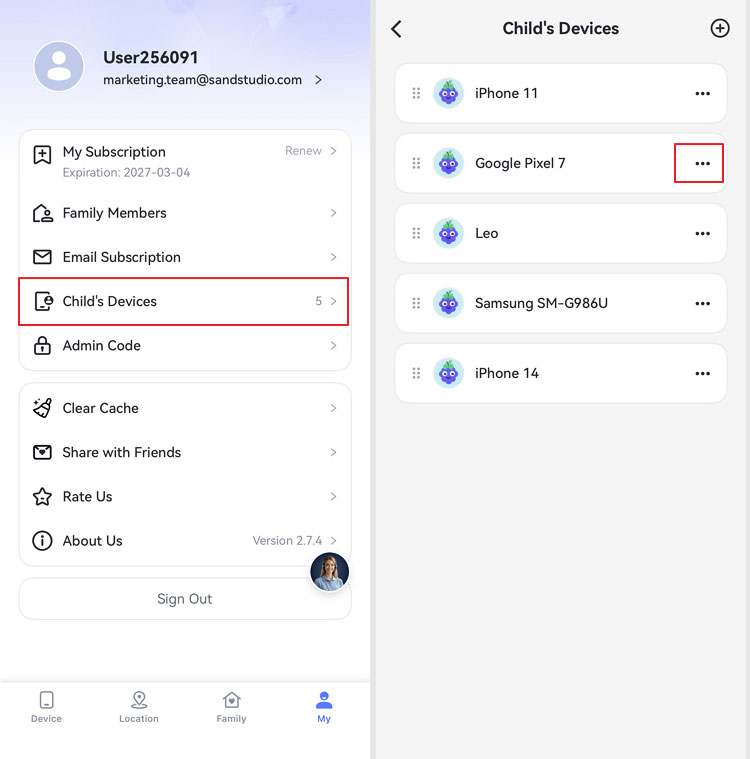
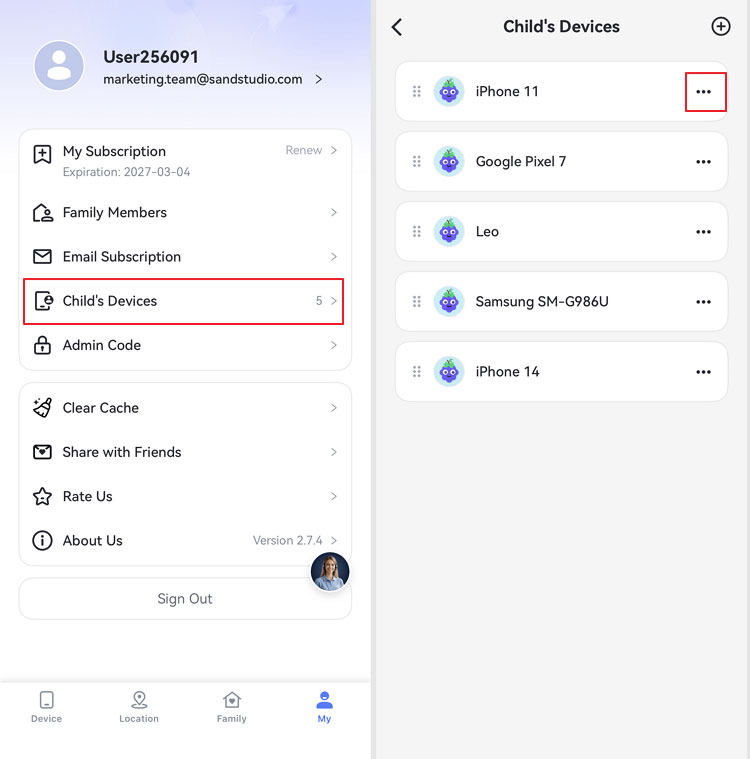
Step 1.Select "My" at the bottom of the dashboard.
Step 2.Tap "Child’s Devices," find the child you want to hide, and tap the three-dots icon next to their name.
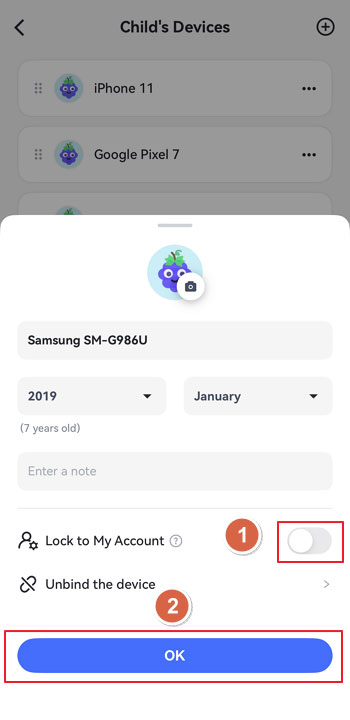
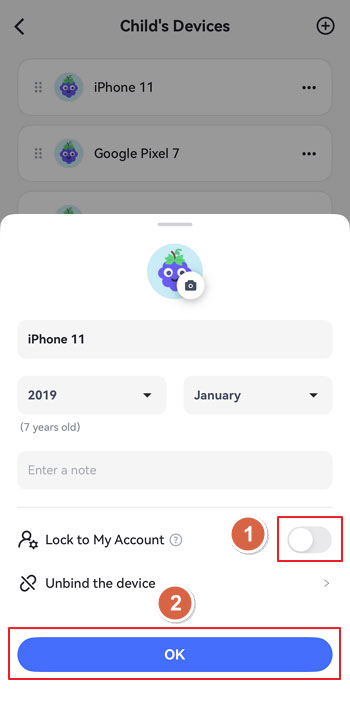
Step 3.Toggle on the switch next to "Lock to My Account" and then OK to confirm.
Only the admin can chat with the hidden child, monitor and mange the child’s device.
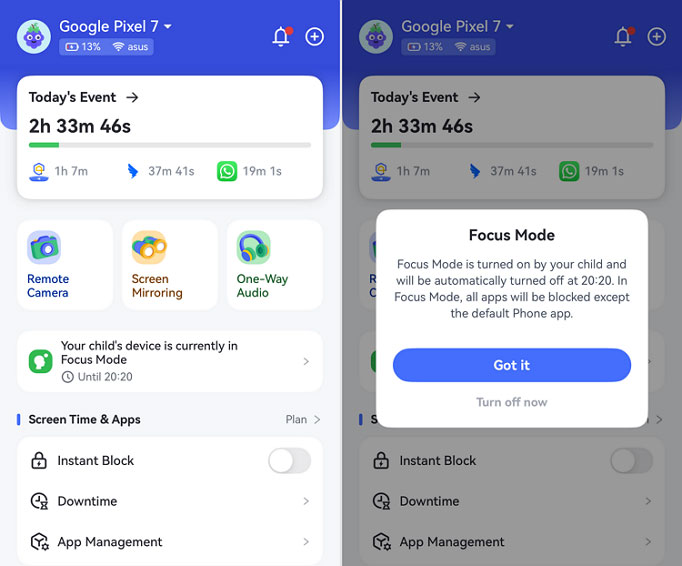
Focus Mode
Function
The child can turn on Focus Mode whenever needed.
Once it is enabled, only Phone, Clock, Settings, and AirDroid Kids remain accessible on their Android. And all notifications will be silenced to keep kids focused.
The Focus Mode will remain active until the set time ends or a parent turns it off.
How-to-Use
Built into AirDroid Kids, Focus Mode is designed to help children stay away from distractions during study, rest, or other important times. Therefore, you can guide your child to turn it on by following the steps below.
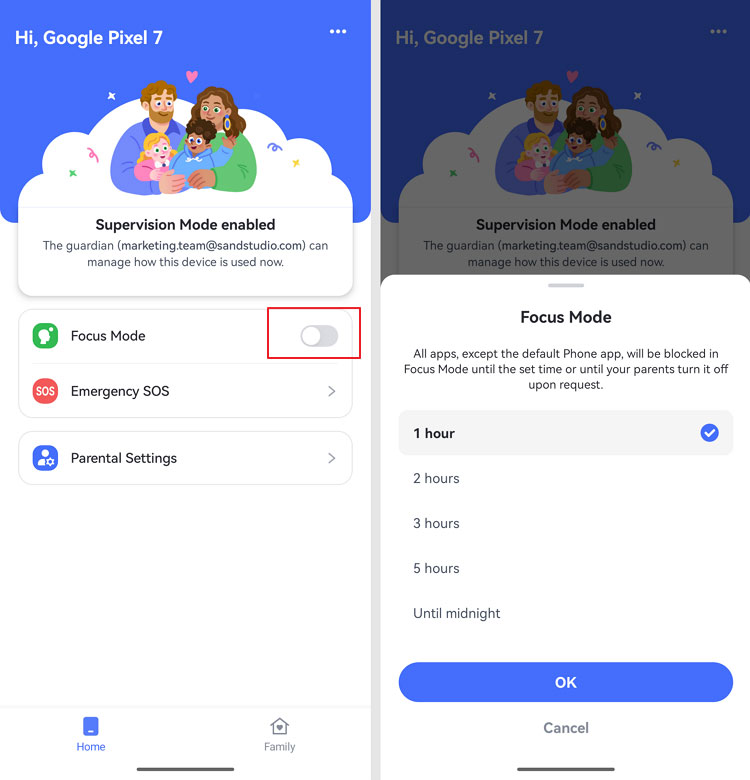
Step 1.Open AirDroid Kids and toggle on the switch next to "Focus Mode."
Step 2.Choose how long the Focus Mode should be activated.
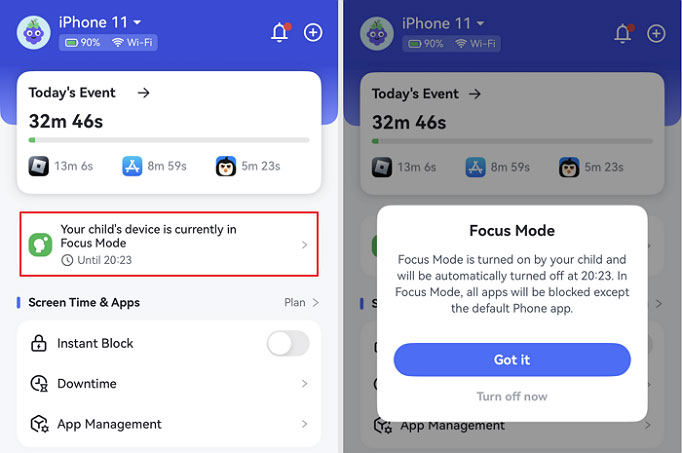
After that, you can check when and how long Focus Mode was active, and turn it off for your child on AirDroid's parental dashboard.
FAQs about AirDroid Parental Control
Can I add another parent to supervise my child’s device?
Yes. You can invite another parent or guardian to manage your child’s device together. Once added, both parents can set app limits, monitor activity, receive alerts, and chat.
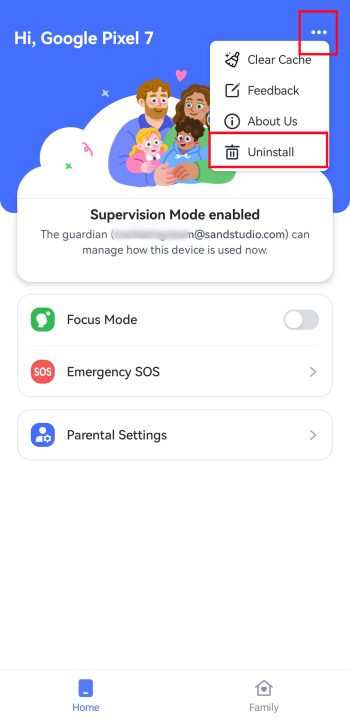
How to uninstall AirDroid Kids from an Android device?
To remove AirDroid's supervision from a child's Android device, please follow:
Step 1.On the child's phone, open "AirDroid Kids."
Step 2.Tap the three dots in the top right corner.
Step 3.Tap on "Uninstall."
Step 4.Enter the 4-digital admin code or the password to confirm the deletion.
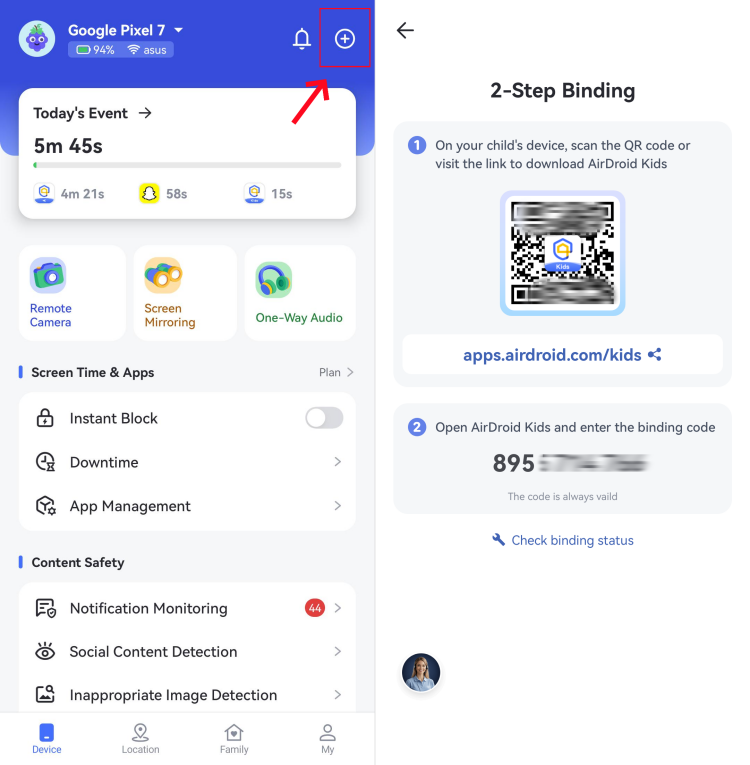
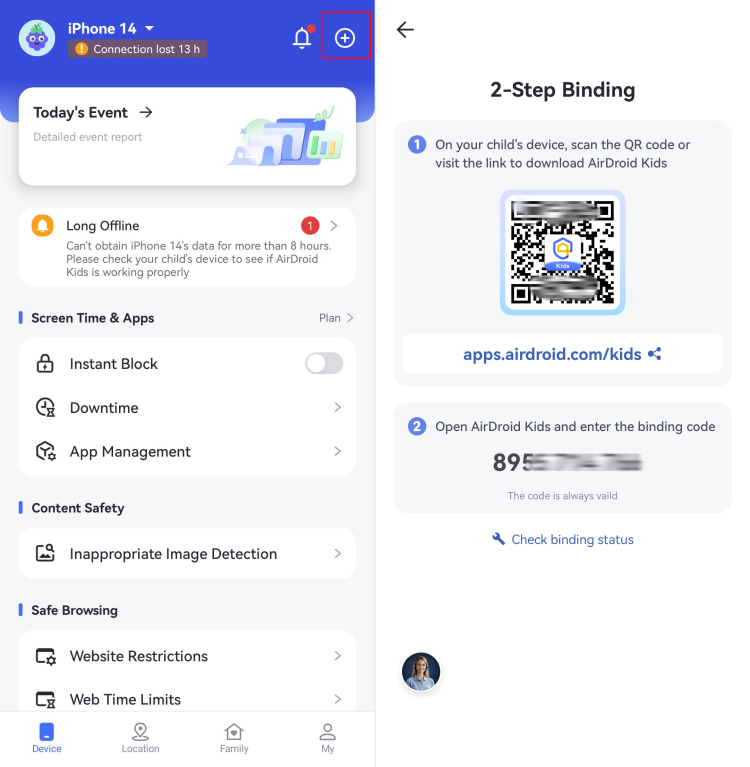
How do I add a child's device?
You can add up to 10 devices and supervise them at the same time in AirDroid, here's how:
Step 1.Launch the AirDroid Parental Control app.
Step 2.Tap "+" in the top right corner.
Step 3.Next, select "Agree" to continue and get the binding code.
Step 4.On your kid's device, open AirDroid Kids and enter the code to connect.
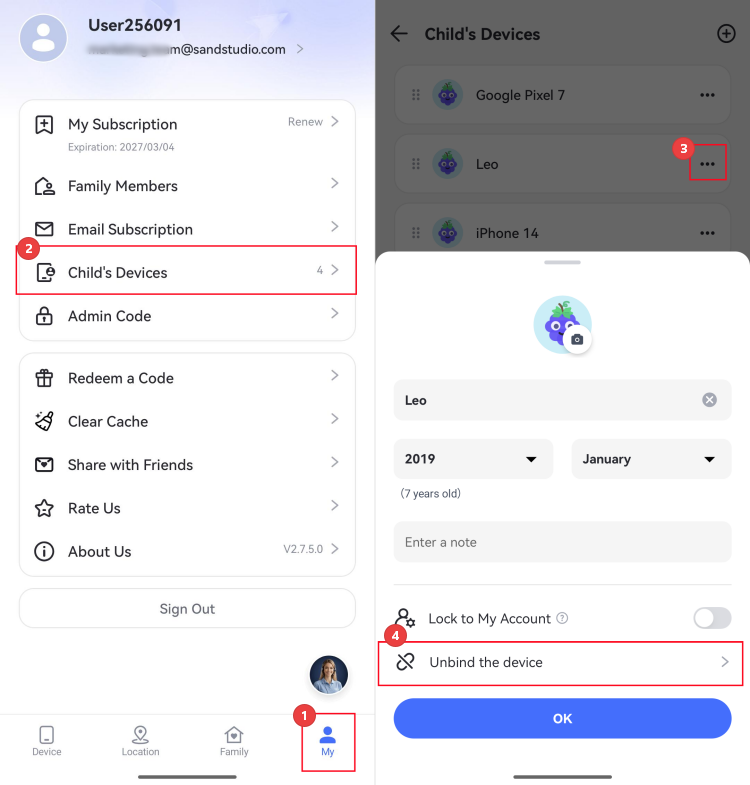
How do I unlink my child's device?
To stop supervising a child’s device, open the AirDroid Parental Control app first. Then, follow the steps below:
Step 1.Go to the "My" tab.
Step 2.Tap on "Child's Devices."
Step 3.Tap on the three dots next to the child's device you need to unlink.
Step 4.Select "Unbind the device."
Step 5.Enter the password to unbind it. Then,it will no longer be managed.
What does the 'Admin Code' do? How can I set it up?
The "Admin Code" in AirDroid Parental Control can be used for your kids to uninstall the AirDroid Kids app on their Android, extend the screen or app time limits, unblock restricted apps, and turn off focus mode. To set it up,
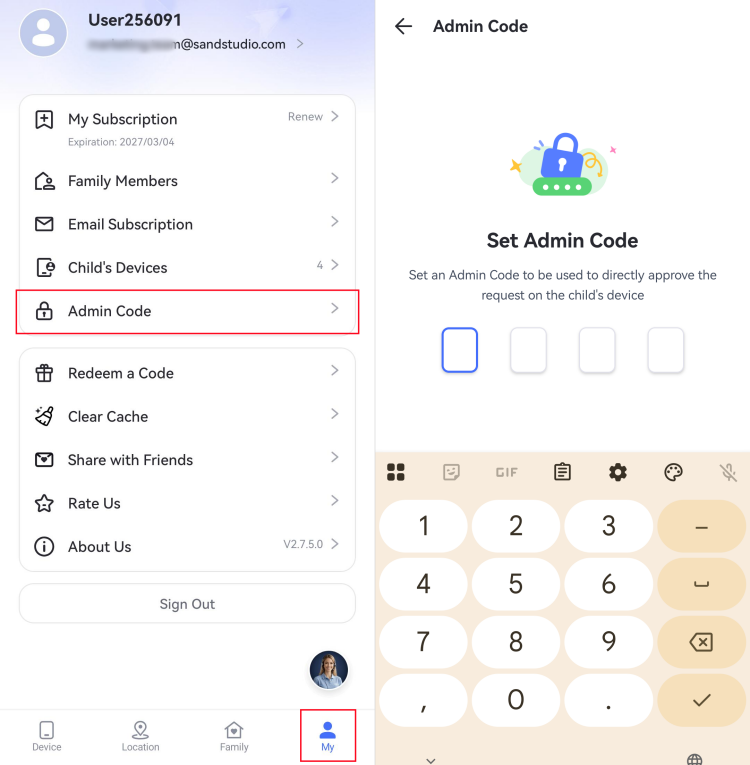
Step 1.Access the "My" tab in AirDroid Parental Control.
Step 2.Go to "Admin Code" to set a new one.
If you forget the admin code, open AirDroid Parental Control and go to "My > Admin Code > Change Admin Code or Remove Admin Code > Forgot Admin Code." Enter your account password to reset it. Once the admin code is changed, all family members linked to the account will receive a notification.
Need more help? Browse our FAQ section to find quick answers.
Part 1: Get Started on Parent's End
Get started with AirDroid Parental Control by first installing and registering an AirDroid account on the parent's device.
Step 1.Download AirDroid Parental Control
Directly search for AirDroid Parental Control on Google Play or App Store to download it. You can also download the app by clicking the download icon below.
Note: If you'd rather not install an app, you can use the web version of AirDroid Parental Control.
Step 2.Sign up and Log in
Launch AirDroid Parental Control on your device after installation. You will be directed to the sign-up page. You can directly sign into your AirDroid account if you have one. Or, sign up and log in with your own email, Apple, or Google account.
Step 3.Select Device Owner
Follow the on-screen instructions to select "Mine" then check both boxes and tap Agree to continue.
Part 2: Connect Kid's Device
Below are the detailed steps to tie up your kid's iOS device.
We have also created a YouTube video to help you understand this guide better and faster.
Video Tutorial: How to Connect Kid's iOS Device in AirDroid Parental Control
Step 1.Install AirDroid Kids and Bind Your Kid’s Device
1. After installing AirDroid Parental Control on your device, you will be directed to a binding page with a QR code and a URL.
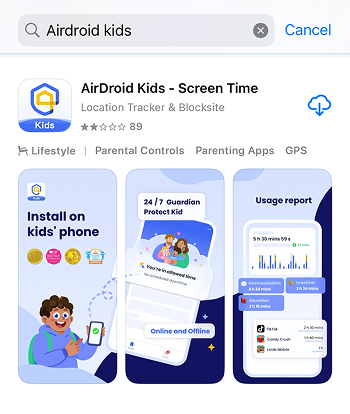
2. Use your child's iOS device to scan the QR code or enter the URL in a browser to download AirDroid Kids onto the device. You can also search AirDroid Kids in the App Store of your child's iPhone or iPad.
3. Your child's iOS device will redirect to the App Store. Tap the download icon to complete the download and installation.
4. Check the boxes and tap Agree to continue. Then enter the binding code which shows on the parent's end.
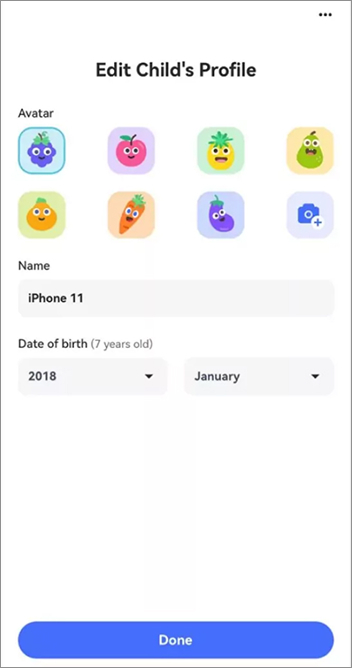
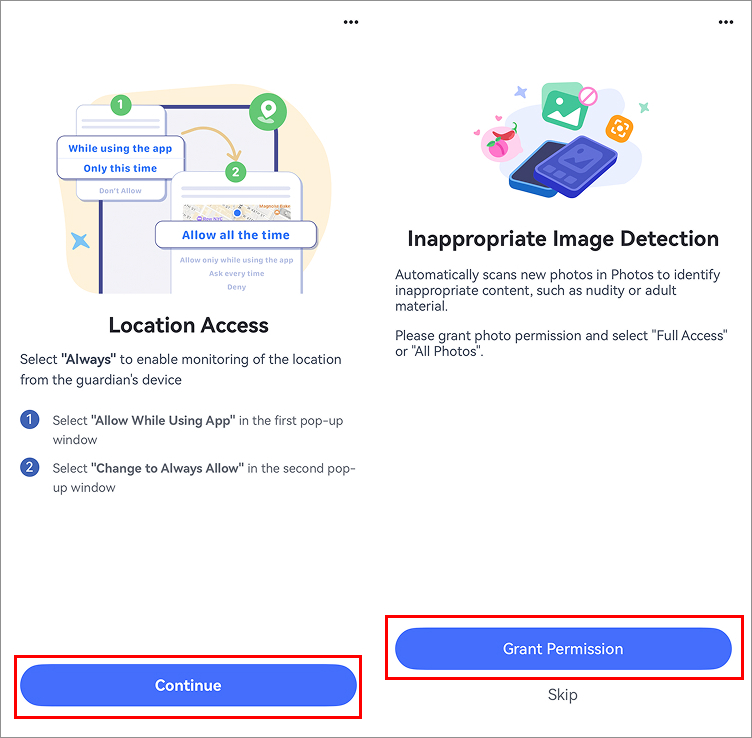
5. Follow the on-screen instructions to edit your child’s profile, enable the location and photo permission.
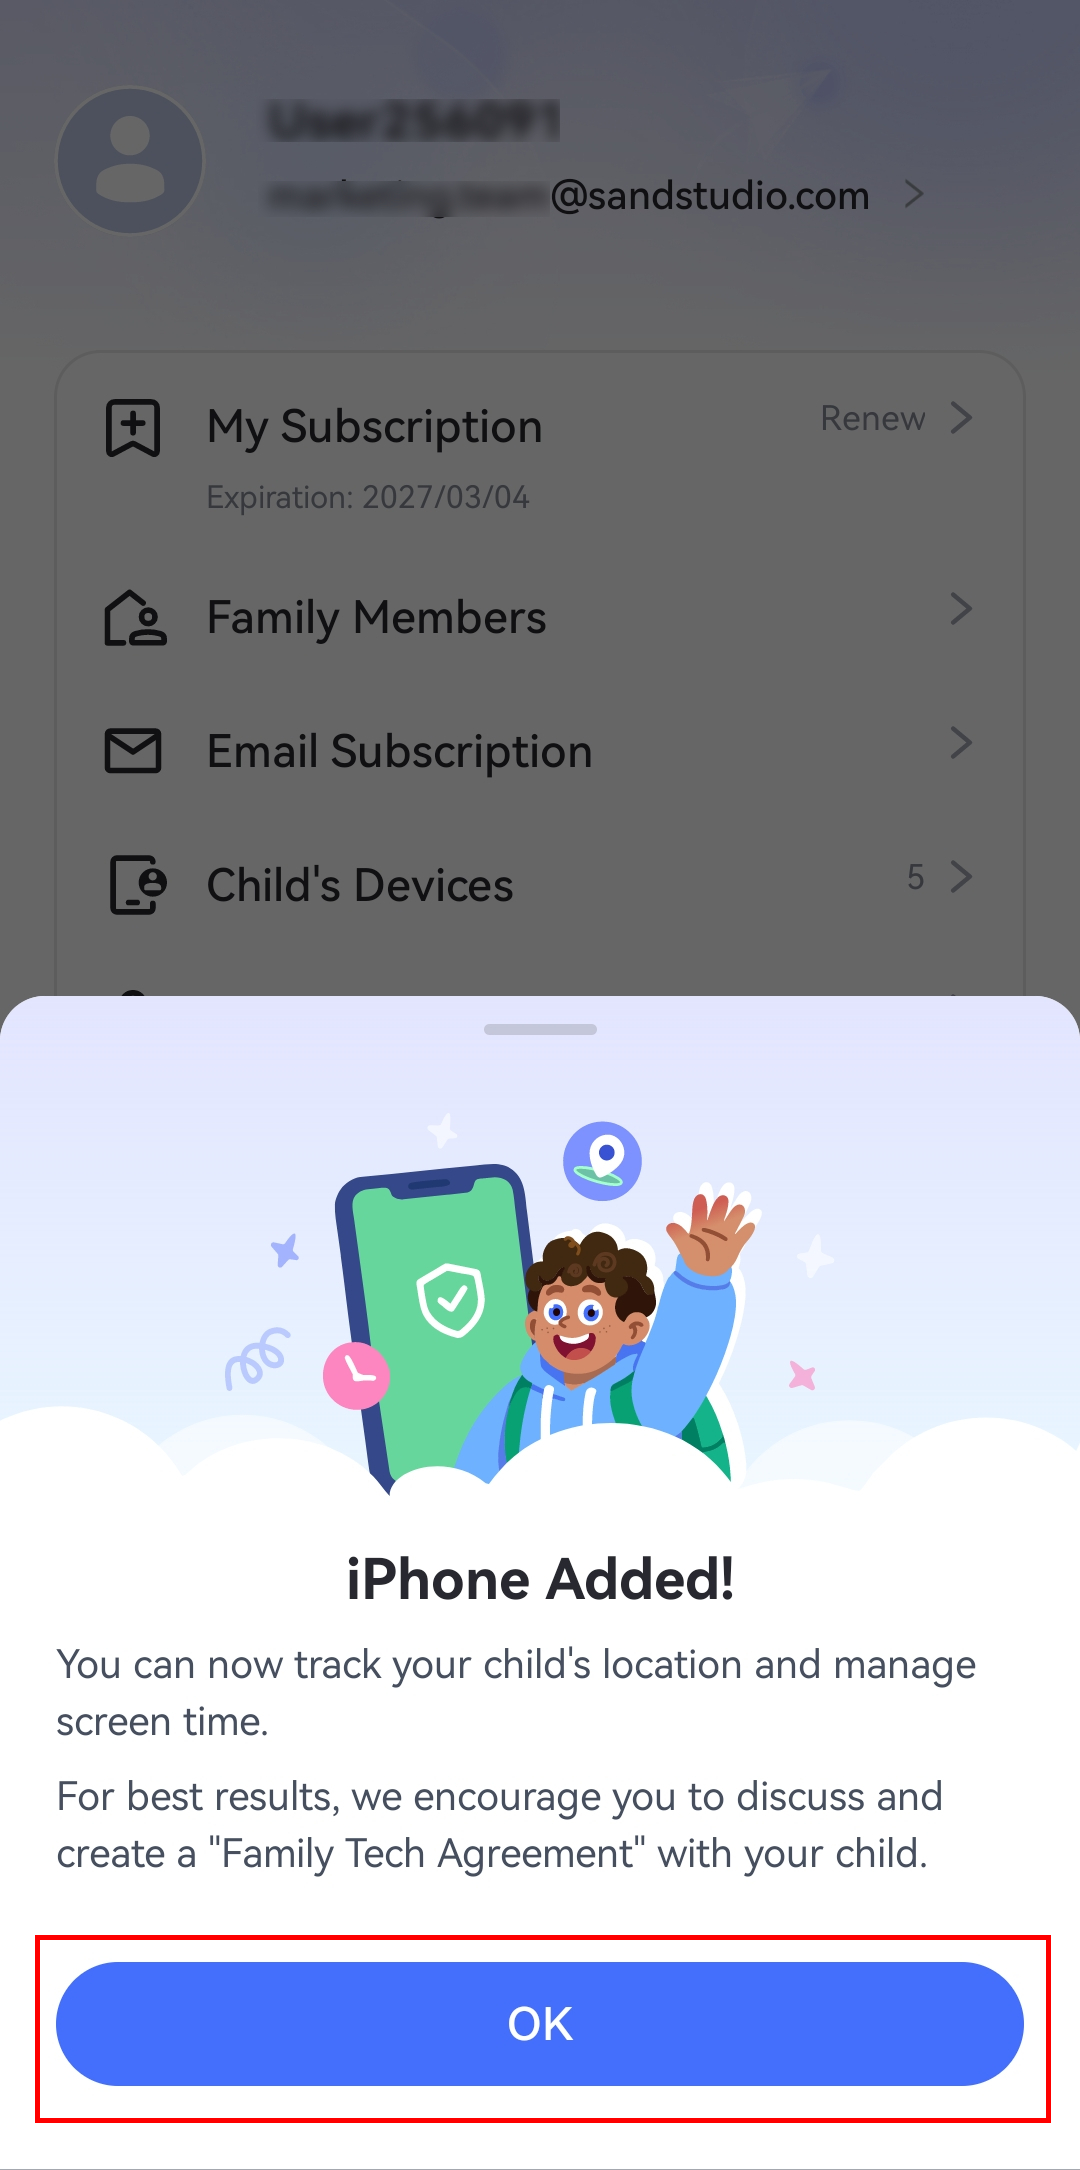
6. A pop-up shows up. Tap "OK" to continue. You can now track your child's iPhone location from your account.
To unlock all features, you will need to enable Supervision Mode.
Step 2.Enable Supervision Mode
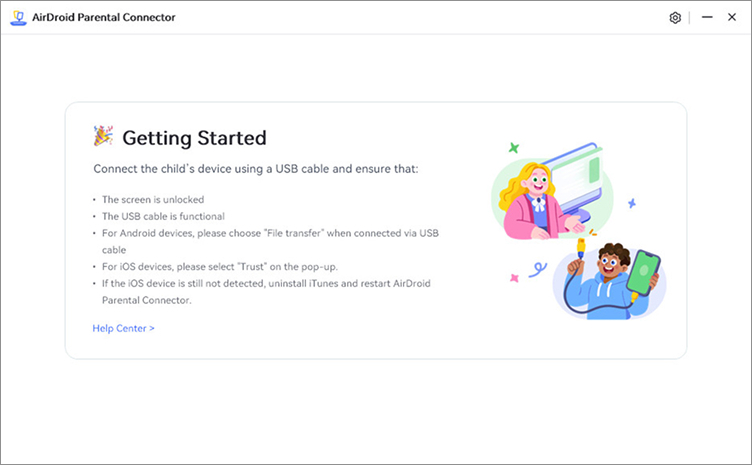
1. Enter the link apps.airdroid.com/connector in a browser to download AirDroid Parental Connector on your computer or Android device. On Android, you can also search AirDroid Parental Connector in Google Play Store directly.
2. After installation, open AirDroid Parental Connector and use a USB cable to link your child’s iPhone/iPad to your computer or Android device.
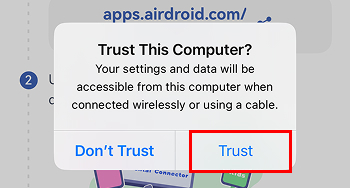
3. Tap "Trust" on the iOS device.
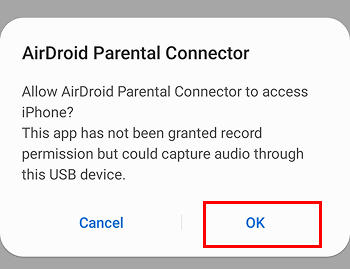
Tips: If you are using Android to enable Supervision Mode, you’ll also need to tap OK on Android to let AirDroid Parental Connector access the USB device.
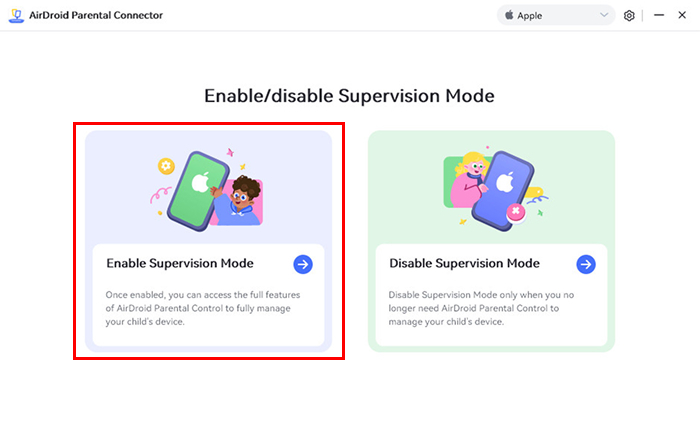
4. Select "Enable Supervision Mode" on the AirDroid Parental Connector.
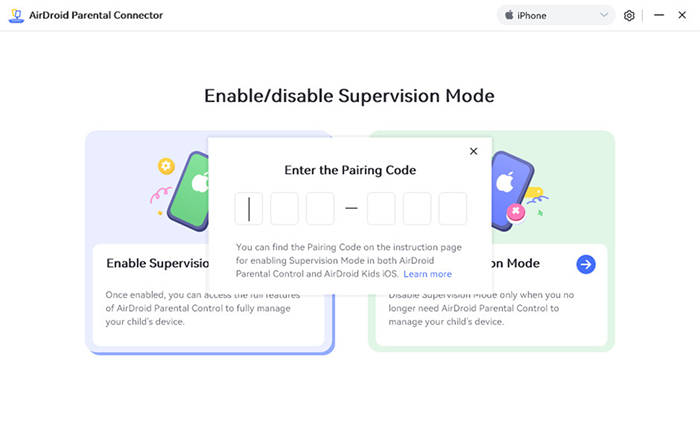
5. Enter the Pairing Code displayed on the screen of your child's iOS device in the pop-up window.
Tips: If Find My is enabled on your child’s device, please go to Settings (Settings > Find My > Find My iPhone) and turn it off first. After Supervision Mode is successfully enabled, you can turn Find My iPhone back on.
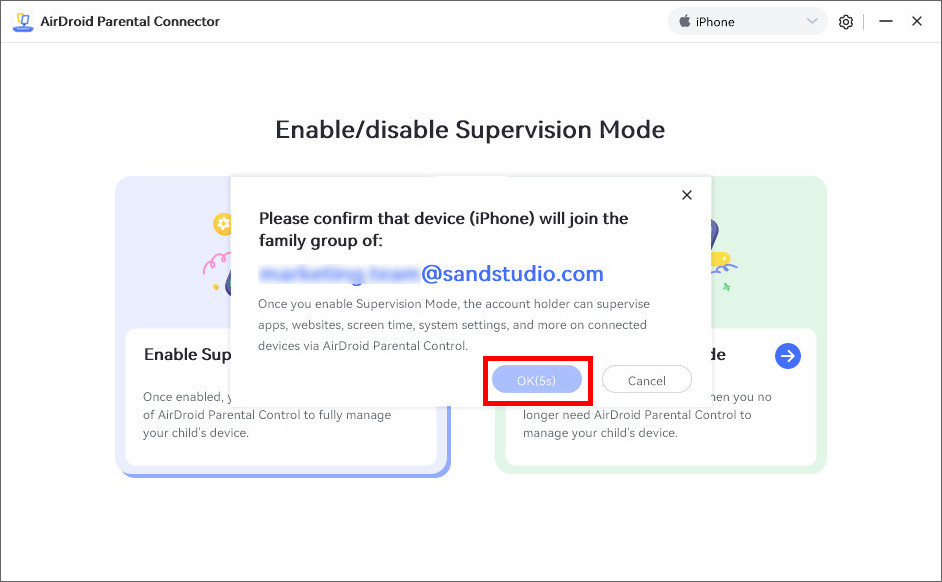
6. When a confirmation pop-up appears, click "OK" to proceed.
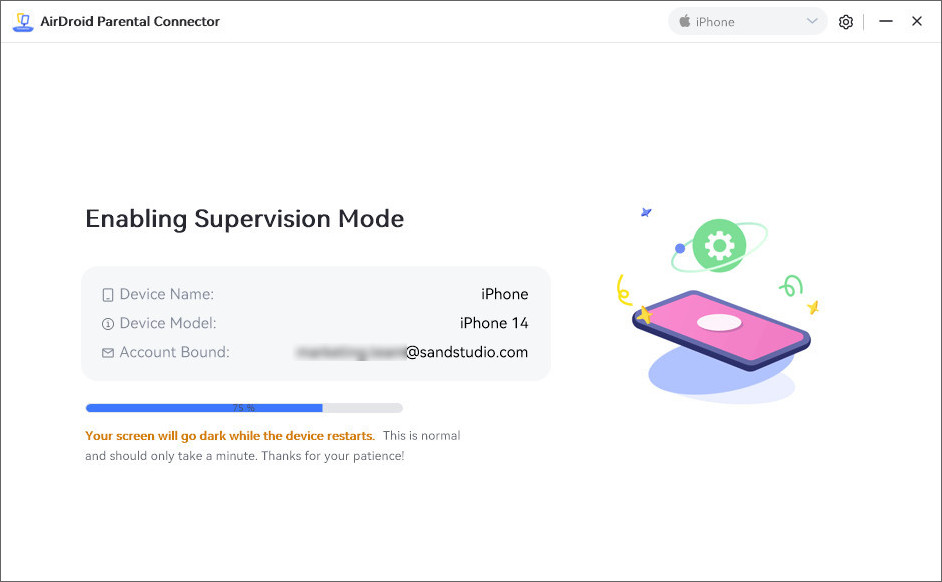
7. It will show your child's device name, device mode, and your account. Click on "Start". Your child's iOS device will restart.
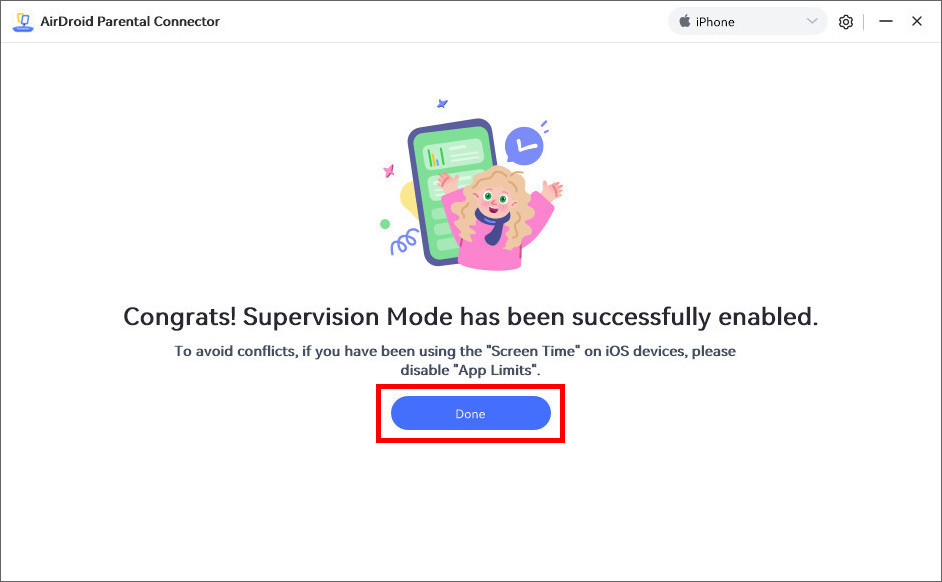
8. Tap on "Done". Once the restart is complete, you can supervise your child's iOS device from your phone.
Part 3: Start Supervising
Limit App Time
Function
Set time limits or schedule downtime to restrict access to apps or categories within certain time frames.
How-to-Use
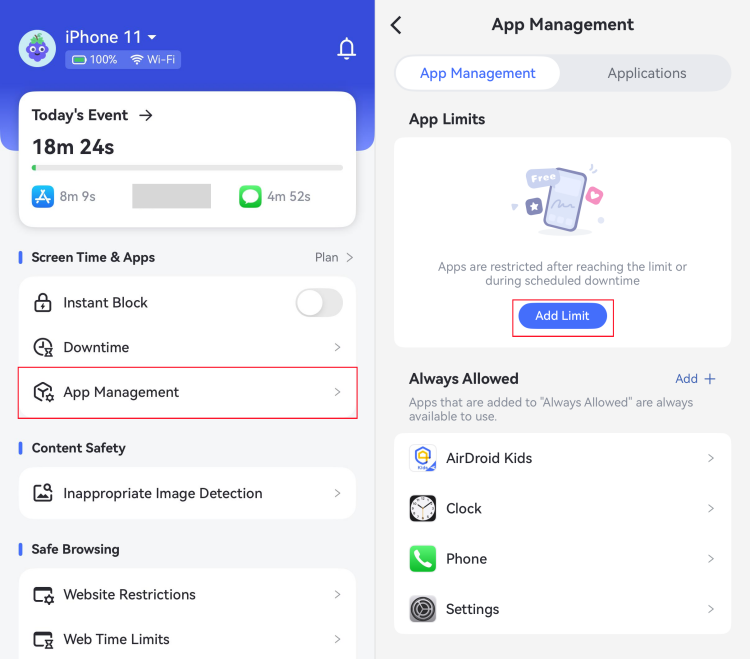
Step 1.Select "App Management" from the home page. Then, tap "Add Limit" under the "App Limits" section.
Step 2.Tick the apps or categories you want to limit, then tap "Next" in the upper right corner. You can also quickly find an app by searching for its name.
Step 3.Next, select a limit type based on how you want to manage app usage:
Total Time Limit: Set one shared time limit for all selected apps. Once the total time is used up, all selected apps will be blocked.
Individual App Limits: Set a separate time limit for each selected app. Each app will be blocked when its own limit is reached.
Downtime: Block the selected apps during specific hours, such as bedtime, study time, or family time. The apps will be unavailable throughout the scheduled period.
Step 4.Tap "Done" to save your settings.
Block App
Function
Know all apps installed on your kid's phone.
View what app your kid has added recently.
See whether the apps are safe for kids.
Block the apps that you don't want your kids to access.
How to Use
Step 1.Go to "App Management" in AirDroid.
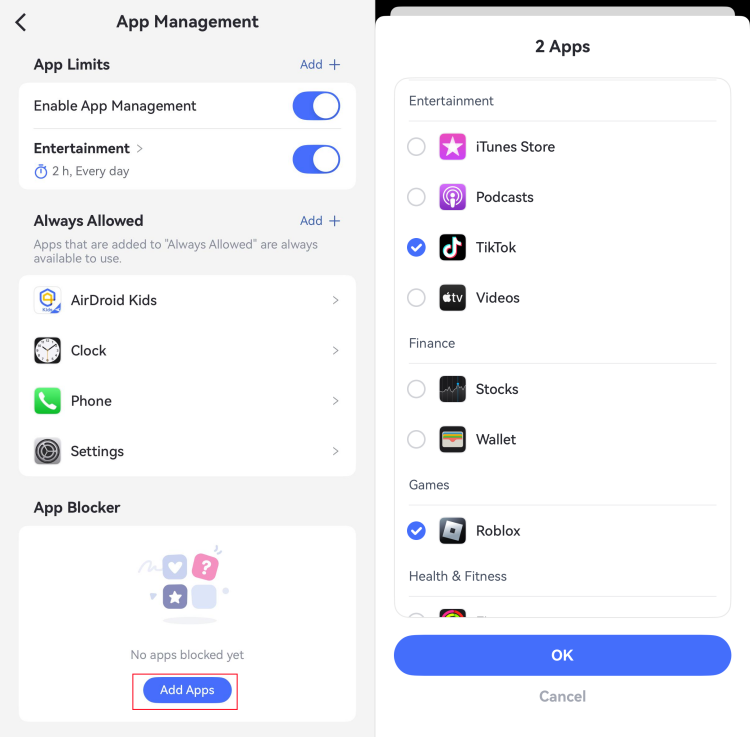
Step 2.Scroll down to the "App Blocker" section and tap "Add Apps." Select the apps you want to block, then tap "OK."
Also, you can switch to the "Applications" tab at the top and use the search bar to quickly find an app to block. To restrict all apps at once, simply tap "Select All."
Limit Screen Time
Function
Schedule downtime to decide when your child's device is not available.
How-to-Use
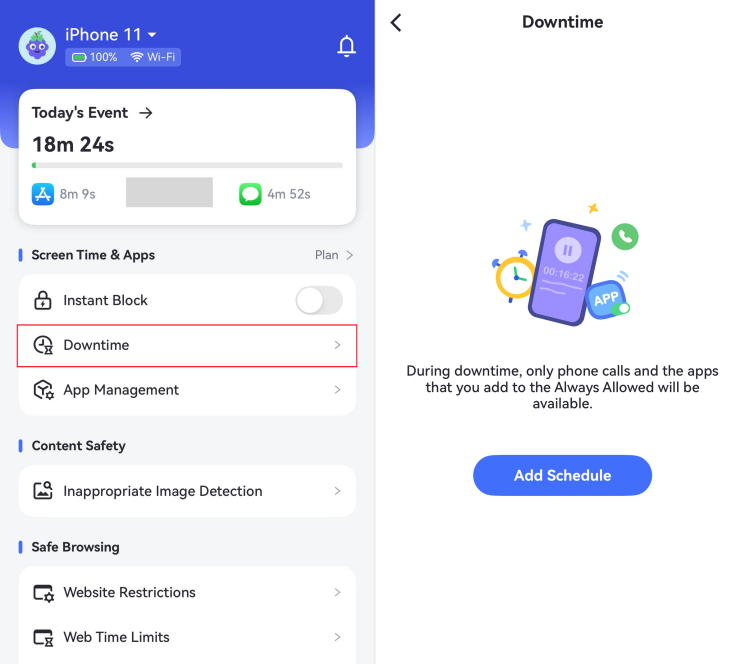
Step 1.Scroll down the home page and select "Downtime." Then tap "Add Schedule."
Step 2.Set the same downtime for every day or customize different downtime for each day. You can even set downtime to activate in specific areas.
💡During downtime, phone calls and apps added to "Always Allowed" will be accessible. So, you can add apps and websites to the "Always Allowed" list to let your kid can always access them. Here's how:
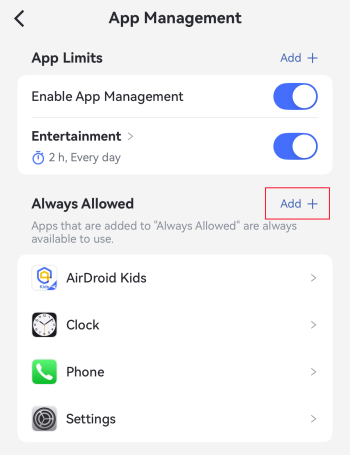
1.In the "App Management" menu, select "Add+" next to "Always Allowed."
2.Choose the apps you want your child to access at all times and tap "OK."
3.Similarly, you can switch to the "Applications" tab at the top and use the search bar to quickly add a specific app to the "Always Allowed" list.
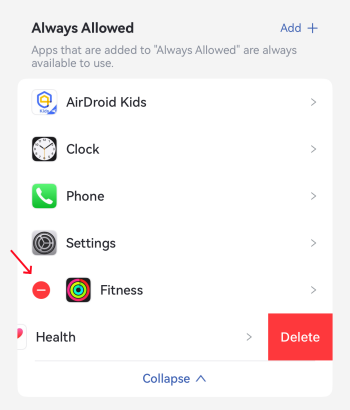
Note: If you want to delete an always allowed app, tap the "-" and then "Delete."
Restrict Device Access
Function
Instantly block all apps except those always allowed until the set time ends or you disable this feature.
How-to-Use
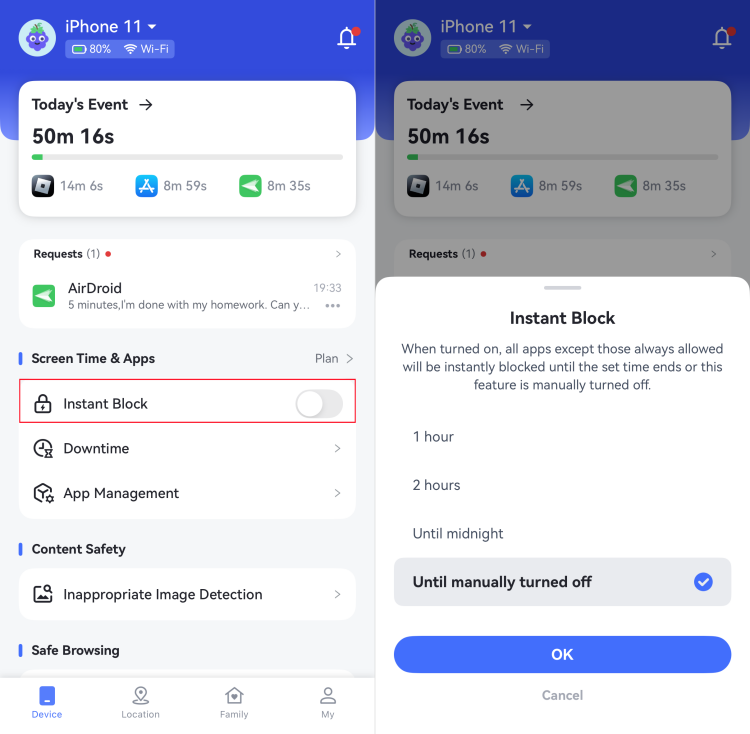
Step 1.Under "Screen Time & Apps," locate and tap "Instant Block."
Step 2.Choose to block all apps (except always allowed apps) for 1 hour, 2 hours, until midnight, or until manually turned off. Then, tap "OK."
Though Instant Block allows you to enforce restrictions instantly, we recommend encouraging your child to activate Focus Mode on their own. It provides the same level of restriction while also helping them develop self-discipline.
Filter Web Content
Function
Block or allow specific websites on your child’s device.
Easily adjust web filtering levels on the fly.
Filter websites by individual URL or broader categories.
AirDroid Parental Control can manage all installed browsers on your child's device, including Chrome, Safari, Opera, Edge, Firefox, and more.
👍Looking for a kid-safe search browser? AirDroid Browser seamlessly integrates with AirDroid Parental Control for ultimate child safety.
How-to-Use
Step 1.Choose Website Restriction Mode
In AirDroid Parental Control, go to "Website Restrictions" from the home page.
Then, tap "Mode" and you can manage your child's web activities in these 3 different modes:
Unrestricted Mode: No restrictions for the websites your child can visit.
Blacklist Mode: Restricts specific websites you add or entire categories you choose to block.
Whitelist Mode: Where your child can only access the sites you add.
Step 2.Set Website Blacklist for Your Kid
Go to "URL Blacklist" > "Add custom URLs to the blacklist" and enter the websites you want to restrict.
Surely, you can also add the blacklist URL from your child's browsing history.
Or, switch to the 'Subscription' tab to block websites by theme. This filters out content unsuitable for children, such as adult entertainment, drugs, violence, and gambling.
Step 3.Set Website Whitelist for Your Kid
Under "URL Whitelist," tap "Add URLs" to approve specific sites or select allowed websites directly from your child's browsing history.
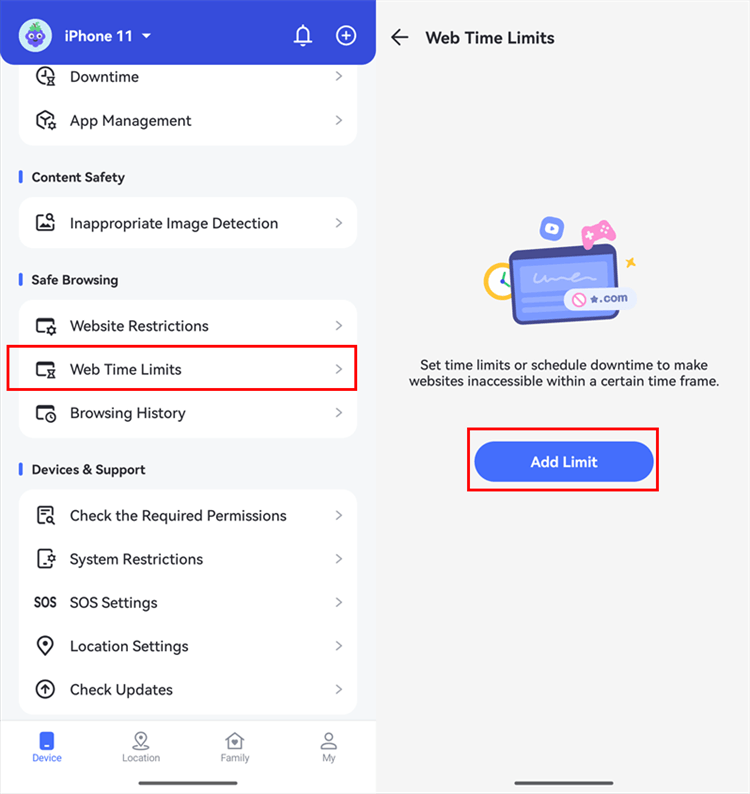
Limit Web Usage
Features
Set a daily time limit for website access.
Schedule downtime to block website access during specific hours.
How-to-Use
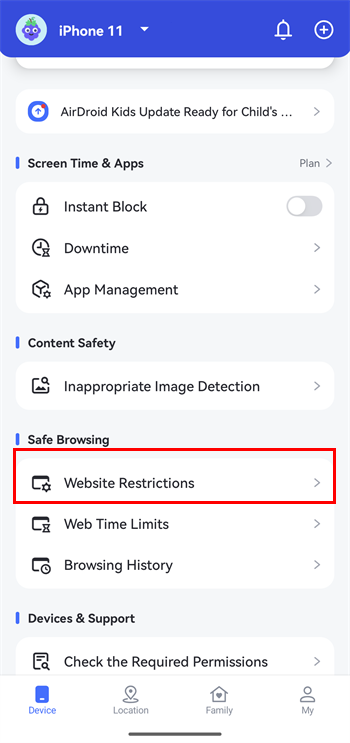
Step 1.Tap "Web Time Limits" and select "Add Limit."
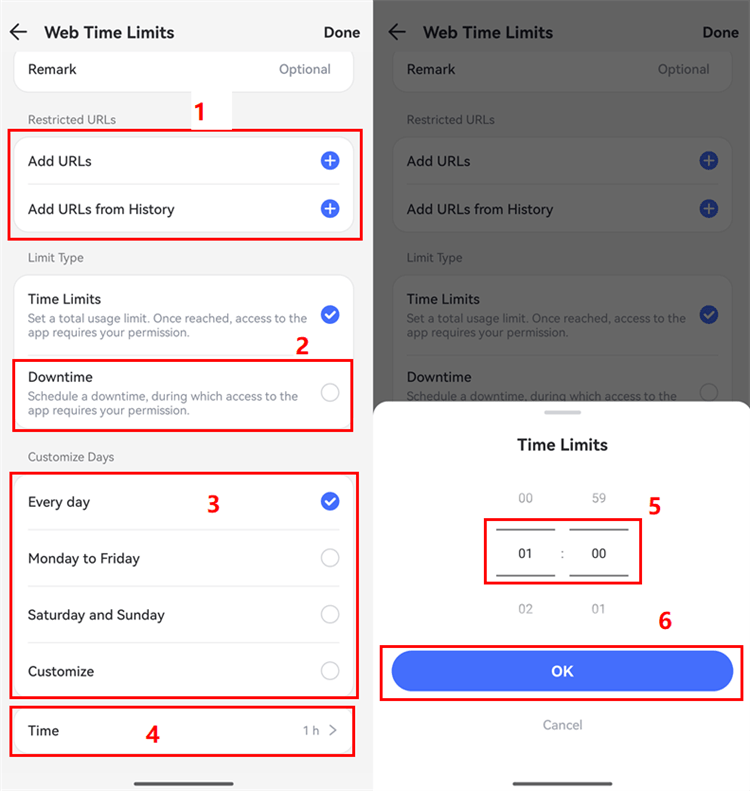
Step 2.Set your child's time limit for specific URLs:
Tap "Add URLs" to enter a website manually, or select one directly from their browsing history.
Tap "Time Limits" to choose between a daily recurring limit or a custom schedule.
Adjust the "Customize Days" setting to set the exact limit duration.
Tap "OK" to save and confirm.
Step 3.Set when your child cannot access specific URLs:
Tap "Add URLs" to enter a website manually, or select one directly from their browsing history.
Tap "Downtime" to choose between a daily recurring schedule or a custom schedule.
Tap "Customize Days" setting to set the exact limit duration..
Tap "OK" to save and confirm.
Step 4.Tap Done in the upper right corner.
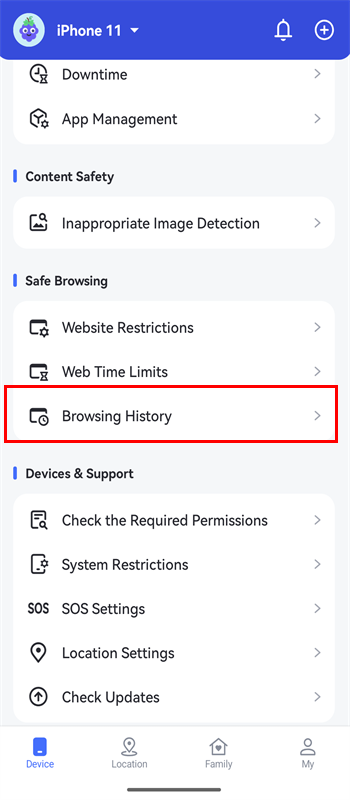
Track Browsing History
Features
Track your child's browsing and search history.
Get instant alerts if your child attempts to visit blocked websites.
How-to-Use
Step 1.Tap "Browsing History" on the home screen.
Step 2.View all browsing history here. Tap the three-dot icon next to any link to visit the website or add it directly to your blacklist. You can also tap "Blocked" to see which sites were restricted under Blacklist or Whitelist mode.
Manage Content & Privacy
Function
Prevent explicit content or control content ratings.
Set restrictions for several types of content, such as movies, apps, books, Siri, games, etc.
Allow or disallow privacy setting changes.
How-to-Use
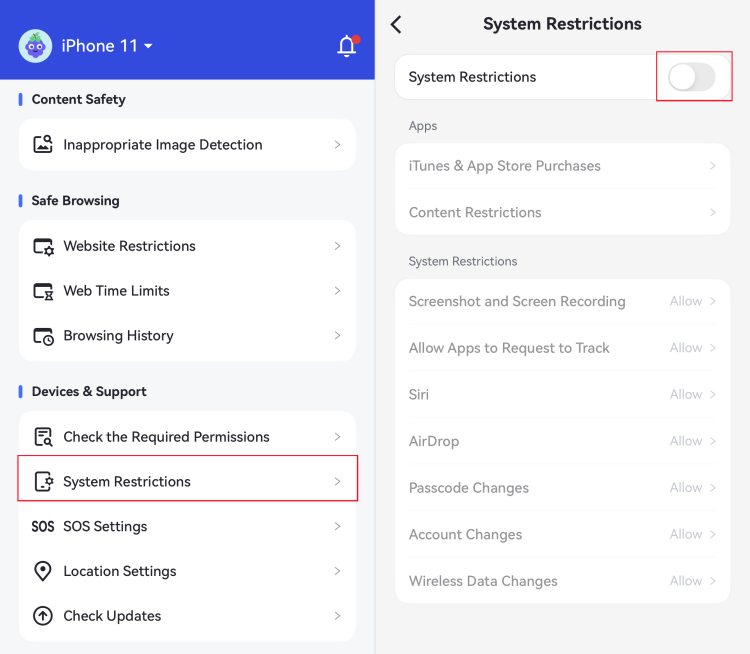
Step 1.Find "System Restrictions" from the home page.
Step 2.Turn on the toggle if it is not already enabled.
Step 3.Then, configure the restrictions that best fit your child's needs:
Under "System Restrictions," select feature (e.g., screen recording) you want to manage and choose either "Allow" or "Don't Allow."
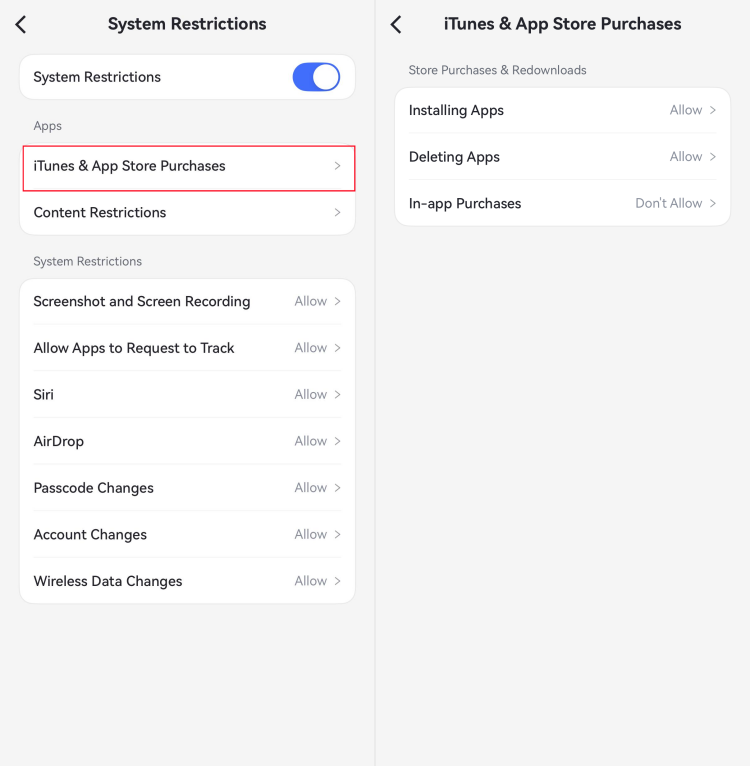
Tap "iTunes & App Store Purchases" to control whether your child can install apps, delete apps, or make in-app purchases.
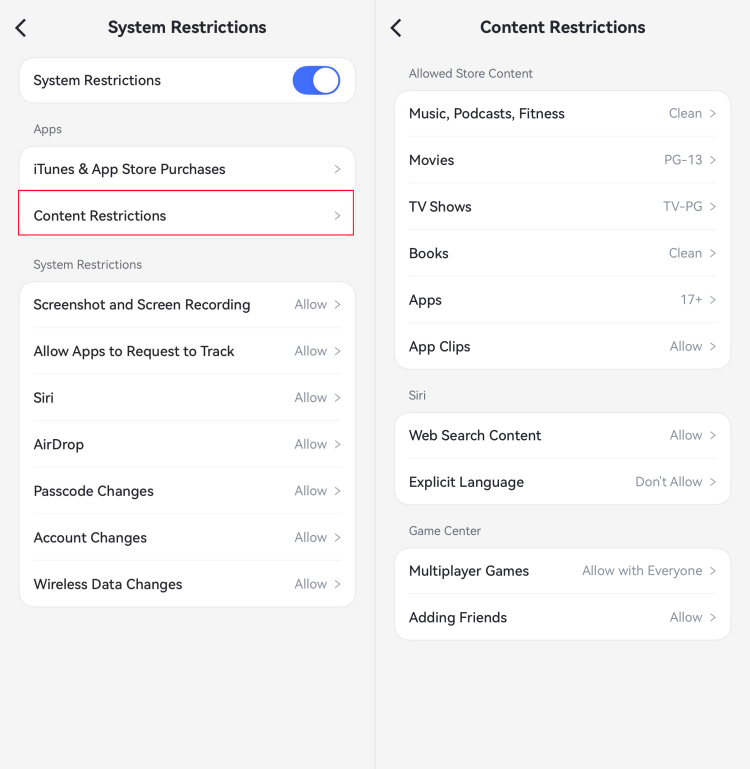
Tap "Content Restrictions" to manage access to media content, Siri, and Game Center features.
Detect Social Content
Function
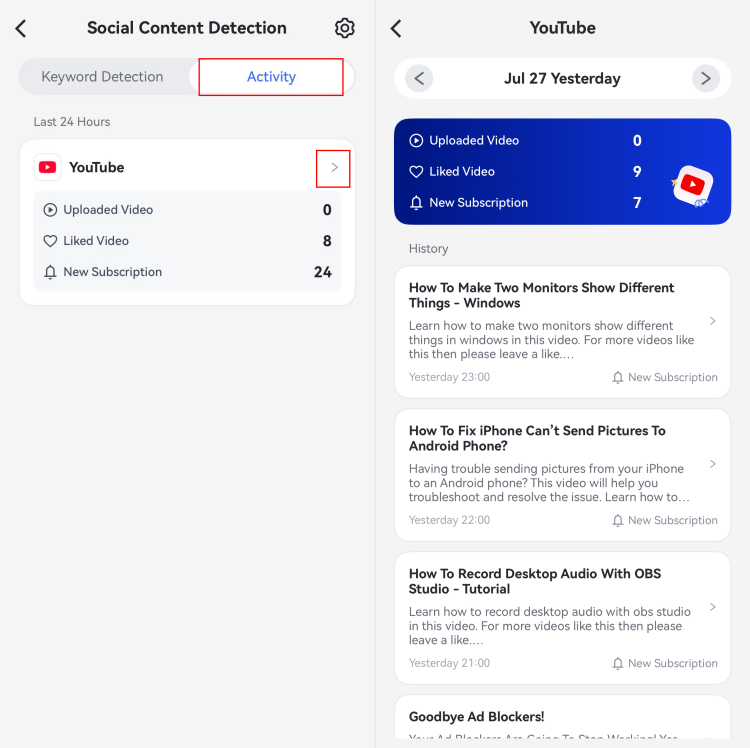
Track your child's YouTube activity, including their published videos, liked videos, and new uploads from subscribed channels.
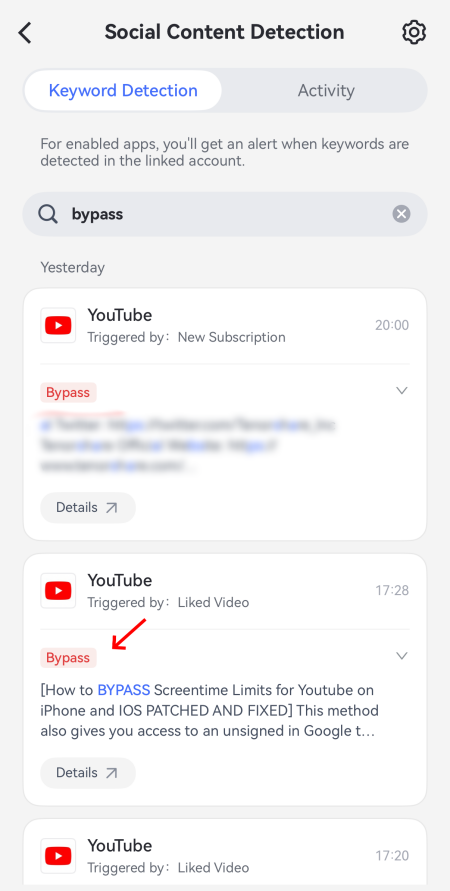
Receive instant alerts when flagged keywords appear in video titles and descriptions.
Currently, iOS' social content detection is available for YouTube only. We're working on expanding support to more platforms, such as Facebook, in future updates.
How-to-Use
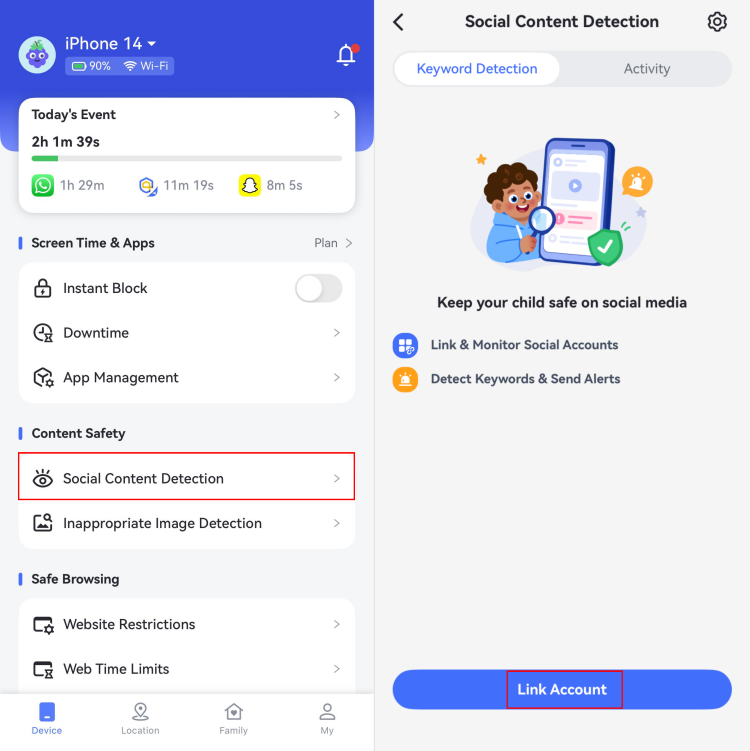
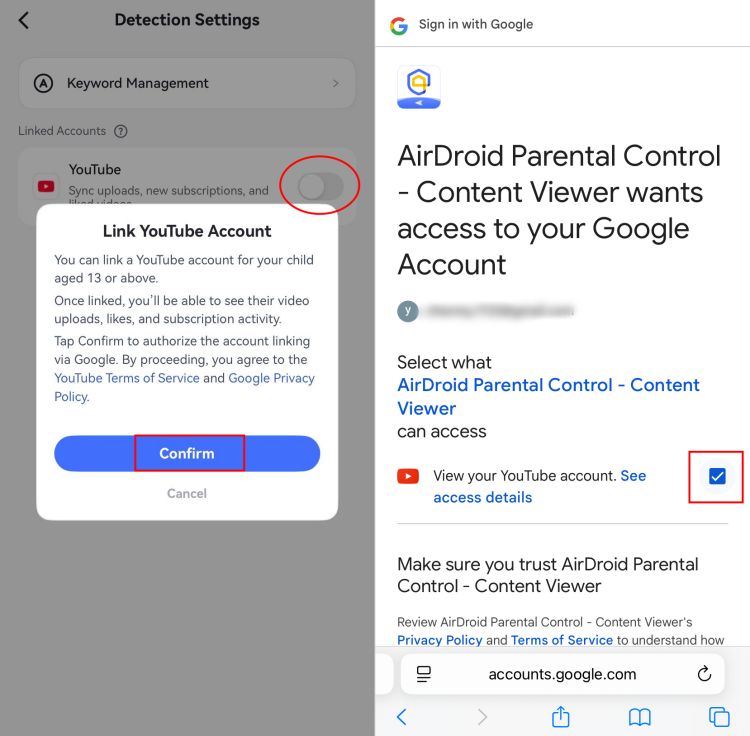
Step 1.In AirDroid Parental Control, go to "Social Content Detection > Link Account."
Step 2.Toggle on the YouTube app for content monitoring.
Step 3.Confirm the account linking, sign in with your child's Google account, and grant the access.
Step 4.Once authorized, you'll see "YouTube linked successfully!" And AirDroid will send alerts whenever keywords you've added are detected.
Step 5.In the "Activity" tab, you can view videos your child has liked, uploaded, and subscribed to.
To set up keywords for content detecting, please follow:
Step 1.Navigate to "Social Content Detection" and tap "Settings > Keyword Management."
Step 2.Press "✨AI Keyword Assistant" to let AI generate related keyworkds or "Create Custom Keywords" to enter specific keywords you don't wish your child to access.
Step 3.You can also switch to "Subscriptions" to enable the categories that contain the keywords for the content monitor.
Detect Inappropriate Images
Function
Monitor if your child saved adult, violent, or other inappropriate images and get instant alerts.
View details of inappropriate photos.
How-to-Use
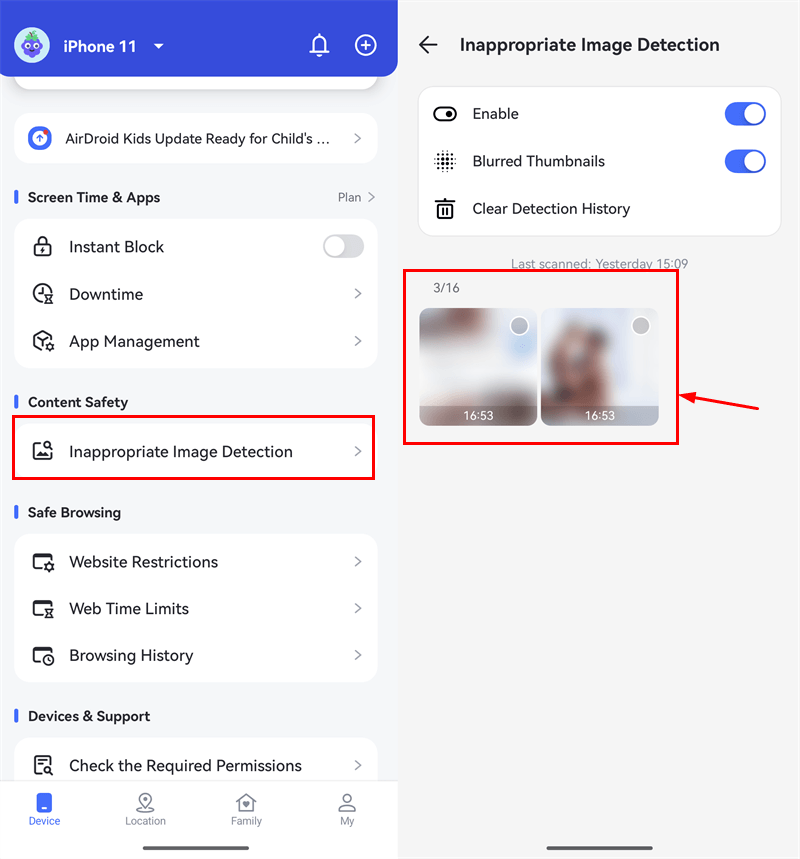
Step 1.Tap on "Inappropriate Image Detection" in AirDroid Parental Control.
Step 2.Touch "Enable" to activate this new feature!
Step 3.Once an inappropriate picture appears on your child's photos app, you can see it on your dashboard and receive alerts.
Part 4: Track Location
Live Location
Function
Check the current location of your kid's device.
How-to-Use
Step 1.Click the "Location" button at the bottom of the dashboard.
Step 2.You will see the location of your child's device. To refresh the location, tap the "Refresh" icon in the bottom right corner.
Route History
Function
Check where your kids have been.
View location history of the past 30 days.
How-to-Use
Step 1.On the location section, tap "Route History" at the top.
Step 2.You can check the location history in timeline form.
Step 3.Tap the calendar icon to view the location history for the past 30 days. You can also click "<" or ">" to see the previous or next day.
Geofencing
Function
Set up a specific area to get notified when kids enter or leave the area.
How-to-Use
Step 1.On the Location section, tap the "Geofence" button.
Step 2.Tap "Add geofence."
Step 3.Enter the geofence name, select the location, and set the radius. When you're done, tap "Save."
Part 5: Check Reports & Alerts
Activity Report
Function
Check the daily and weekly phone usage details in a timeline format.
Check information about the most used apps. You can also learn how long they were used and when they were used.
Free to check the activity report of any date within 30 days.
How-to-Use
Step 1.Tap "Today's Event" at the top of the dashboard.
Step 2.Choose whether you want to see a "Daily" or a "Weekly" report. The "Daily" report is the default. You can also swipe the chart left and right to check the activity report from the previous day or the next day.
Step 3.Scroll to view Screen Time Usage, Most Used Apps, Number of Notifications, or Cellular Data Usage.
Screen Time Usage - Check when and how long the device has been used. You will know what kinds of apps have been used most. You can also directly set up downtime for your kid's device here.
Most Used Apps - Learn more about your kid's most used apps, such as duration time, categories, and age ratings, making sure that your child uses appropriate apps and stays away from malware.
Requests
Function
Receive and respond to your child's requests for restricted apps.
Get notified when your child tries to open a blocked app or installs a new one.
Know whether your child is in or out of the Geofences.
Stay aware of low battery and device offline.
Share new Admin Code with other family members.
Grab the latest and best deals.
How-to-Use
Press the Bell icon at the top or navigate into the "Request" section if any. Then, you will see three tabs - Requests, Alerts, and System.
Requests - Check if your child requested to access the blocked application. Then, choose "Approve" or "Refuse" to decide whether to grant additional time for the restricted app.
When approved, go to pick these options for your preferences: 5 minutes, 10 minutes, 15 minutes, 30 minutes, 1 hour, Available for today, and Always allowed.
Alerts - Get immediate alerts of low battery, device offline, when your child tries to open blocked apps or installs a new app, and reach or leave the geofencing area.
You can also choose to see the restricted app details or add it to the "Always Allowed" list directly. For the newly installed app, AirDroid Parental Control allows you to block it at the touch of a button.
System - Whenever you or the family member change or remove the Admin code, you'll get notified. Plus, receive the latest notifications if there are discounts or sales on the app.
By tapping on the "<" or ">" button, you are able to check the alerts of the previous or next day.
SOS Alerts
Function
This feature allows your child to send an emergency alert when they feel unsafe.
When the child taps the SOS button, parents can receive an instant alert with a loud siren, view the child's real-time location, and listen to what's happening around them.
👇Video Tutorial: Set up SOS in AirDroid
How-to-Use
Step 1.Enable SOS Settings
On AirDroid Parental Control,tap on "SOS Settings" and turn on the "Enable" toggle.
After this, SOS alerts can bypass silent mode on Android devices.
However, if you're using an iPhone, please open "Settings" from the pop-up and enable "Critical Alerts" to ensure SOS alerts are not missed even when the phone is muted.
Step 2.Teach Your Child to Use SOS
Once SOS is enabled, the "Emergency SOS" button will appear on your child's device in the AirDroid Kids app.
So, show your child where to find the button and explain when it should be used.
When he taps the "Emergency SOS" button, a 5-second countdown begins. If not canceled, the SOS alert will be sent.
Step 3.View SOS Details
When an SOS alert is triggered, you will first hear a 15-second siren alert.
Then, you're able to check your child's location, listen to surrounding audio, and contact them directly in AirDroid.
The admin can add up to 10 family members to the group. Here’s how:
Step 1.Tap "My" at the bottom of the parental dashboard, and Choose "Family Members."
Step 2. Tap the Invite icon, and input the member’s email. Then, tap "Invite" to confirm.
Step 3.Request the family member to check their email and accept the invitation.
You can also tap the “+” icon in the upper-right corner to add more family members.
Note that all joined family members can modify parental control settings for a child’s device from the dashboard.
Chat with Family Members
If no child is excluded, the admin, all joined family members and supervised children are in the Family Group.
All of the members in the group can send personal messages to anyone in the Group. You can send text or audio messages, and share files, videos and photos in both group and personal chat.
In personal chat, you can even tap the call icon at the upper-right corner to make calls.
Remove a Child from the Family Group
Once a child’s device is linked to your account, they are automatically included in the Family Group. However, the admin can remove a child from the chat.
Step 1.Tap "My" at the bottom of the dashboard.
Step 2.Tap "Child’s Devices," locate the child you want to exclude, and tap the edit icon next to their name.
Step 3.Toggle on the switch next to "Lock to My Account" nd then OK to confirm.
Only the admin can communicate with the excluded child and manage the child’s device.
Focus Mode
Function
The child can turn on Focus Mode whenever needed.
Once it is enabled, only Phone, Clock, Settings, and AirDroid Kids remain accessible on their iPhone. And all notifications will be silenced to keep kids focused.
The Focus Mode will remain active until the set time ends or a parent turns it off.
How-to-Use
Built into AirDroid Kids, Focus Mode is designed to help children stay away from distractions during study, rest, or other important times. Therefore, you can guide your child to turn it on by following the steps below.
Step 1.Open AirDroid Kids and toggle on the switch next to "Focus Mode."
Step 2.Choose how long the Focus Mode should be activated.
After that, you can check when and how long Focus Mode was active, and turn it off for your child on AirDroid's parental dashboard.
FAQs about AirDroid Parental Control
Can I add another parent to supervise my child's device?
Yes. You can invite another parent or guardian to manage your child's device together. Once added, both parents can set app limits, monitor activity, receive alerts, and chat.
How to uninstall AirDroid Kids from an iOS device?
If you haven't enabled the Supervision Mode, then the AirDroid Kids app can be deleted directly.
But if Supervision Mode is enabled, you need to unlink the child's iOS device first to uninstall the AirDroid Kids on an iOS device. Here's how:
Step 1.Go to the "My" tab in AirDroid Parental Control.
Step 2.Tap on "Child's Devices."
Step 3.Tap on the three dots next to the child's iOS device.
Step 4.Select "Unbind the device."
Step 5.Enter the password to unbind it. Then,it will no longer be managed.
Step 6.Lastly, long-press the AirDroid Kids app on the kid's iPhone and select "Remove App." Then, it can be uninstalled.
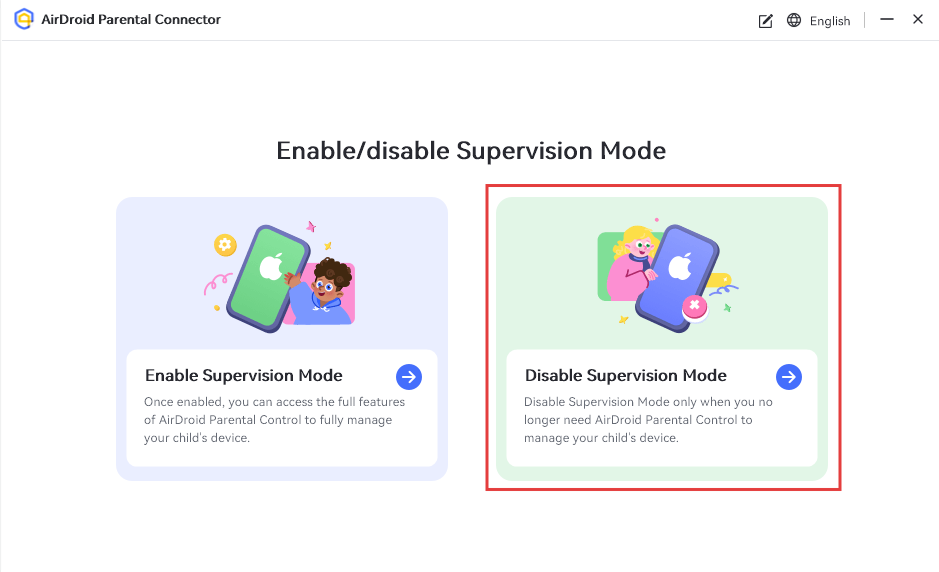
How to disable the Supervision Mode?
To disable the Supervision Mode for your kid's iPhone, you'll need:
Step 1.Open AirDroid Parental Connector on your computer or Android.
Step 2.Connect the child's device to your computer or Android via a USB cable.
Step 3.Click on "Disable Supervision Mode."
Once Supervision Mode is disabled, most features will no longer be available. However, you can still track your child's real-time location to ensure their safety.
How do I add a child's device?
You can add up to 10 devices and supervise them at the same time in AirDroid, here's how:
Step 1.Launch the AirDroid Parental Control app.
Step 2.Tap "+" in the top right corner.
Step 3.Next, select "Agree" to continue and get the binding code.
Step 4.On your kid's device, open AirDroid Kids and enter the code to connect.
What does the 'Admin Code' do? How can I set it up?
The "Admin Code" in AirDroid Parental Control can be used for your kids to uninstall the AirDroid Kids app on their Android, extend the screen or app time limits, unblock restricted apps, and turn off focus mode. To set it up,
Step 1.Access the "My" tab in AirDroid Parental Control.
Step 2.Go to "Admin Code" to set a new one.
If you forget the admin code, open AirDroid Parental Control and go to "My > Admin Code > Change Admin Code or Remove Admin Code > Forgot Admin Code." Enter your account password to reset it. Once the admin code is changed, all family members linked to the account will receive a notification.
Need more help? Browse our FAQ section to find quick answers.

 For Kid's Android
 For Kid's iOS
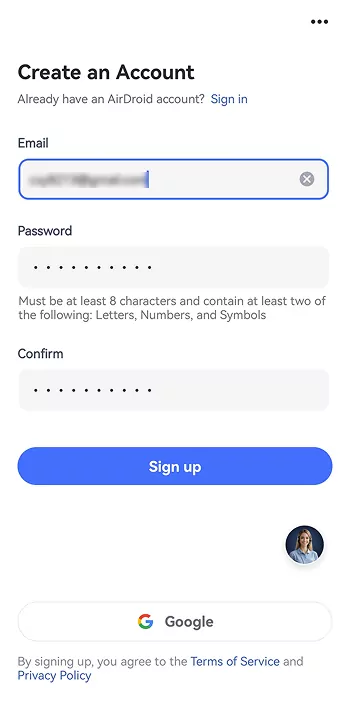


Leave a Reply.